
Are you a preschool or elementary teacher and looking for classroom crafts for kids? Well, then this article is made for you. We have 14 amazing classroom crafts for kids, which you can use for the craft classroom activity.
The classroom is a place to enjoy, create and learn new things. Creating new things increases the creativity of the kids. Today, we are going to make some super easy and creative things that your kids are going to love. You just have to arrange a few things and then let your kids have their fun.
Contents
- Creative Classroom Crafts For Kids
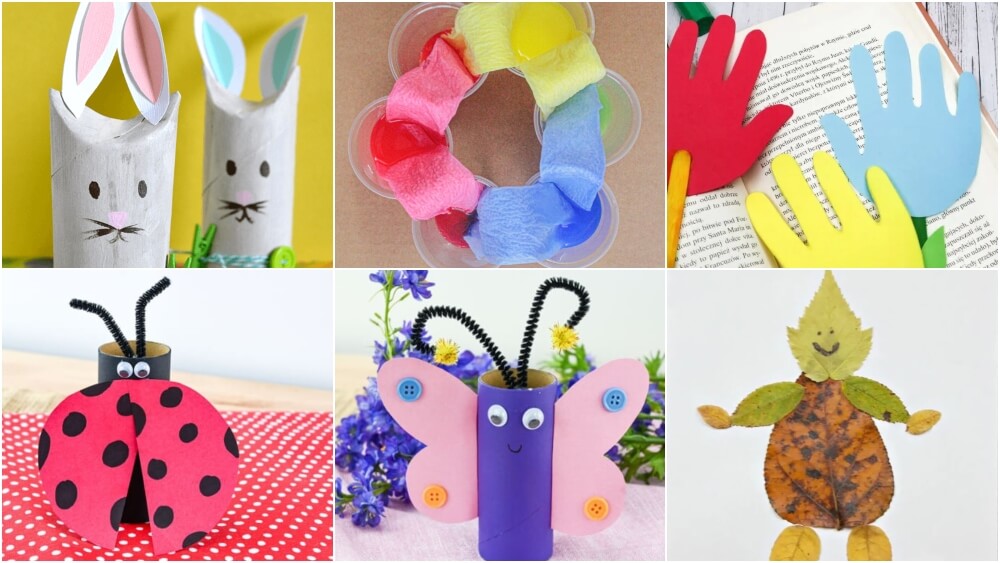
- 1. Egg Carton Caterpillar
- 2. Weaving Rainbow Fish
- 3. Leaf People
- 4. Paper Roll Ladybug
- 5. DIY Handprint Bookmarks
- 6. Puffy Paint Ice- Cream Cone
- 7. Toilet Paper Roll Butterfly
- 8. Paper Bag Jelly Fish Family
- 9. DIY 3-D Photo Frame
- 10. Toilet Paper Roll Bunnies
- 11. Robot Puppets
- 12. GLASS SUNCATCHER
- 13. Walking Rainbow
- 14. Cool Cat Newspaper Art
- You may like these:
Creative Classroom Crafts For Kids
1. Egg Carton Caterpillar
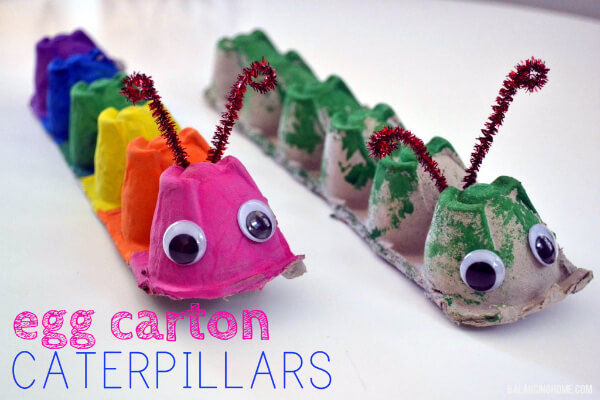
Image Source/Tutorial: poofycheeks.com
Why waste the empty egg carton when you can make a beautiful thing from it? All you have to do is collect all the cartons in one place and show your creative skills. With the waste egg cartons, you can make this super easy DIY that looks cute at the same time. You can put them on your tables or shelves and showcase your children’s skills.
- Level: Moderate
- Materials required: Empty egg cartons, Watercolors, Googly eyes, Designer wire
Take the cartons and cut them from between if they are 2. Now take the watercolors and color the upper part of the carton with the color of your choice. You can use different colors for each part. After coloring the cartons, paste the googly eyes on them. Cut the wires in equal size and paste them on the head of your caterpillar. Your super cute caterpillar is ready now.
2. Weaving Rainbow Fish
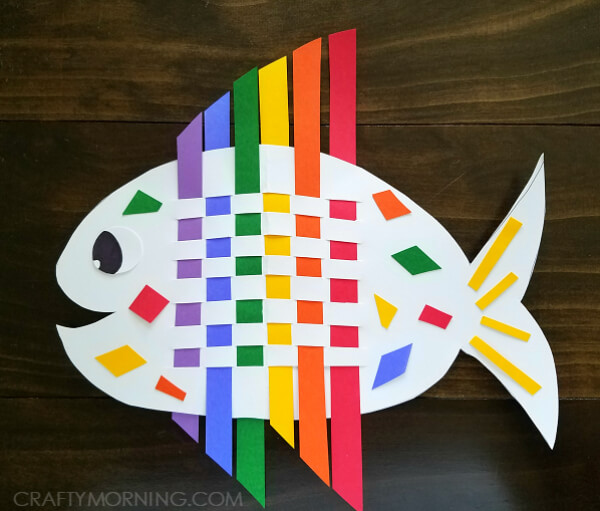
Image Source/Tutorial: craftymorning.com
Who doesn’t like cute fishes? What if you can make one of your own. Just collect a few color papers and you are good to go. The kids can make this super easy DIY within a very short period and enjoy it as well. They will love to make and play with this cute fish.
- Level: Moderate
- Materials required: Color sheets, A white chart paper, scissors, Glue
On the white chart paper, draw the body of the fish with a pencil. With a pencil, draw straight lines in the middle part of the fish. Make sure, all the lines are of equal length. Cut the drawn lines with scissors. Now, cut the color papers into long strips. Then, take the first strip and insert it in the lines as shown in the picture. You have to put it from the upper side. Then, take the next strip and insert it from the back part of the fish. After putting the strips should look like a block. Follow these steps with all the next strips. After completing the fish should look like a blocked fish. Now make the eyes of the fish and paste it. Cut the remaining papers in different shapes and sizes and paste them on the body of the fish to decorate it and you’re done.
3. Leaf People
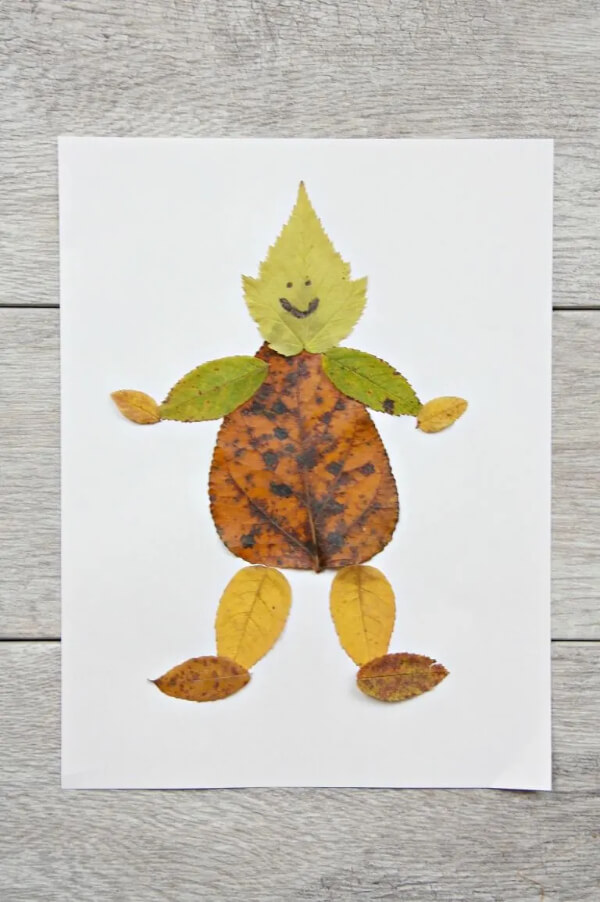
Image Source/Tutorial: mymommystyle.com
We usually throw away the fallen and dried leaves of the trees. But what if you can make leaf peoples from the waste leaves? Collect all the waste leaves of different sizes and colors and indulge in this DIY craft. How about creating a man of your own? Sounds exciting, right! Gather all dry leaves and start making a man of your own.
- Level: Easy
- Materials required: Dry leaves, Glue, Googly eyes, White sheet, Black marker
Take all the leaves and start pasting them on the white part in the shape of a body. Make the face, hands, legs, and stomach of the man. Make sure the leaves are pasted nicely so that they don’t get curled. Draw the eyes, nose, and mouth of it and your leaf man is ready.
4. Paper Roll Ladybug
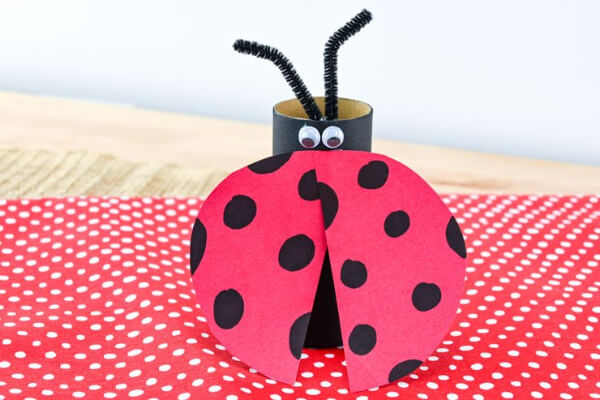
Image Source/Tutorial: consumerqueen.com
Ladybugs looks cute, right? So let’s make a ladybug of our own with the things present in your house. Use the waste things present in the house to make this cute DIY craft. Make your ladybugs and decorate them as you want. These ladybugs look very cute and attractive.
- Level: Moderate
- Materials required: Paper roll/ toilet paper roll, Color papers, Googly eyes, Black marker, Designer wires, Glue, Scissors
Take a paper roll. You can also use a clean toilet paper roll. Cover the roll with black paper. Now on red paper, draw a circle and cut it. Draw small circles on it and cut the circle into two parts. Now, paste the wings on the body of the ladybug. Put the eyes on the top and paste the antenna on the head of the ladybug. Your ladybug is ready.
5. DIY Handprint Bookmarks
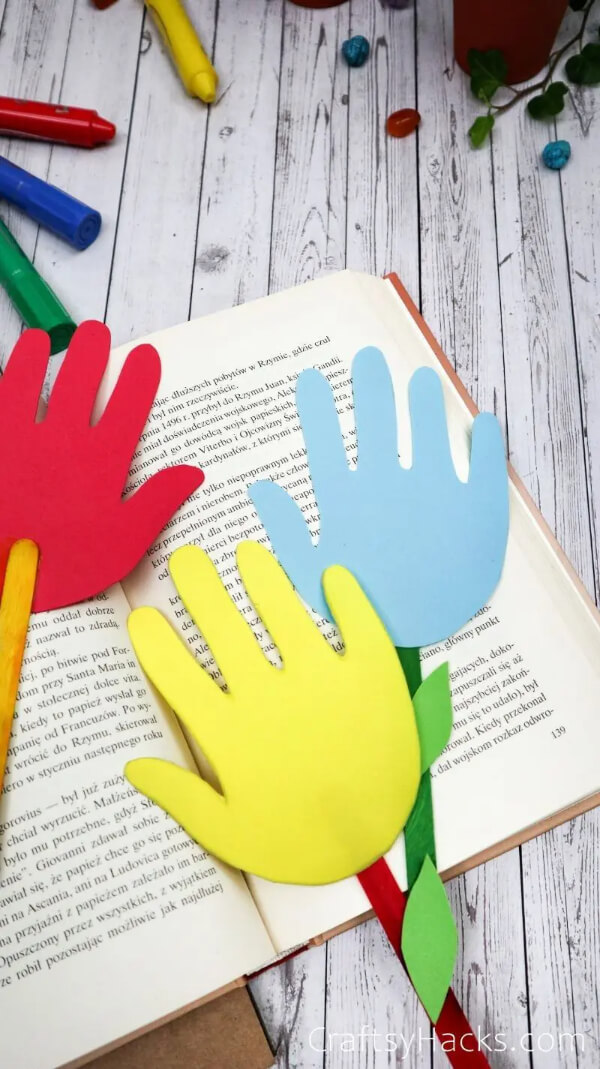
Image Source/Tutorial: craftsyhacks.com
Bookmarks are an easy way to make the kids love reading. With these bookmarks, the kids will take interest in reading different books. Let’s make these bookmarks and show your creativity. With these bookmarks, you can engage your kids with books. They are super easy to create and very useful.
- Level: Very easy
- Materials required: Color papers, Popsticks, Scissors, Glue, Watercolors, Paintbrush
Firstly, paint the pop sticks with the color of your choice and let them dry. For the hands, you can use your handprints or your parents to create some memories. Cut the hands and paste them on the pop sticks. To make it look more beautiful, cut the paper in the shape of leaves and paste it on the sticks. Your bookmarks are ready.
6. Puffy Paint Ice- Cream Cone
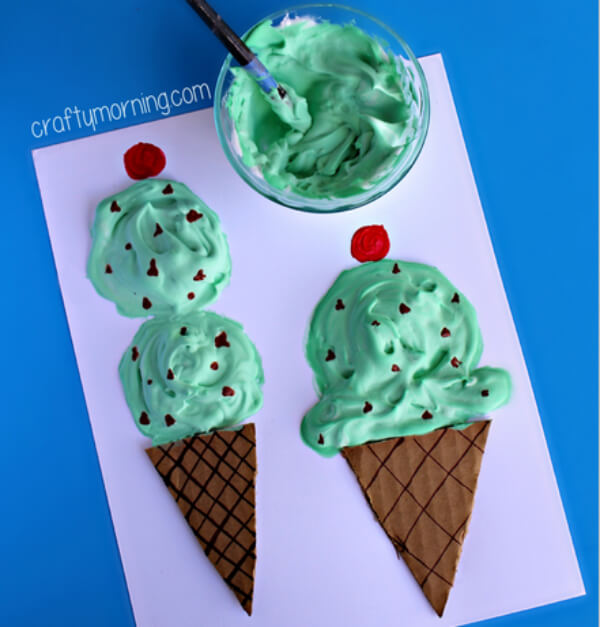
Image Source/Tutorial: craftymorning.com
Everyone loves ice- cream. And puffy ice-creams are even more delicious. So, gather some items and be ready to become a cook by making your yummy ice- cream. These delicious ice- creams are super easy to make and look yummy. The cherry on the top makes it more attractive.
- Level: Easy
- Materials required: Watercolors, Shaving cream, Glue, Cardboard, White paper, Scissors, Paintbrush
Cut the cardboard in the shape of a cone and paste it on the white sheet. In a bowl, mix shaving cream, glue, and the color of your choice. You can also use food color. Mix very well. With the help of the brush, put the mixture above the cone in the shape of ice- cream. Make check designs on the cone. Put a cheery at the top with red paint and let it dry. Your mouth-watering ice- cream is ready.
7. Toilet Paper Roll Butterfly
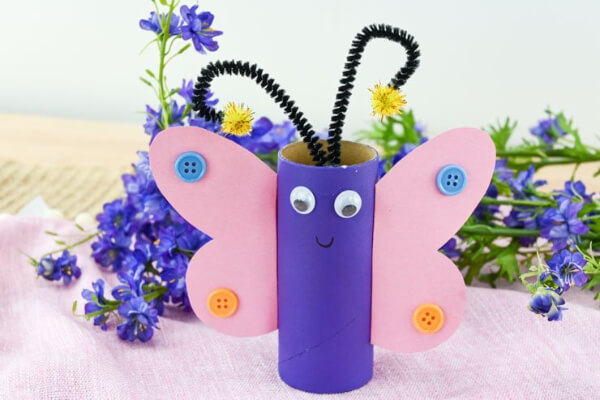
Image Source/Tutorial: consumerqueen.com
If you have some extra toilet paper rolls, use them to make this creative DIY. It will look very attractive and the kids will get to learn a new thing. Also, it is very easy in making. This butterfly is easy to make and looks very beautiful. The buttons used on the wings give it a special look.
- Level: Easy
- Materials required: Clean toilet paper roll, Watercolors, Color paper, Googly eyes, Designer wire, Buttons, glue, Scissors
Choose your favorite color and paint the roll. Cover it well with the color and let it dry. Now, take the color paper and fold it into two halves. Draw the wings and cut them. Now you will get two wings. Paste the buttons on both wings. Now, paste the wings on the roll. Apply the googly eyes and draw them.
8. Paper Bag Jelly Fish Family
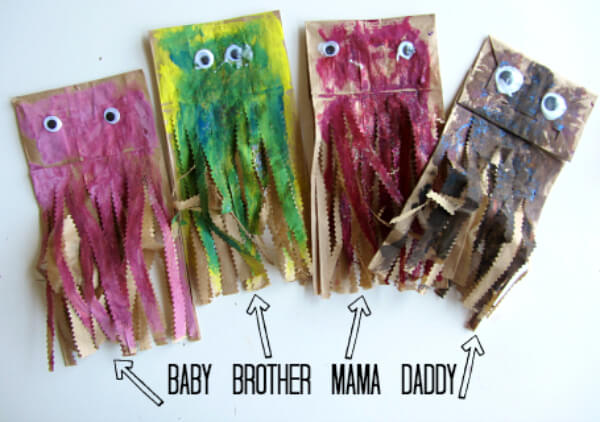
Image Source/Tutorial: notimeforflashcards.com
Jellyfishes look cute. Right. Let’s make our jellyfish family with a beautiful blend of colors and accessories. This activity will be super fun for the kids. The paper bag jelly family is a fun way to create beautiful memories. The jellies are very easy to make and look wonderful.
- Level: Moderate
- Materials required: Paper bags, Painting colors, Paintbrush, Googly eyes, Glue, Scissors
Take all the paper bags and start by coloring them. Color every bag with a different color. Let them dry. After drying, cut the papers in a zig-zag design. Put the googly eyes and your jelly family is ready. Give every jelly a name to make it more fun.
9. DIY 3-D Photo Frame
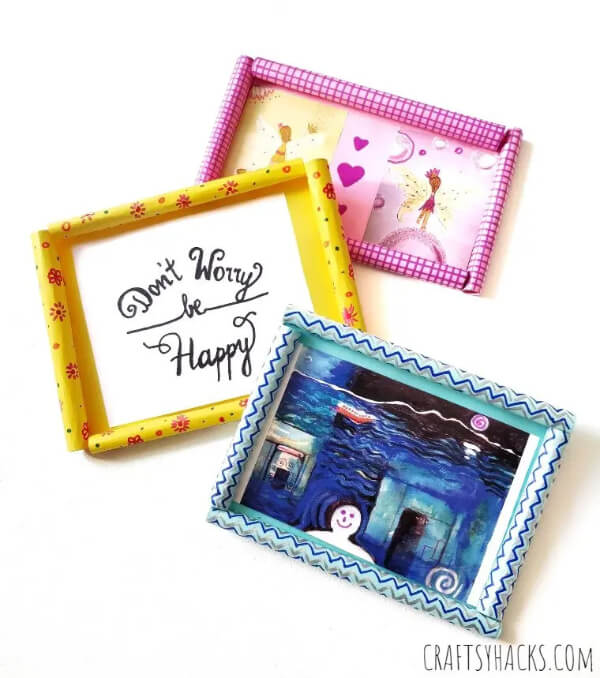
Image Source/Tutorial: craftsyhacks.com
Photo frames are a great way to store all your beautiful memories. But why buy expensive frames when you can make them easily at home. So let’s start. These attractive photo frames are super easy to make. You can use these frames to preserve your memories. Use these creative classroom crafts for kids’ ideas and get your handmade photo frame within no time.
- Level: Very easy
- Materials required: Color papers, any photo, Glue, Scissors, Pencil
Take the photo of your choice and place it on the color paper. Now, draw the outlines. Also, draw the outlines for the frame. Cut the extra paper and give it the shape of a frame. Now, to make the frame, start rolling each side of the paper. You can use a pencil to roll perfectly. Roll all the sides and your frame is ready. You can decorate the frames before rolling. Now paste the photo in the frame and it’s done.
10. Toilet Paper Roll Bunnies
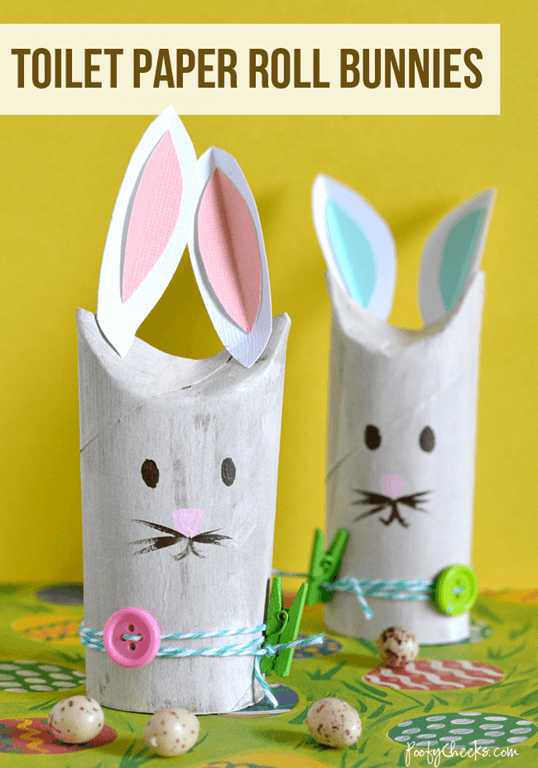
Image Source/Tutorial: poofycheeks.com
Bunnies are the cutest animals. I love them a lot. I’m sure you must love them. So, let’s make this super cute bunny and let the kids play with them. You can use these bunnies to decorate your room or shelves. The bunnies look very cute and friendly. It will give your visitors an inviting look.
- Level: Moderate
- Materials required: Toilet paper roll, painting colors, paintbrush, white, pink, and blue sheets, googly eyes, black marker, glue, thread, buttons, mini clothespin
Fold the corners of the roll in an oval shape. Paint the roll in white and let it dry. Till then, prepare the ears of your bunny. Cut it in the shape of an ear and paste a small ear of different color on the first one. Make the eyes, nose, and mouth of the bunny. Paste the ears on the top of the bunny. Now, put the thread in the button and tie it to the bunny. Put the clothespin on the thread and your cute bunny is ready.
11. Robot Puppets
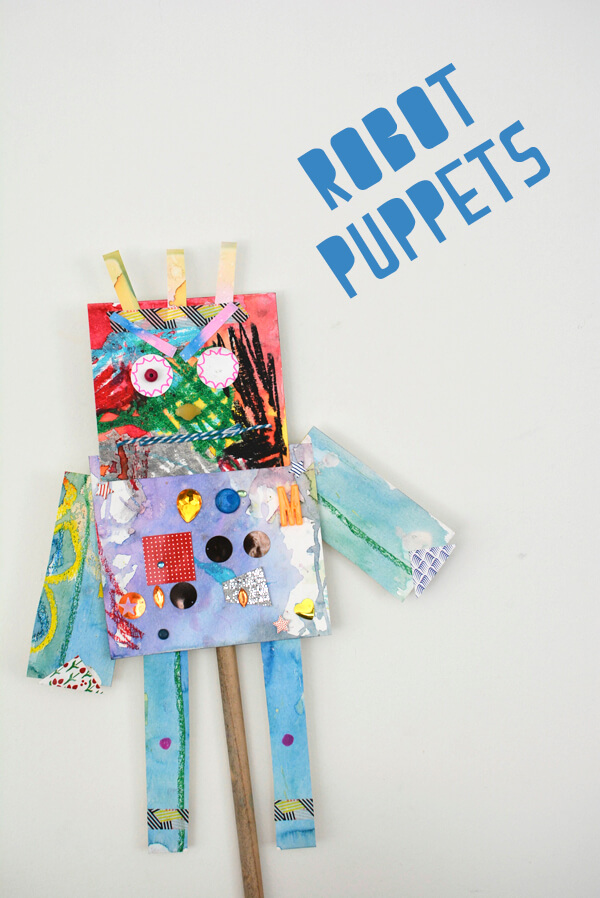
Image Source/Tutorial: mericherry.com
Puppets are a great way of entertainment. So, how about making a robot puppet of your own. Yes, you read it right. A robot puppet. Let’s go and make it. This robot is a great way to keep the kids engaged. All the kids are going to love it.
- Level: Moderate
- Materials required: Different paintings, stones, designer threads, buttons, stick
All you have to do is collect all the paintings you made and put them in the shape of a robot. Decorate it with different stones, gems, buttons, and accessories. Paste a stick to hold the robot and it is ready.
12. GLASS SUNCATCHER
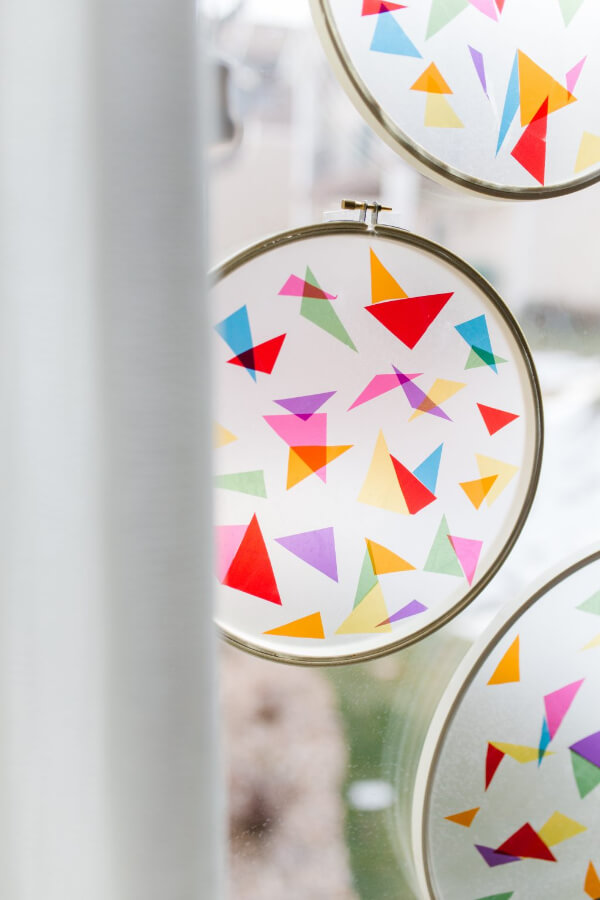
Image Source/Tutorial: prettylifegirls.com
Glass suncatchers are a great way to decorate your room and lighten it with the sun rays. It looks beautiful and changes the complete look of the room. The suncatcher will enhance the beauty of your room. Kids will need the help of their parents in making it.
- Level: Moderate
- Materials required: Embroidery hoops, cellophane sheets, contact paper, scissors
Make different shapes or designs on the cellophane sheets and cut them. Separate the inner hoop from the outer one. Now place the sticky side of the contact paper on a flat surface and put the inner hoop on it. The contact should be an inch extra from the hoop. Now place the cellophane designs on the contact paper and make sure that it is well stuck. Now carefully take the inner hoop with the sheet and put it inside the outer hoop. Your suncatcher is ready. Hang it wherever you want and enjoy!
13. Walking Rainbow
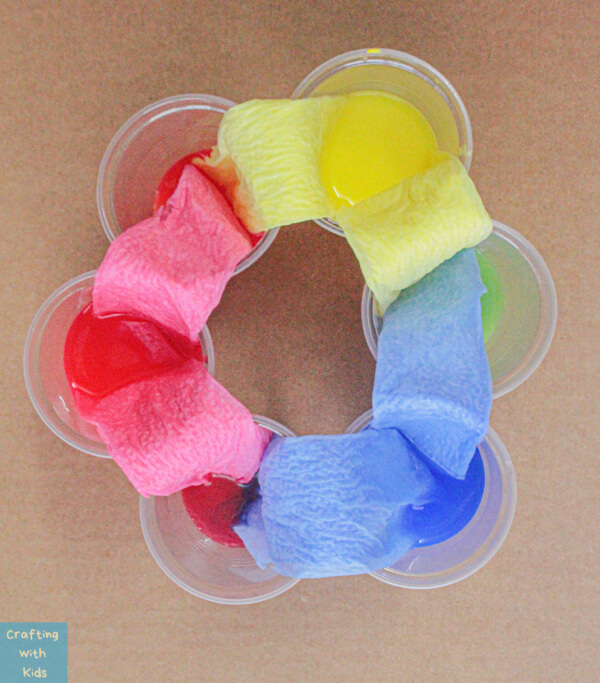
Image Source/Tutorial: craftingwithkids.net
Rainbows look beautiful, right. We all have seen rainbows, but have you ever seen a walking rainbow. If not, let’s see today. This is a very interesting activity. You will learn how the colors travel and how you can make a new color by mixing two different colors.
- Level: Moderate
- Materials required: Plastic cups, thick paper towels, water, blue, red, and yellow color
Take 6 glasses and place them in a circle. Now, fill every alternate glass with half water. Put the blue color in one glass, red in another, and yellow in another. Mix it well. Now, fold an inch of the paper towel and put the folded side in the colored water. And another part in the empty glass. Now, sit back and let the magic happen. You’ll see how the color travels from one part to the other. The empty glass will be filled with water. Also, you’ll see how blue and yellow together makes the green color.
14. Cool Cat Newspaper Art
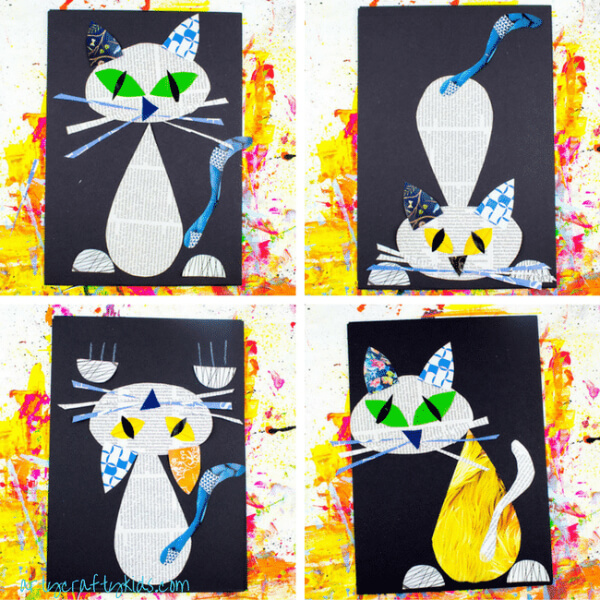
Image Source/Tutorial: artycraftykids.com
One such amazing classroom craft for kids is newspaper art. It is the simplest way of crafting, with recyclable materials. The cats are lovely. How about making your sweet and lovely cat cool. And the interesting thing about this activity is that you just need some newspapers and magazines to create your cool cat. This super cool cat will help you to reuse your old newspapers and magazines. It will also help you in creating a super amazing craft.
- Level: Easy
- Materials required: Old newspapers, magazines, scissors, glue, black paper or cardboard
Make the body of the paper by cutting newspapers. Picks different colors and patterns to make the tail, eyes, and ears of the cat. Once you have all the parts, paste the body of the cat on the black sheet. Paste all the body parts of the cat. You can choose the posture of yo
So, these are some of the super easy, creative, and beautiful DIY classroom crafts for kids that the kids can make very easily and keep themselves engaged.
I hope you like these creative classroom crafts for kids. Don’t forget to give your valuable comments so that we keep providing you with creative and fun crafty posts.
Also, kindly visit our website to get more fun DIY craft ideas.
You may like these:
Space-Themed Crafts for Children
Spacecrafts inspire curiosity about the universe. These engaging projects use simple materials to create rockets, planets, and stars, fostering creativity, imagination, and a love for science and exploration in young minds.
Simple and Unique Craft Ideas for Kids That Anyone Can Create
Fun, easy crafts spark creativity and imagination in children. These accessible projects use simple materials, encourage hands-on learning, and are perfect for fostering artistic expression and family bonding.
Easy Hanukkah-Themed Crafts for Kids to Enjoy
Hanukkah crafts engage kids with festive, creative activities. These simple projects celebrate tradition, encourage cultural connection, and provide a fun way to make holiday decorations while learning about the festival’s significance.
Do-It-Yourself Craft Projects Designed for Teenagers
DIY crafts for teens combine creativity and self-expression. These projects use trendy designs and materials, offering a productive outlet for personal growth, skill-building, and creating unique handmade items for gifts or decor.
Creative Ideas for Making Wooden Picture Frames
DIY wooden picture frames blend functionality with artistry. These projects allow customization using wood, paint, or embellishments, creating personalized keepsakes that preserve cherished memories in a stylish and meaningful way.


