
A fun day trip for the whole family is going to the beach! Everyone enjoys playing on the beach, swimming in the water, and basking in the sun. Kids like the cool sensation of seawater on their toes, and playing on the smooth sand of the beach is a classic childhood activity. The pleasure doesn’t have to end once you get home from your trip. However, the day following always makes us all wish we were still on that picture-perfect beach. The weekend may be planned to include a day of crafts after going to the beach as a terrific approach to combat the beach blues. There is a range of seaside and beach projects available to preschoolers and toddlers.
Contents
- Simple Beach Crafts For Kids to Make at Home
- Sandpaper Castle
- Paper Plate Jellyfish
- Glitter Shell
- Cupcake Liner Fish
- Sand Slime Craft ForKids- Step-by-Stepp Tutorial
- Salt Dough Starfish
- Easy Newspaper Shark
- Adorable Borax Crystal
- Fun Sand Play Handprint
- Ocean Slime
- Salt Dough Pendants
- Colourful Marbled Seashell
- Paper Bowl Jellyfish
- Sand Art Bottle
- Paper Plate Beach Craft
- Beautiful Beach Painting
- Fun Cup Sea Crabs
- Whale Craft For Kids
- Easy Beach Crafts for Kids | Fun Summer DIY Art Activities
- Educational Benefits of Beach Crafts for Kids
- Benefits of Beach Crafts
- FAQs
- Q1. What are some easy beach crafts for kids?
- Q2. How do beach crafts help children learn?
- Q3. What materials are used in beach crafts?
- Q4. Are beach crafts suitable for summer activities?
- You may like these:
- Unicorn-Themed Craft Projects for Children
- Penguin Craft Activities for Kids
- Dinosaur-Inspired Craft Ideas for Toddlers and Preschoolers
- Simple Butterfly Craft Projects for Kids – Create Your Own Fluttering Butterfly
- Bee-Themed Craft Activities for Kids – Ideal for School Projects
Simple Beach Crafts For Kids to Make at Home
Sandpaper Castle

Image Source/Tutorial: I Heart Crafty Things
Tan cardboard, blue tissue paper, tan sandpaper sheets, scissors, and school glue are the materials needed to make a sandpaper castle. Amass your resources. Start by cutting out various shapes from your sheets of sandpaper. You may cut out whatever form you choose, including rectangles, triangles, tiny squares, circles, and more. For further use, keep some of the sandpapers uncut.
Allow kids to make their sand castle crafts by setting out the tan papers, tissue paper, sandpaper forms, and school glue on a table. Every youngster will enjoy fuelling their imagination by making a distinctive-looking sand castle activity thanks to the range of available shapes. The final sand castle activity should be displayed somewhere in the house or classroom where kids can be proud of their work, such as on the fridge or an art wall.
Paper Plate Jellyfish
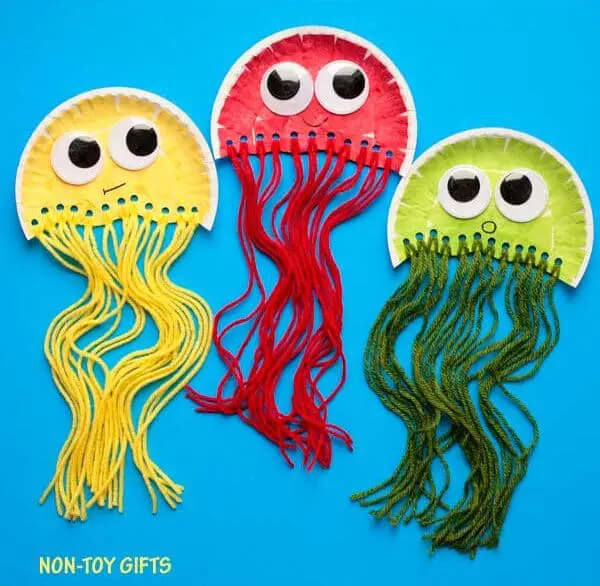
Image Source/Tutorial: Non-Toy Gifts
A terrific summer activity for an ocean or marine unit study is this paper plate jellyfish craft. Both preschoolers and older children will love making it and discovering these adorable water creatures. Put colourful paper plates to use. If tissue paper is not available, you can colour the paper plates instead. No squinty eyes? No issue. With a black marker, create them. Crepe paper streams are used to create the tentacles. Paper plates, tissue paper, scissors, glue, hole punches, yarn, googly eyes, and black markers are needed.
The tissue paper should first be cut into small squares. Young children can simply rip up the tissue paper if they aren’t yet confident with scissors. At the paper plate’s bottom, doodle a wavy line, then cut along it. Add tissue paper squares to the paper plate using glue. Make multiple holes with a hole punch along the paper plate’s wavy bottom edge. Cut identical-length strands of yarn. The paper plate’s bottom has holes that you can weave the yarn through and knot off. On the paper plate, adhere the googly eyes, then draw a mouth with a black marker.
Glitter Shell
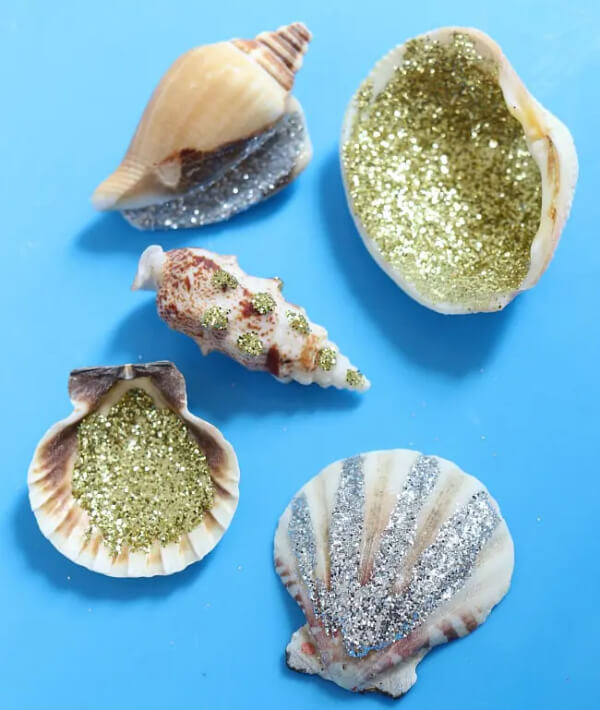
Image Source/Tutorial: No Time For Flashcards
This is a straightforward art exercise that kids adore. Ideally, you could bring home some shells you found at the beach, wash them, and also use them for this, but I understand that not all of you live fairly close to a coastline as I do. That’s alright because shells are typically available in the craft department of dollar stores and craft stores. Amass your resources. A small dish, a paintbrush, various shells, white glue, and extra-fine glitter are also required. Extra-fine glitter performs far better than regular glitter. Some are available here. A tray is also necessary so that glitter doesn’t go all over the place. Paint some white glue first.
Less drying time results from the glue applying thinner as a result of this. Additionally, giving kids a paintbrush motivates them to draw pictures and makes them more careful about where they apply adhesive. Put the glitter in the project using glittery seashore shells. We simply pour it on. Get rid of the surplus. If you use different colours of glitter, don’t try to put the excess of each colour back into its original canister. Instead, combine everything in a bag with all the additional glitter. When you just want some shine and don’t care what colour you choose, it’s entertaining. Let it dry. And the beautiful artwork is ready.
Cupcake Liner Fish
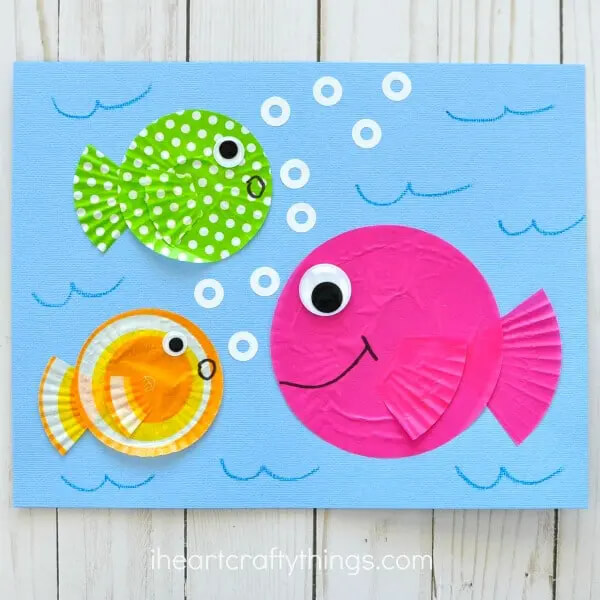
Image Source/Tutorial: I Heart Crafty Things
When you really need to catch a break indoors on a hot summer afternoon, this lovely fish kids project is perfect at any time of year. The prerequisites include cupcake liners, a blue cardboard paper sheet, triangles of paper in various colours for the fish’s fins, glue, a black marker, a blue crayon, and the bubbles: White paint as well as a cardboard straw, blue sequins, or white binders, and reinforcing labels are all acceptable alternatives. If you wish to utilize paper fishtails, assemble the cupcake liners and fishtails on your blue backdrop paper in the desired locations. To adhere them to your paper, use a glue stick.
If you want to keep your fish in cupcake liners only: For each fish body, use a whole cupcake liner. Cut the remaining cupcake liner in half, then cut one of those halves in half once more. Your rear tail fin will be one of those components. Cut a little portion off the other cupcake liners, quarter, and remove the triangular tip to create the side tail fin. To create your fish, adhere every component to your paper using glue. Each fish needs a wiggly eye and a mouth, which should be drawn with a black marker. To use paint to create the white bubbles: On a little paper plate or scrap of paper, squirt a tiny bit of white paint. Blow out the bubbles that form above the hole you just made in the paper straw after dipping the end of the straw in the white paint.
Put the straw’s tip on the blue backdrop. Repeat as often as necessary. To use sequins to create blue bubbles: For the bubbles, glue blue beads on your paper. Using binder reinforcement labels, create the bubbles as follows: To create the appearance of fish bubbles, just peel and place the white hole stickers around your fish. Create random water scribbles on your paper using your blue crayon. To add more elements to your fish scenes, such as plants or other creatures, you might also use coloured crayons of different hues. Even a 7-year-old would like this activity because it is easy enough for a preschooler.
Sand Slime Craft ForKids- Step-by-Stepp Tutorial
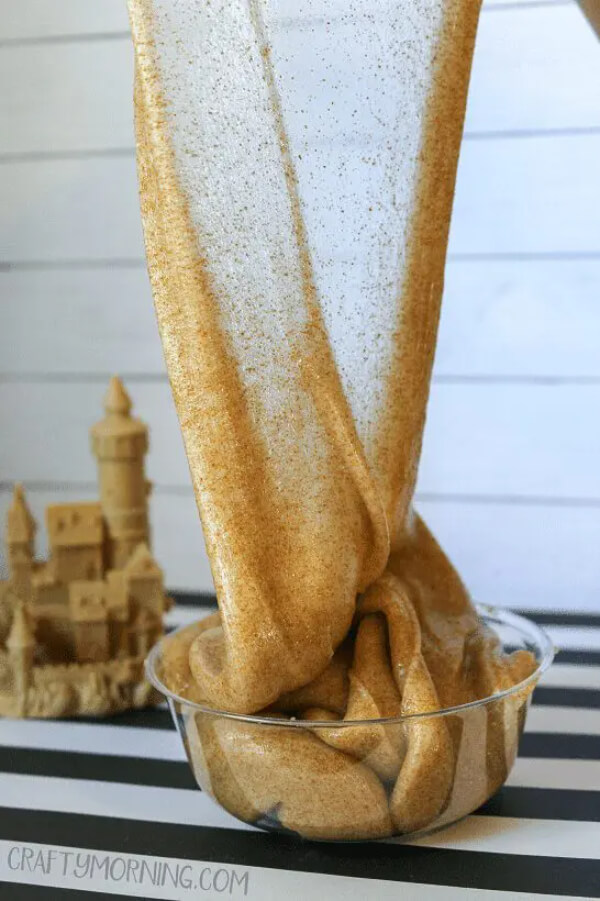
Image Source/Tutorial: Crafty Morning
The things needed to make sand slime are quite enjoyable to use, and they include one sealed container, 1 tbsp contact solution, 1/2 cup water, 1/2 tsp baking soda, and a 1-oz. A container of transparent glue, sand, a little bowl, and a seashell. Pour the full 5-ounce container of clear glue into a basin first. Include 1/2 cup of water. Stir in 1/2 tsp of baking soda. Add a little sand. Later, you may always add more! Add 1 tablespoon of contact solution. It will start to develop right away. It will stick around! Not to worry! Mix the mixture in the container until it begins to take shape. The slime must be well mixed to become non-sticky. Sand should be added until the desired effect is achieved. Keep it in an airtight container. And the work is done.
Salt Dough Starfish
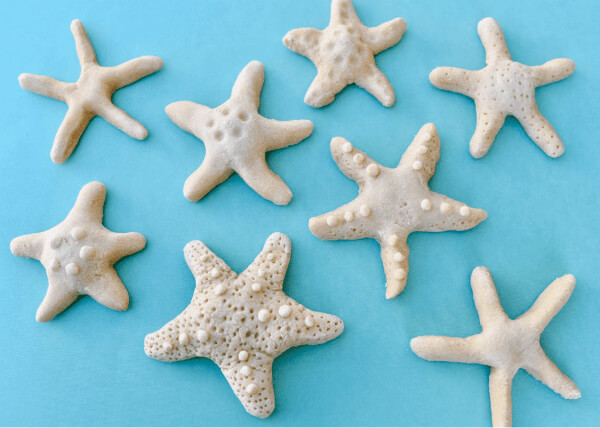
Image Source/Tutorial: The Crafting Chicks
For the Salt Dough Recipe, you’ll need 2 cups of flour, 2 cups of salt, and 1 cup of water. The ingredients should be thoroughly mixed in a bowl. The dough should be soft after a brief period of kneading. Begin by rolling out a ball of dough and shaping it into a starfish shape. Five “blobs” evenly spread out around the middle will serve as the arms; carefully draw them out. Make every effort to equalize them. If a starfish limb is too huge or too small, you may easily pull some off or add additional dough. Just use a light tug to gently form each arm into the shape of a starfish. To create the basic starfish form, I prefer to press on the sides, draw the arms out, and then softly push on the top edge. Now for the enjoyable part! Your chance to make your starfish just as you like it with the kids is at this point. To give the starfish a more realistic appearance, we used the tip of a pen to put tiny holes in some of them.
Once those starfish have indeed been made, you have two options: bake them or let them dry naturally over a few days. We, impatient people, are lucky to have baked them. Put them in an oven set to 325 degrees and bake them until they become hard to the touch. For a little starfish, this could take an hour, but for a larger, thicker starfish, it might take two to three hours. You have two options when the starfish have condensed: either keep them plain and unpainted, as we decided, or paint them.
Easy Newspaper Shark
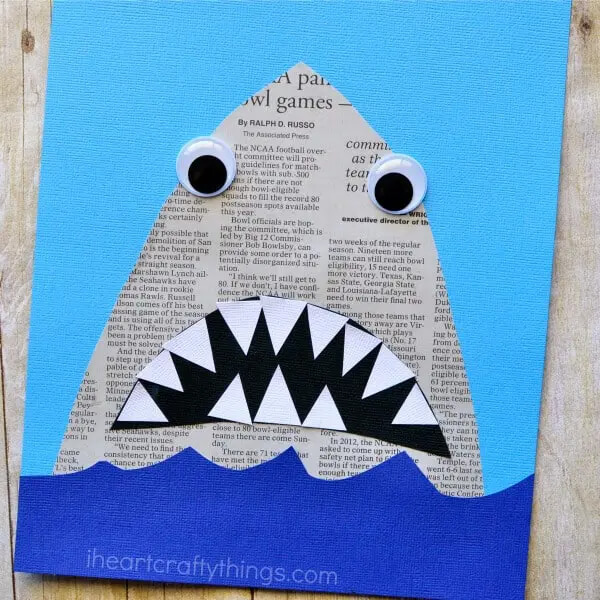
Image Source/Tutorial: I Heart Crafty Things
A fun project for the entire family, this newspaper shark craft for kids is really easy to make and suitable for children of all ages. Additionally, since it only needs a few materials to construct, you probably already have all you need for the activity. Newspaper, light blue, dark blue, black, and white cardboard paper, googly eyes, scissors, and glue are required for this shark craft. Make a shark face from your magazine to start. The amusing aspect of this craft is how each person customizes their shark by cutting out their face in a certain way.
You may make it tall or short, slim or broad, whatever you choose. On your sheet of light blue cardboard paper, adhere the shark face. From your royal blue cardboard paper (or construction paper), cut out some ocean waves. Attach them to your light blue paper beneath the shark mask. Make shark teeth and gums from your black and white cardboard paper. Add your googly eyes and glue them on the shark’s face. This craft is suitable for toddlers and preschoolers as it is easy to make.
Adorable Borax Crystal
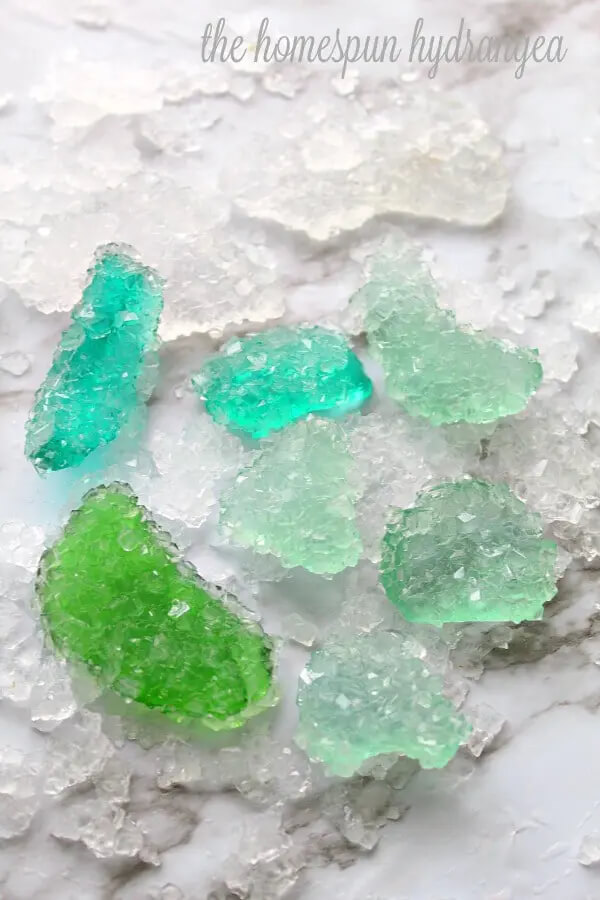
Image Source/Tutorial: The Homespun Hydrangea
Beach glass fragments, borax powder, hot water, and a sizable glass or ceramic dishpan are required to manufacture stunning borax crystals. Start by adding HOT trash to your pan. Usually, hot tap water won’t work. Before putting water into the pan, I like to microwave it first. Be sure to select glass or ceramic when choosing a pan. This will do exactly what you need it to do—keep your hot water for a very long period. Add your Borax now. For every two cups of hot water you make, add 1/4 cup. Borax has to be stirred to dissolve. Make sure the borax thoroughly dissolves if you want the nicest crystals.
Let’s now include the beach glass. Put the glass right into the serving plate. Aim to avoid any contact between the parts. The challenging thing now is waiting! Give your beach glass roughly 24 hours to sit. The beach glass will begin to crystallize as it lies still. They should become apparent in around 6 hours. Try to be patient, don’t remove or touch them, and let them alone. You may take them out of the mixture after 24 hours and let them dry on some paper towels. The crystals will glow brilliantly after they have completely dried! They genuinely resemble gem-like crystals. You may also scrape off any Borax that has accumulated at the base of the pan. Additionally, white crystals will develop.
Fun Sand Play Handprint
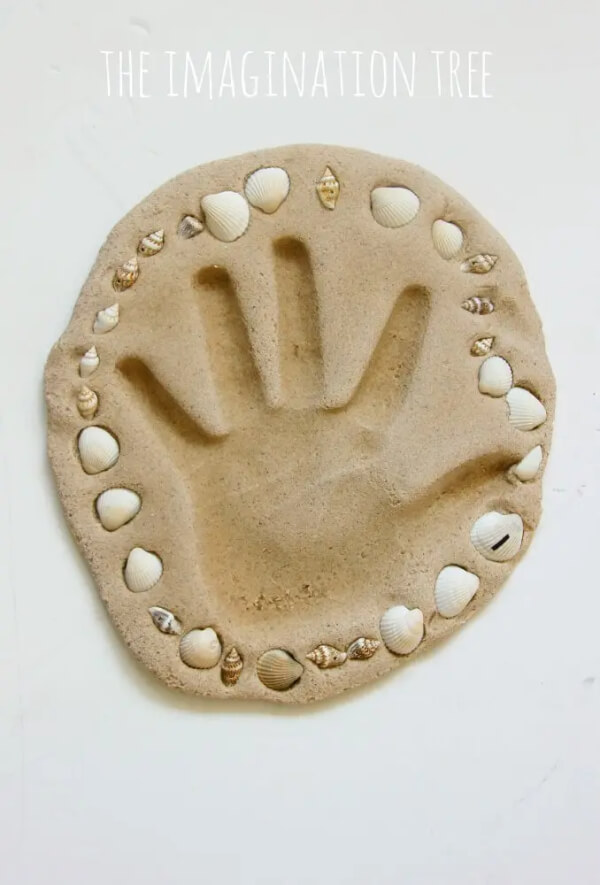
Image Source/Tutorial: The Imagination Tree
Use this easy, handmade sand clay recipe to create some handprint mementoes for charming gifts and enduring memories. Provide souvenirs from trips to the beach, such as shells and treasures, to include lasting holiday memories. The requirements are sand, two cups, 1 1/2 cups plain flour, warm water, 1 cup, and 1/4 cup salt. In a large bowl, combine the sand, flour, and salt.
Add the hot water gently while stirring with a big spoon. This recipe makes dough, and as with other doughs, the dry ingredient amounts may dramatically affect how sticky or dry the final product is. Add the water carefully, and if it seems a bit too sticky, just balance it out by adding more flour or sand. Once everything is fully incorporated, remove it from the bowl and start to knead it on a surface that has been lightly dusted with flour. A soft, malleable ball that resembles Play-Doh in feel and consistency will form in less than a minute. From this point on, continue to roll, cut, and air-dry or oven-dry the sand clay in the same manner as salt dough. Divide the ball of dough into four equal pieces, and then roll each piece individually into a circular form with a thickness of about 2 cm.
This was rolled straight onto a large baking sheet so it wouldn’t have to be moved. Even better is to spread it out on the baking sheet covered with parchment paper, but we didn’t have any this time. This sand dough ball is extremely large. Each kid inserted their hand into the middle of their piece after the dough discs had been shaped into circles, and then either I or they assisted in firmly pressing each finger down one at a time with another hand placed on top. The handprints in the dough were then delicately peeled off.
They later embellished the edges of these into genuine beach treasures by utilizing little shells from beach excursions and party materials. They were immediately placed in the oven, which was preheated at 120 degrees Celsius (about 250 degrees F), and left there to dry out for about 4 hours. Depending on your oven and, most significantly, the width of the dough discs, the sand batter will dry hard at different periods. They mustn’t be too thick because if they are, they won’t dry out as hard and quickly and may stay a touch doughy in the centre. If you discover that they are firm on the top but not the bottom, remove them from the oven, carefully flip them over, and then return them for one or two more hours to harden the bottom.
Ocean Slime
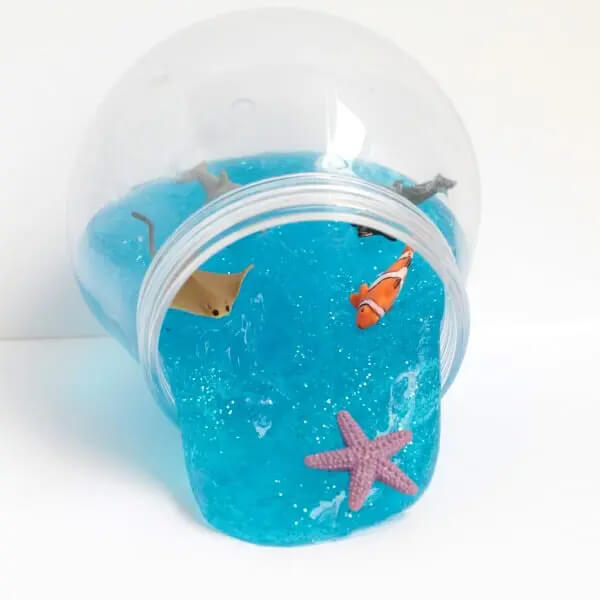
Image Source/Tutorial: STEAMsational
A simple, practically infallible formula for borax slime is required to create transparent blue slime. The use of transparent glue is the key to creating lovely blue glitter slime. The slime will still work if you use white glue, but it won’t have the same ocean-like sparkle. Glitter gives the slime a nice finishing touch and turns it into ocean water. To capture the essence of the ocean and create a slime play instructive, add tiny sea animals to your blue glitter slime.
Salt Dough Pendants
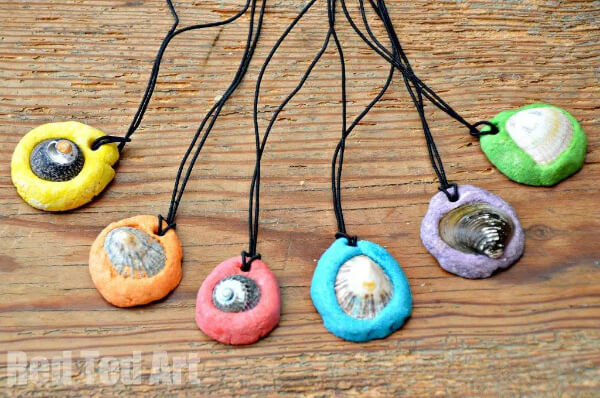
Image Source/Tutorial: Red Ted Art
For this art, the prerequisites are tiny shells and two cups of flour. UP TO 1 cup of water and 1 cup of salt. Food colouring or paint, a tray, and a muslin cloth to keep the salt dough moist if working outside in the summer. (We added a generous knife tip of top-quality food colouring gel.) Mix your salt dough first. Salt and flour should be combined before adding water gradually. To combine the basic salt dough, we added between half and two-thirds of the water. Afterwards, split into 7 pieces. Add food colouring in large amounts.
You might obtain purple or red hands when mixing food gel; wash your hands between colours to prevent cross-contamination. Additionally, work on a surface that can be cleaned of colour if necessary, if you knead your colour in! Prepare your shells. Make little salt dough balls. Add some water if it begins to crack. Once it is somewhat flattened, insert your shell. Using a chopstick or something similar, make a hole for hanging. As it may break later, make sure the hole is not too near the edge. Turn a couple of times while it dries. It dried towards the end of the day since we had nice, hot summer days. I used to bake the salt dough in the winter at a low temperature (80 °C), turning it after 10-15 minutes.
Ensure that you “revoke” your hanging holes as well. Due to the spreading and closing properties of salt dough. The shells should remain firmly in place; if not, you can simply glue them in afterwards! Keep your salt dough covered with a moist towel if you’re working outside on a hot day to prevent it from drying out. When the shells are dry, string them together to make a pendant to wear.
Colourful Marbled Seashell
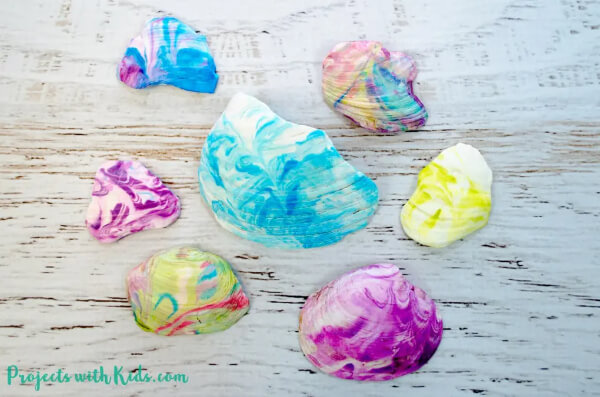
Image Source/Tutorial: Projects With Kids
This seashell artwork is so captivating and addictive! The designs were extremely fascinating, and the colours came out as required. The best results were with shells, specifically white clam shells that we had personally picked from the shore, using a neon food colouring kit for colouring.S having lotion, Artistic trays, and Wooden skewers. You’ll need a lot of paper towels! Prepare your shells. Ensure that they are dry and clean. As I already indicated, the seashore shells we had collected gave us the best results.
The greatest outcomes were obtained using plain, white clam shells that were neither coated nor shiny. Squeeze your food colouring onto the shaving cream on your tray after filling it with shaving cream. We used a neon food colouring set, but I didn’t think the colours looked really vibrant. However, they still came out vivid and colourful. Whatever hues you choose will look fantastic! Create a marbled design in the shaving cream with the bamboo skewers. We experimented with utilizing one colour at a time after beginning with several colours originally. Scoop up some shaving cream with a shell after dipping it in the marbled shaving cream. Remove the shaving cream with a paper towel to uncover the fascinating patterns below! Put extra paper towels down to dry the shell. It is an easy and fun activity for toddlers and preschool children.
Paper Bowl Jellyfish
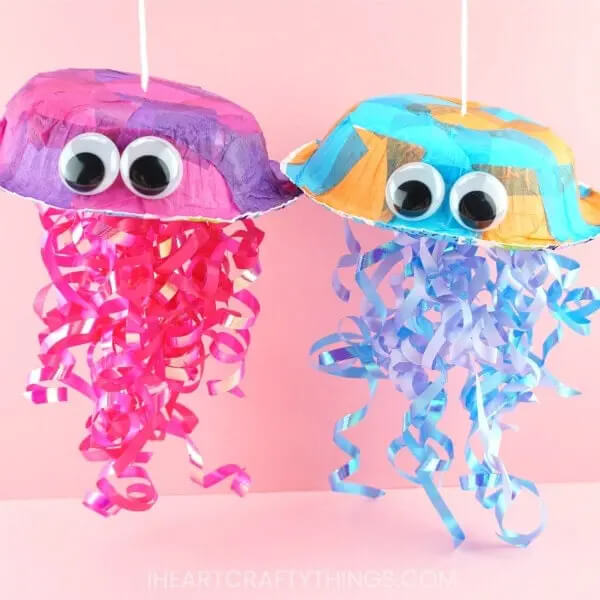
Image Source/Tutorial: I Heart Crafty Things
A small paper bowl, tissue paper (in any colour), a self-adhesive curled present bow (in any colour), googly eyes, white string (to hang it), school glue, wrapping tape, a pair of scissors, and other materials are needed. To begin, first, cut your tissue paper into squares. If you want to make your jellyfish craft really vibrant, choose a few different colours. Turn your paper bowl on its side and cover the bottom and sides with school glue. Place the tissue paper squares over the whole surface of your bowl, including the edges and bottom.
If there are any toilet tissue edges that are still protruding, you might want to apply a little additional glue. Allow your glue to totally dry. To make a small hole in the middle of the paper bowl, have an elder use your cutters. Your white thread should be inserted through the opening, knotted, and taped inside the bowl. Your curled gift bow’s glued backing should be removed before you stick it to the bowl’s interior. You should set it up such that it drapes down from the bowl’s middle. Add googly eyes to complete your adorable and colourful jellyfish creation. And the sweet jellyfish is prepared.
Sand Art Bottle
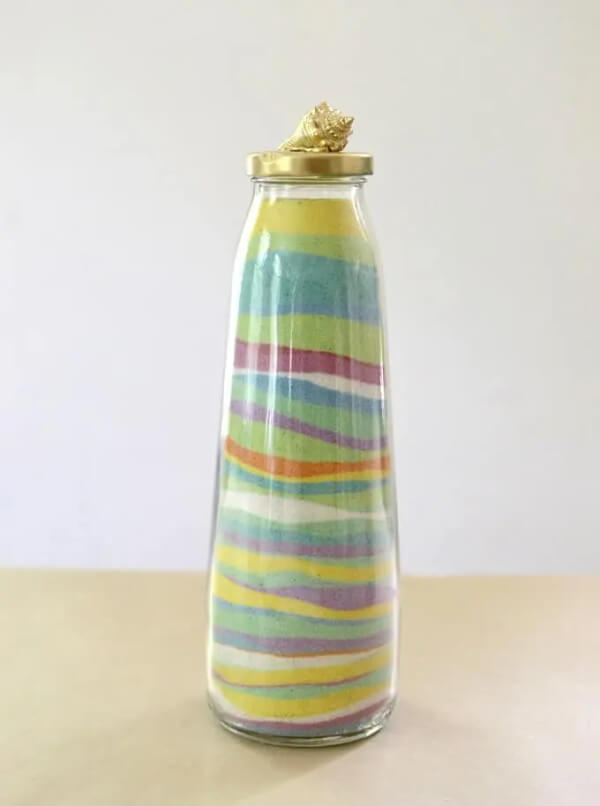
Image Source/Tutorial: Art Bar
Sand, food colouring or liquid watercolour, gallon-sized Ziploc baggies, drying trays, Tupperware to retain the sand that has dried, recycled jars or bottles, the funnels, Big spoons, the shells, an adhesive gun, and gold spray paint. Grab some sand. To make the sand the same colour, add some colour to the bag and stir it around. The liquid watercolour should first be diluted with water.
The sand will indeed be poured onto platters to sit in the sun. It took roughly a day to do this. You must keep in mind to occasionally walk outside and stir the sand. The sand will dry indoors even if you aren’t in the light; it simply could take longer. Put a jar for each colour of sand once it has dried. You may now start creating your sand sculpture. Fill the empty bottle with the coloured sand in various designs that they have created by themselves and add their own originality. Great fun day activities for school-going children.
Paper Plate Beach Craft
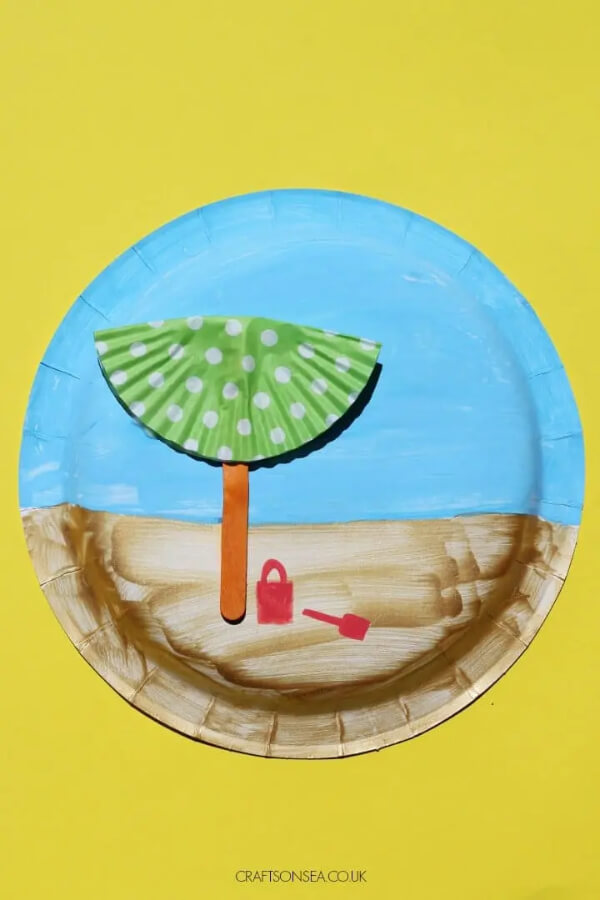
Image Source/Tutorial: Crafts On Sea
Kids may easily construct this simple paper plate beach craft. It’s also one that encourages some use of the imagination. Paper plates, children’s blue and yellow/gold paints, a paintbrush, cupcake liners, craft sticks, glue, and pens are required materials. Start by painting a piece of cardboard with some paint. I selected a light blue colour for the skies and gold for the beaches, but yellow might also work. While creating the line separating the two of them does need a steady hand, it scarcely matters if the two colours coincide somewhat. You may then add your embellishments after the paint has dried.
To create the fabric portion of the beach umbrella, adhere a craft stick to the ground, fold a paper cake liner in half, and adhere it to the top. Put some glue in the centre of the cupcake liner to keep the paper from unfolding by sticking it level with the paper plate. I used chalked crayons to make drawings on that paint. You’re done now! If you already have playing sand, you might place it on top of the beach area after applying a little glue to give it a little structure. You could also embellish with some stickers with beach-themed designs.
Beautiful Beach Painting
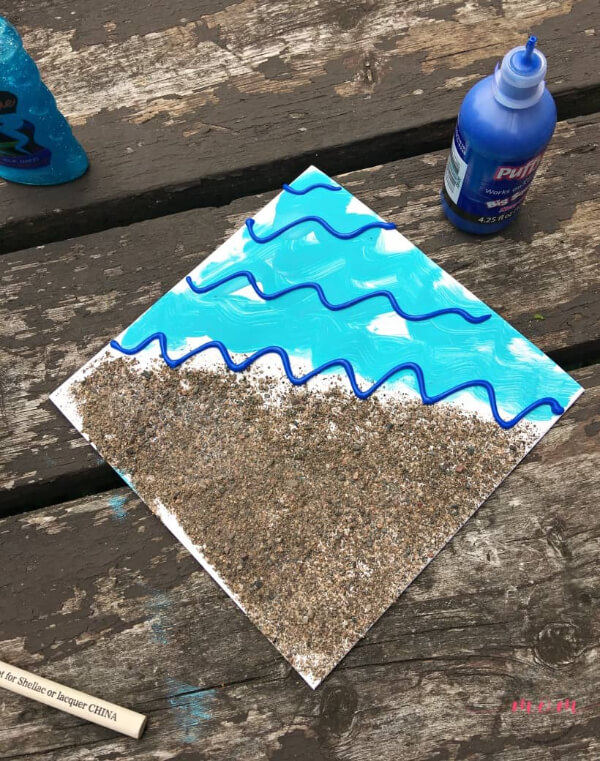
Image Source/Tutorial: Must-Have Mom
To complete this beach painting project, you’ll need a canvas or thick piece of paper, sticky adhesive, paint, and foam paint brushes. Start by creating triangular patterns with the sticky glue on the lower part of the canvas. Then have the kid fill the canvas with sand and blow off any extra. When you’re done placing enough sand, your sand painting ought to look like this. Next, apply blue waves to the upper part of the canvas with your foam brush. Additionally, dimensional puffy paint can be used to give the ocean and waves texture.
Allow the youngsters to express their creativity as they paint their own take on the seaside scene. Let them dry completely before handling. And the beautiful artwork is done.
Fun Cup Sea Crabs
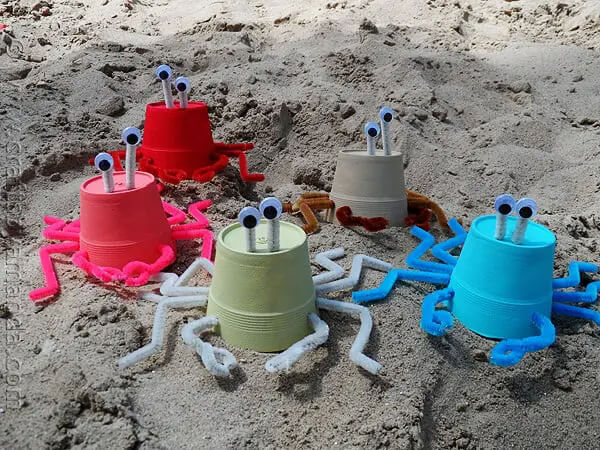
Image Source/Tutorial: Crafts By Amanda
You must have craft paint. Bahama Blue, Green Tea, Tuscan Red, Desert Sand, and Coral Blush were the colours I utilized. You’ll also need some googly eyes and tube cleaners that match your colours. First, you should trim the cups slightly, approximately an inch and a half. Each cup should have its outside painted. If necessary, apply a second coat. Cut a pipe cleaner into five equally sized pieces of beige hue for the crabs’ eyes. To get a total of 10 pieces, repeat the process using another pipe cleaner. That will feed five crabs. Set these aside to dry after applying a little amount of white craft glue to the tip of each one, attaching it to a googly eye. Cut a pipe cleaner in half and use it as the crab’s forearm claws. One piece at a time, fold it in half. Coil the pipe cleaner beginning at the curve, keeping the last 3/4 inches free. To make the claw, twist those two exposed sections. Repeat with the second half of the pipe cleaner. Two forearm claws may be made from a single pipe cleaner.
Cut two additional pipe cleaners into six equal pieces for the legs; each pipe cleaner will yield three pieces. As seen in the photographs, bend the pieces into a sort of S form. To insert the forearm claws, use a toothpick to make two holes at the front of the cup. Apply white glue to secure. Cut three holes on every side of the cup with the toothpick, then insert the legs with one pointing forward and the other two directed back. Apply white glue to secure. Make two eye openings at the top of the cup above the front claw arms. Insert the earlier-made eyeballs with a dab of adhesive. Before exhibiting, allow everything to dry.
Whale Craft For Kids
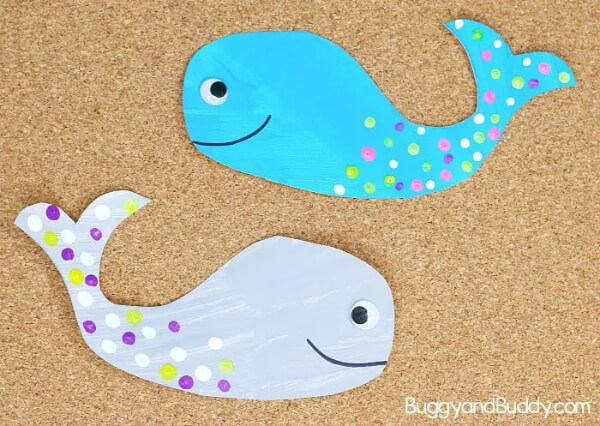
Image Source/Tutorial: Buggy And Buddy
We adore crafting crafts with aquatic creatures. Simple Whale Crafts for Children: Materials: paint in a variety of hues, white art paper or cardboard, a paintbrush, and Swabs of cotton. To hold your paint, use a paper plate or tray. Black Sharpie, scissors, and Googly eyes and a whale template are optional. Instructions for a Kids’ Whale Craft: The printable whale template should be printed out onto art paper or white cardboard. Over each whale, apply a thin coat of sky blue or grey tempera paint. And do not be concerned about crossing the lines. Be sure that you can still see them, though. Encourage children to create their own blue and grey hues. They adore blending colours to make new hues! Apply decorated dots of various colours to your whale using a cotton ball. Give your paint time to cure. Remove the whale. On your whale, create a mouth with a black marker. Put a googly eye on your whale with glue. (You could just use your marker to draw an eye.) And the stunning whale is prepared to be shown.
Easy Beach Crafts for Kids | Fun Summer DIY Art Activities
Enjoy easy beach crafts for kids with creative summer DIY activities inspired by the seaside. These fun craft projects help children develop creativity, fine motor skills, imagination, and environmental awareness. Perfect for preschool, kindergarten, classroom activities, homeschool learning, summer camps, beach themes, and vacation fun.
Educational Benefits of Beach Crafts for Kids
Beach crafts help children learn through creativity, exploration, and hands-on activities. Making sandcastles, seashell art, ocean animal crafts, and beach-themed projects helps kids develop important skills while learning about marine life and nature.
Benefits of Beach Crafts
- Improves fine motor skills through cutting, painting, and gluing.
- Encourages creativity and imagination.
- Strengthens hand-eye coordination and concentration.
- Introduces children to ocean animals and beach environments.
- Supports sensory learning through different textures and materials.
- Builds patience and problem-solving skills.
- Promotes environmental awareness and appreciation for nature.
- Increases confidence through completed craft projects.
FAQs
Q1. What are some easy beach crafts for kids?
Answer: Paper plate jellyfish, seashell crafts, sandcastle collages, and ocean animal crafts are easy and fun beach activities for children.
Q2. How do beach crafts help children learn?
Answer: Beach crafts improve creativity, fine motor skills, hand-eye coordination, and knowledge about marine life and coastal environments.
Q3. What materials are used in beach crafts?
Answer: Common materials include colored paper, seashells, sand, paint, glue, cardboard, popsicle sticks, and recycled craft supplies.
Q4. Are beach crafts suitable for summer activities?
Answer: Yes, beach crafts are perfect for summer learning because they combine creativity, nature exploration, and educational fun.
Beach crafts provide a wonderful way for children to explore the ocean, learn about marine life, and develop creative skills. These fun activities make learning enjoyable while encouraging imagination, artistic expression, and environmental awareness. Explore our website for more educational resources, including paragraphs, worksheets, flashcards, Quizzes, essays, and much more. Follow us on YouTube & Facebook for daily learning content.
You may like these:
Unicorn-Themed Craft Projects for Children
Spark creativity with magical unicorn crafts, providing children with enchanting projects that inspire imagination and artistic exploration in a fun and engaging way.
Penguin Craft Activities for Kids
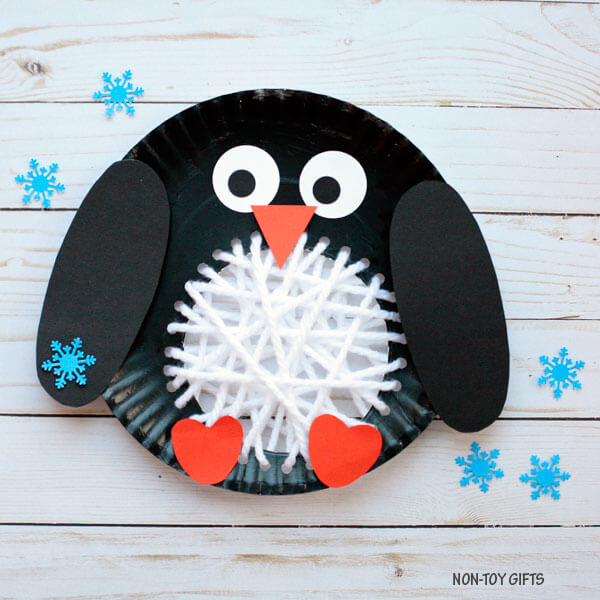
Engage kids in crafting adorable penguin-themed creations, combining fun and learning about these fascinating Arctic animals through creative and hands-on activities.
Dinosaur-Inspired Craft Ideas for Toddlers and Preschoolers
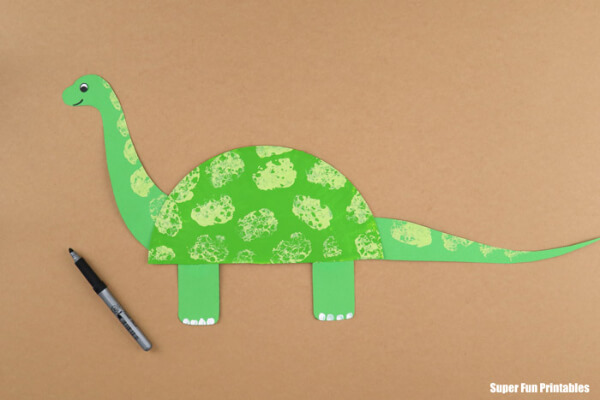
Introduce young children to fun and easy dinosaur crafts, fostering creativity and fine motor skills while sparking their curiosity about prehistoric creatures.
Simple Butterfly Craft Projects for Kids – Create Your Own Fluttering Butterfly
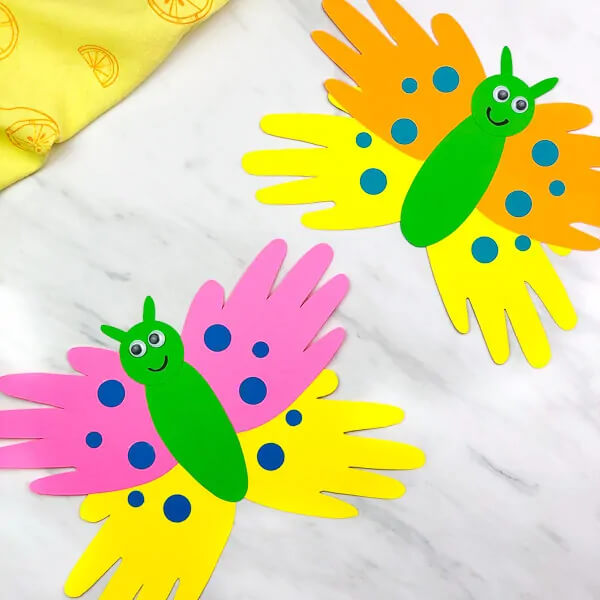
Encourage kids to craft beautiful butterfly designs using simple materials, combining creativity with an appreciation for nature’s delicate and colourful wonders.
Bee-Themed Craft Activities for Kids – Ideal for School Projects
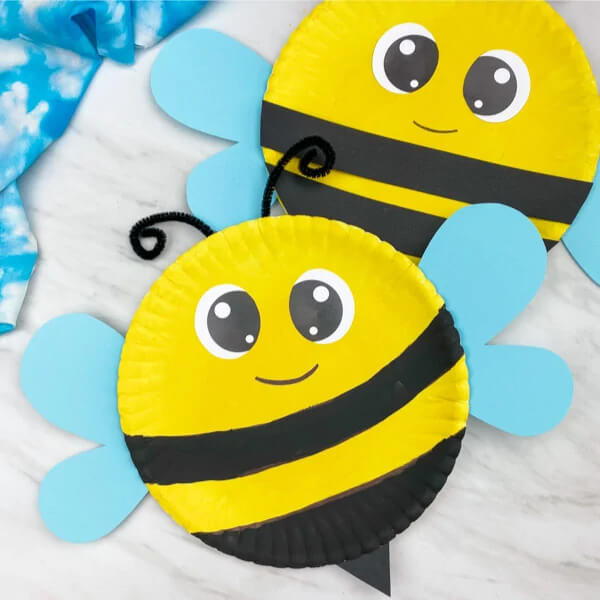
Introduce kids to educational and fun bee crafts, ideal for school projects and teaching about the importance of pollinators in our ecosystem.


