
I am super excited for the spring and all the fun that it brings: playing in the park, jumping in the mud puddles, riding bikes, going on picnics, and whatnot. As we are all aware that a pandemic is going on and just when we recover from one virus, we end up witnessing yet another virus. At this point, we all are missing the pre-covid times and all the natural experiences that our kids are missing out on. So, we thought why not explore a bunch of ideas where our kids can feel close to mother nature and learn some new things as well which will not only help in their development but also build their skills.
Here we have brought to you a bunch of ideas for the spring craft this coming season. They are very easy to make and you will end up having a lot of fun. Also, they require very minimal materials in order to make them and they are very cheap as well as easily available. You can easily find them at your nearest stationery shop or you can also buy them from e-commerce sites such as Amazon, Flipkart, Snapdeal, etc.
Read More: Easy Fun Craft Ideas for Kids
Contents
- Butterfly Crafts For Kids
- Handprint Butterfly
- Toilet Paper Roll Butterfly
- Rainbow Butterfly
- Paper Bag Butterfly Craft
- Tissue Paper Butterfly
- Butterfly Ring
- Butterfly Magnet
- 3d Butterfly Craft
- Butterfly Black Glue Craft
- Paper Plate Butterfly Craft
- Paper Butterfly
- Sew Felt Butterfly Craft
- Filter Butterfly Craft
- Butterfly Sponges
- Snack Butterfly
- Butterfly Mask Craft
- Butterfly Suncatcher
- Origami Butterfly
- Pipecleaner Butterfly
- Caterpillar And Butterfly Craft
- You may like these:
Butterfly Crafts For Kids

Read More: Fun Tissue Paper Crafts For Kids
Handprint Butterfly
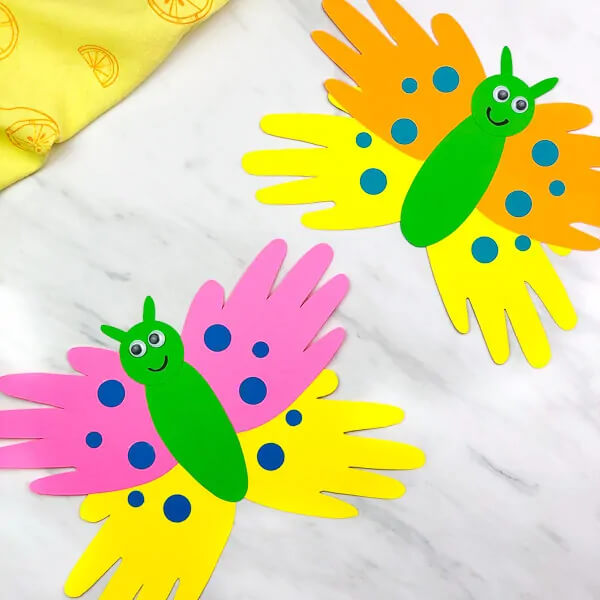
Image Source/Tutorial: simpleeverydaymom
Kids are generally very fond of butterflies and fireflies so we have brought to you an activity where you can create butterflies of your own and that too with a paper ad it’s super cool. Here’s how:
Suitable age group: 9-14 years
Supplies you need:
- Colored cardstock
- Googly eyes
- Black marker
- Scissors
- Glue stick
- Pencil
Procedure:
- Start by tracing your child’s hand on two different colors of paper.
- With the help of the scissors cut out a circle from green cardstock.
- Now, cut out an oval shape for the butterfly’s body.
- Next, cut out a smaller circle from the green cardstock for the butterfly’s antennae.
- Adjust the handprints with the thumb facing up and fingers to the side.
- Now, glue the two green colored ovals on the middle of the handprints.
- Paste the antennae on the back of the head of the butterfly.
- Glue the googly eyes on the butterfly and with the help of markers, draw the smile and features of the butterfly.
- Now, paste the smaller circles on the wings of the butterfly.
AND THAT’S IT, IT’S READY!!!
Toilet Paper Roll Butterfly
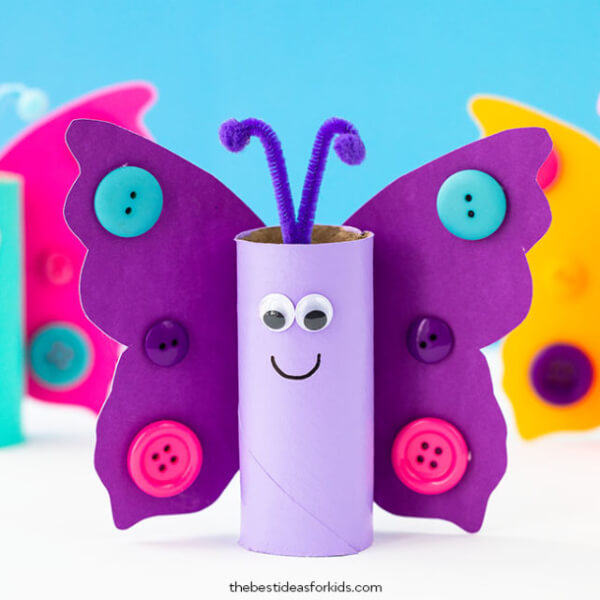
Image Source/Tutorial: thebestideasforkids
Butterflies and the season of spring blossom everything around them and that’s why we have an amazing activity for you where you can create butterflies by simply using toilet rolls and it’s very interesting. Take a sneak-peal.
Suitable age group: 9-14 years
Supplies you need:
- Toilet paper roll
- Small googly eyes
- Colored buttons
- Cardstock
- Acrylic paint
- Pipe cleaner
- Small pom poms
- Black sharpie
- Butterfly wing template
Procedure:
- Start by downloading the butterfly wings from the internet and printing it out.
- Now, paint the toilet roll of a color of your choice and leave it to dry.
- Next, cut the wings out and paste colored buttons on the wing.
- As for the antennae, fold the pipe cleaner into a v shape and twist it ends to secure it.
- Paste the antennae at the top of the toilet roll.
- Glue googly eyes on the toilet roll and by using a black marker draw the smile of the butterfly.
- Now, glue the wings of the butterfly at the back of the butterfly.
TADDDAA!!! YOU’RE DONE!!
Rainbow Butterfly
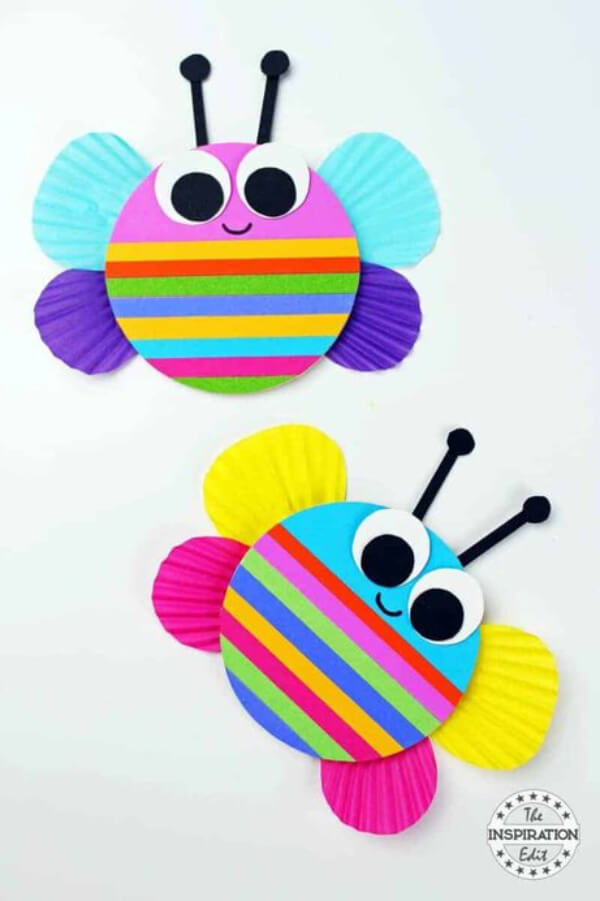
Image Source/Tutorial: theinspirationedit
We all love butterflies, don’t we? So let’s come together and help our kids to build a beautiful butterfly craft that will not only help us to decorate the walls but can also act as refrigerator magnets.
Suitable age group: 9-14 years
Supplies you need:
- Cardstock
- Glue stick
- Scissors
- Black marker
- Wooden circles
- Cupcake liners
- Paper cutter
Procedure:
- Start by pasting circles onto the colored cardstock and cutting the excess paper off.
- Now, cut the thin strips from the colored cardstock and paste it onto the circles leaving at least an inch from the top.
- Chop off the excess part.
- Glue googly eyes on them.
- Cut out antennae from black cardstock and paste it at the back of the head.
- Now, fold a cupcake liner in half and cut it out into a large wing.
- Repeat the above step but this time uses different colors as well as cut smaller wings.
- With the help of the black marker, draw the smiley of the butterfly.
AND TADDDDAA!!! YOU’RE DONE!!!
Paper Bag Butterfly Craft
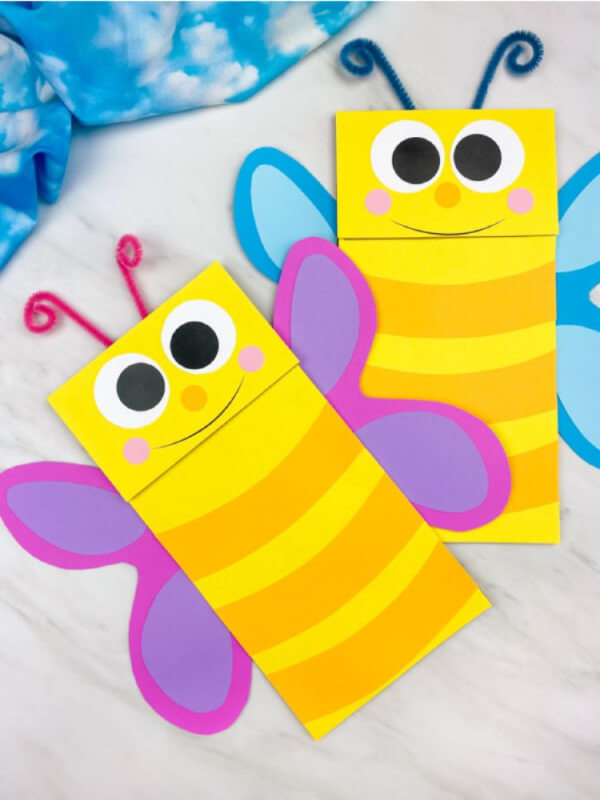
Image Source/Tutorial: simpleeverydaymom
We often have brown paper bags at our home which we tend to throw away as they are of no use to us but this time we have brought to you an activity that will utilize the bags as well as keep our kids engaged too.
Suitable age group: 9-14 years
Supplies you need:
- Brown paper bag
- Colored cardstock
- Colorful pipe cleaners
- Scissors
- Glue stick
- Tape
- .25inch punch circle
- Markers
- Butterfly craft template
Procedure:
- Start by downloading the template and then print it out on a paper.
- Glue googly eyes on them.
- Now, paste the .25inch yellow circle just below the googly eyes.
- Next, place the pinky cheeks on either side of the face.
- To make the butterfly’s body striped, paste the light orange strips onto them.
- Now, paste the head of the butterfly on the top of the brown paper bag and place the striped body on the bottom part of the bag.
- Cut the wings from purple cardstock and paste it on the back of the paper bag.
- Fold a pipe cleaner into a v shape and twist the ends of the same.
AND THAT’S IT YOU’RE DONE!!
Tissue Paper Butterfly
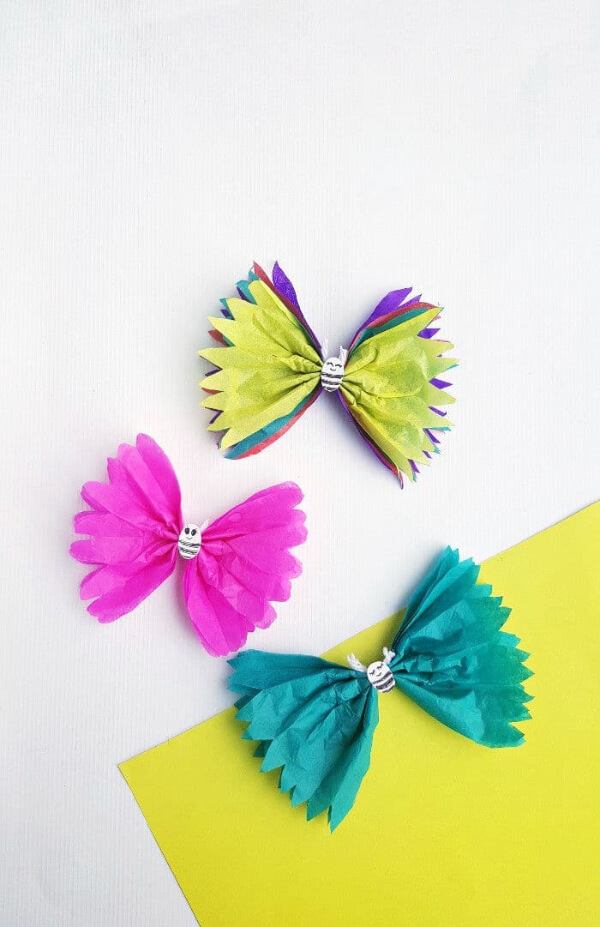
Image Source/Tutorial: gluesticksgumdrops
We have exclusively brought to you a craft that will not only help your kids engage in some physical activities but also act as an ingredient to decorate your home this festive season. Here’s how:
Suitable age group: 9-14 years
Supplies you need
- Colored craft tissue paper
- Scissors
- Glue
- Yarn or string
- Black marker or pen
Procedure:
- Start by taking 3-4 tissue papers at once and hold the sheet together so that the edges are matched.
- Next, start creating accordion folds with all the 4 tissue papers at once.
- Take a small piece of yarn and tie it from the middle to secure it.
- Now, hold the ends of the accordion pattern and create pointy endings on each fold.
- Next, cut a small piece of oval and with the help of markers, draw features on them.
AND THAT’S IT YOU’RE DONE!!!
Read More: Easy Pasta Crafts for Kids to Make at Home
Butterfly Ring
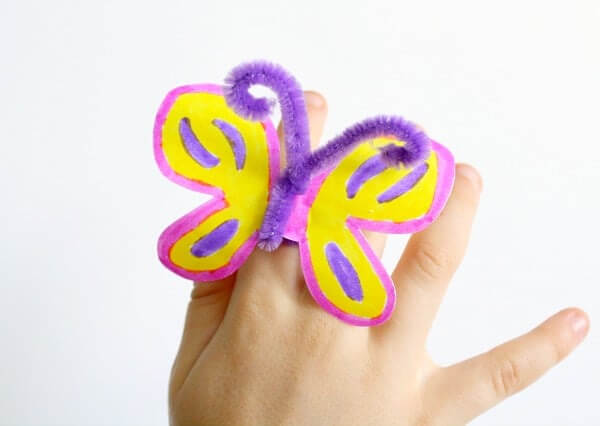
Image Source/Tutorial: fantasticfunandlearning
We all want to gift someone something that they will really love but we all know nothing can match the essence of a personal touch. We have this activity where you along with your child can create a beautiful butterfly ring for the people you love and it will be super amazing.
Suitable age group: 9-14 years
Supplies you need:
- Colored cardstocks
- Scissors
- Glue
- Pipe cleaners
Procedure
- Start by drawing wings of butterflies on white cardstock and then cut it out.
- Next, again draw the wings of the butterfly on a purple cardstock but this time uses a smaller size and cut it out.
- Now, glue the purple cardstock on the white one.
- Take a pipe cleaner and fold it into a v shape and twist its ends to secure them.
- Add another pipe cleaners of smaller size to the end of the v shaped pipe cleaner and twist it to secure them.
- Now, paste the pipe cleaner on the middle part of the wings and that’s it you’re done.
AND THAT’S IT, YOU’RE DONE!!
Butterfly Magnet
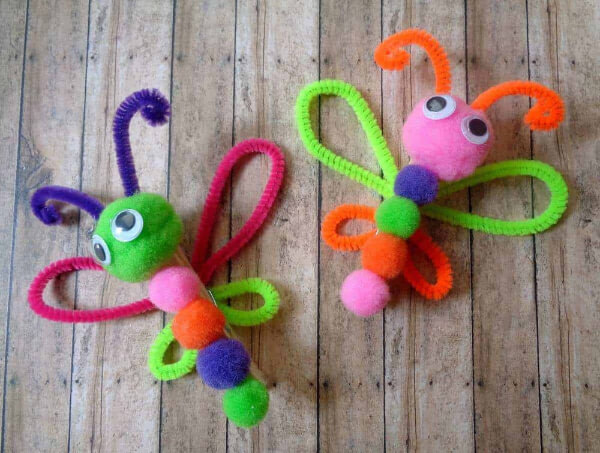
Image Source/Tutorial: theinspirationedit
Want to create a cool clothe clippings? well, we have got you covered, here is an activity in which you can create butterfly clothes clips and that too with minimal materials along with your child. This activity will strengthen your child’s hand-eye coordination.
Suitable age group: 9-14 years
Supplies you need:
- Clothespins
- Googly eyes
- Pipe cleaners
- Pom poms
- Magnets
- Hot glue
- Scissors
Procedure:
- Start by selecting a piece of 1 to 1.5inch pom pom and pipe cleaners.
- Lay down the clothes pin in an upward position.
- Next, spread glue on the clothes pin and start pasting the pom poms on the clip.
- Now, stick googly eyes on the head of the pom pom.
- Take a pipe cleaner and bend it in half, then cut the pipe cleaners at the bend.
- Create a loop from the pipe cleaners and glue them together.
- Repeat the same steps with another set of pipe cleaners but in a smaller variation.
- Paste them at the back of the clip.
- For the antennae, fold the pipe cleaner into a v shape and twist its ends.
- Paste the antennae at the back of the butterfly.
AND THAT’S IT, YOU’RE DONE!!!
3d Butterfly Craft
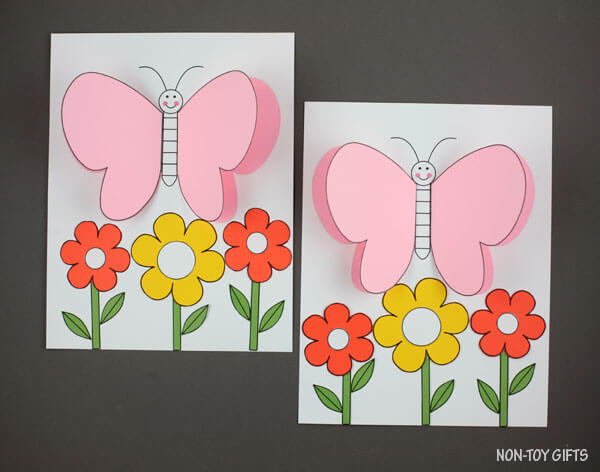
Image Source/Tutorial: nontoygifts
After even hearing 3D, any kid will jump and after realizing they get to create their own 3D stuff, they will surely jump on their feet. So, below we have listed an activity where you can create your own 3D butterfly and also hang them around in your home.
Suitable age group: 9-14 years
Supplies you need:
- 3D butterfly template
- White cardstock paper
- Construction paper: pink, yellow, orange, white and green
- Scissors
- Glue
- Crayons and small pom poms
Procedure:
- Start by downloading the butterfly template and printing it out on a paper.
- Next, trace the template on a sheet of paper.
- Now, cut the two wings and fold them into half.
- Glue the two wings beside the butterfly body.
- Cut three green stems from the green cardstock and paste them at the bottom of the sheet.
- Now, cut two flowers from the orange cardstock and glue them on the left and right stems.
- Next, cut one big flower from yellow cardstock and paste it on the center green stem.
- Finish it off by adding leaves on both sides of the stem and a small circle at the center of each flower.
AND YOU’RE DONE!!!
Butterfly Black Glue Craft
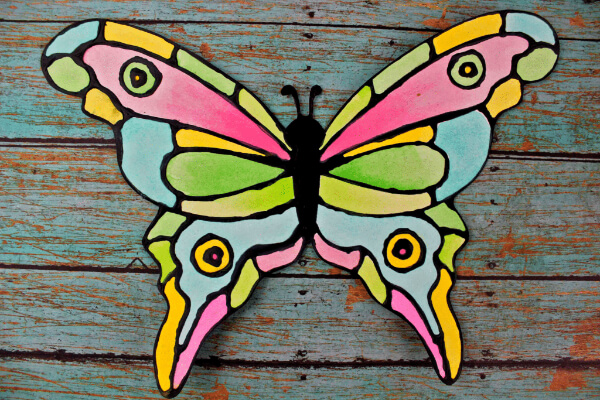
Image Source/Tutorial: viewsfromastepstool
Do your kids love butterflies? Well for a fact, everyone does! They’re so adorable and colorful. Since the season of spring can take a while we have covered an activity for you in which you can create your own colorful butterflies. Here’s how:
Suitable age group: 9-14 years
Supplies you need:
- Cardstock
- Scissors
- White Glue
- Paint Brush
- Black Paint
- Watercolors
- Butterfly Template
Procedure:
- Start by taking an empty bottle of glue and pour some black paint in it.
- Next, put the lid back on and shake them well together.
- Now, download the butterfly template from the internet and print it out on a paper.
- Then, trace the template of the butterfly with the black glue and leave it to dry.
- Maybe leave it to dry for overnight.
- Now, paint the butterflies with paint color and cut them out.
- Leave it to dry for some time.
AND THAT’S IT, IT’S DONE!!!
Paper Plate Butterfly Craft
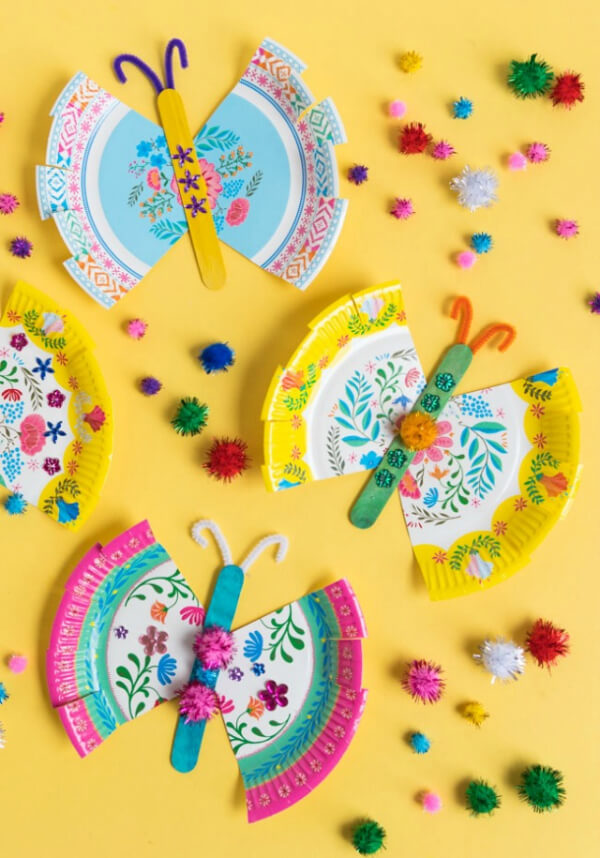
Image Source/Tutorial: designimprovised
Crafting with kids is such a fun way to bond and connect with them! We have brought to you an activity which will not only improve your child’s hand-eye coordination but also improve their willingness to be patient for the better outcome. Take a sneak peak into the activity stated below:
Suitable age group: 9-14 years
Supplies you need:
- Pattern paper plate
- Pom poms
- Pipe cleaners
- Colorful ice cream sticks
- Scissors
- Glue
Procedure:
- Start by cutting the pattern paper plate in the shape of the wings of the butterfly.
- Now, take an ice cream stick and add pom poms to it at the center.
- Next, take a small section of pipe cleaner and fold it into a v shape and twist its ends to secure them.
- Paste the pipe cleaners at the upper part of the back of the stick.
- Finish it off by pasting the two wings made of a pattern paper plate at the back of the stick.
AND THAT’S IT YOU’RE DONE!!!
Read More: Easy recycling crafts & game activities for kids
Paper Butterfly
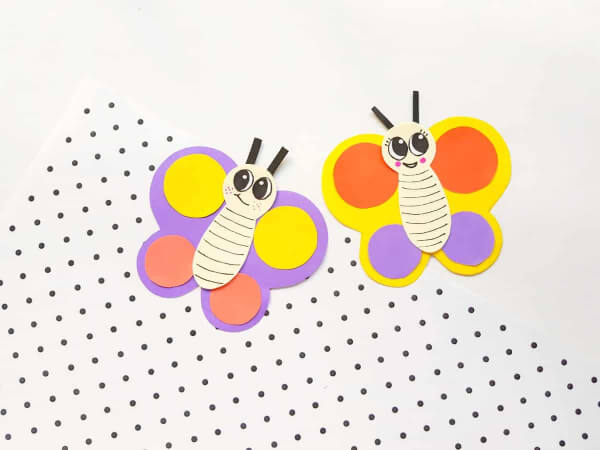
Image Source/Tutorial: messforless
Spring often tends to be everyone’s favorite season and we all know it’s far away for now but we can end up making some spring crafts at home this holiday season, right? Here is a spring craft including beautiful butterflies.
Suitable age group: 9-14 years
Supplies you need:
- Colored craft paper
- Pencil
- Scissors
- Glue
- Black sharpie
- Butterfly template
Procedure:
- Start by downloading the template from the internet and printing it out.
- Use the template to trace down the parts of the butterfly and cut out the parts.
- Take two big circles and paste them on the top of the wings.
- Glue small circles at the bottom part of the wings.
- Next, paste the eyes and antennae cutouts on the top part of the butterfly body.
- With the help of a black marker, draw some smileys and stripes on your butterfly to give it its features.
- Finish it off by pasting the butterfly body into the middle of the butterfly wings.
TADDDAAA!!!! YOU’RE DONE!!!!
Sew Felt Butterfly Craft
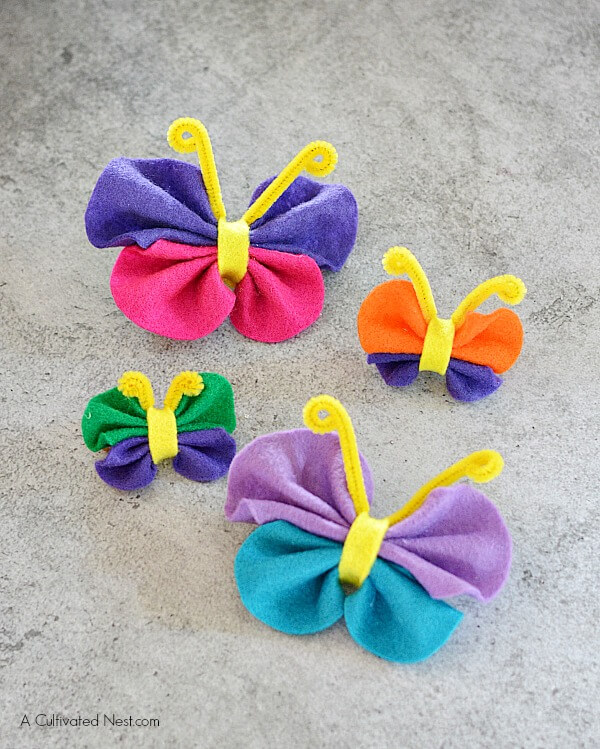
Image Source/Tutorial: acultivatednest
Today, we have brought to you a super quick and easy butterfly craft that is not only fun to perform but also works on our child’s motor skills. Here’s how:
Suitable age group: 9-14 years
Supplies you need:
- Felt
- Hot Glue
- Pipe cleaners
- Circle Templates
- Sharp Scissors
- Pencil
Procedure:
- Start by downloading the circle template and printing it out.
- Next, trace the circle on the felt and cut it out.
- Now, fold the circle from the center and reshape its ends for the wings.
- Once, you have created a wing follow the above steps and create one more wing but with a different color.
- Glue both the wings together with the help of hot glue.
- Next, wrap the center of the body with a small yellow circle.
- As for the antennae, take a pipe cleaner, create a v shape and fold its ends.
- Finish it off by pasting the antennae at the top of the butterfly.
TADDAAA!!! IT’S DONE.
Filter Butterfly Craft
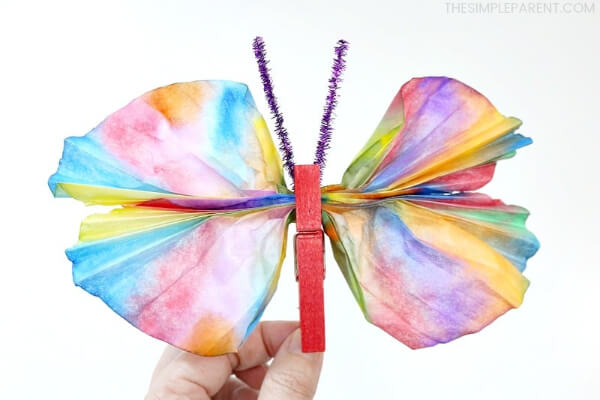
Image Source/Tutorial: thesimpleparent
The activity we have for you today is going to be so useful!!! They can be quickly used as a refrigerator magnet, a decorative piece of art for any scrapbook or photo frame, they will just help you in adding radiance. Below are the steps to perform this activity.
Suitable age group: 9-14 years
Supplies you need:
- Coffee filters
- Spray bottle with water
- Clothespin
- Pipe cleaners
- Washable Paint Brush Pens
- Wax Paper
- Markers
Procedure:
- Start by placing two coffee filters on top of each other on a flat surface.
- Next, use your markers to decorate the top of the filter, the color will automatically seep through the second one.
- Now, take the spray bottle and spray some water on the coffee filters.
- Rip the two filters apart and lay them differently.
- Leave them to dry for a while.
- Once the filters are dry, fold them in an accordion pattern and pinch them from the middle.
- Next, paint your clothespin and let it dry.
- Meanwhile, take a pipe cleaner and fold it into a v shape.
- Once, the pin is dry, paste the antennae at the top of the clothespin.
- Pinch the clothespin at the center of the wings.
AND THAT’S IT, IT’S READY!!!
Butterfly Sponges
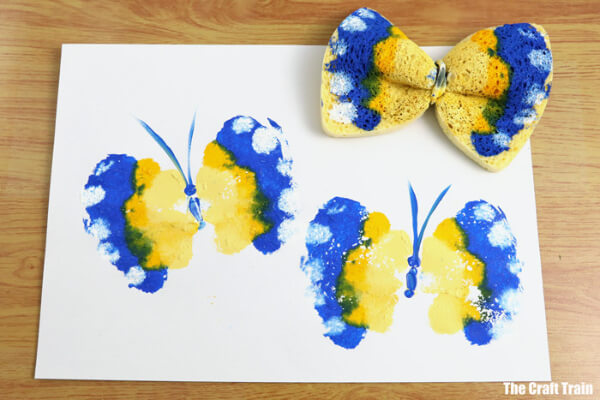
Image Source/Tutorial: thecrafttrain
Kids love sponges and the activities associated with them! The great thing about using sponges for this fun activity is that you have them already in your home and let’s be honest, it’s cheap!!! They can also be used for tons of different activities. This activity will help to improve your child’s imagination level, they will get to see that there is so much more than you can do with one small thing.
Suitable age group: 9-14 years
Supplies you need:
- Paint
- Sponges
- Hair elastics – 1 per butterfly
- Paper
Procedure:
- Scrunch sponge and tie it in the center with a hair elastic.
- Throw colors on one side of the sponge and then squish it so the colors automatically spread to the opposite part.
- Now, take the sponge and thump it onto the paper.
- After that, with the help of the paintbrush, draw little features of the butterfly.
AND THAT’S IT YOU’RE DONE!!!
Snack Butterfly
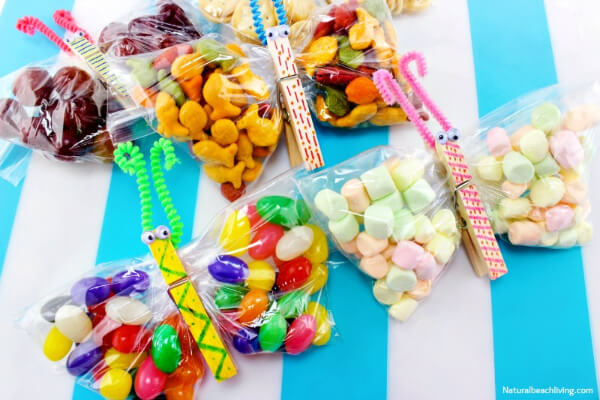
Image Source/Tutorial: naturalbeachliving
Want to create a beautiful and exciting snack with your children and also engage them in some crafts? Well, we have brought an activity exclusively for you where your child will also end up helping you in preparing the snacks.
Suitable age group- 9-14 years
Supplies you need
- You can use anything for the snacks for the kids, in my opinion: raisins, nuts, granola, etc.
- Markers
- Clothespins
- Glue
Procedure
- Start by filling each zip lock with the snacks for the kids and get all the air out of the bag as it is being zip closed.
- Decorate the clothes pin by your choice with the help of colors and markers.
- Push down the snacks at the bottom of each baggie so there is an empty space left to occupy the clip on.
- Next, by using the clothes pin clip it on the empty side so that now the snack has two equal sides.
- Take a pipe cleaner and bend it into u shape and twist its end and clip this onto the top of the clothes pin as antennae.
- Finish by pasting googly eyes on the clothes pin on the top.
AND TADDAA!!! IT’S DONE!!
Butterfly Mask Craft
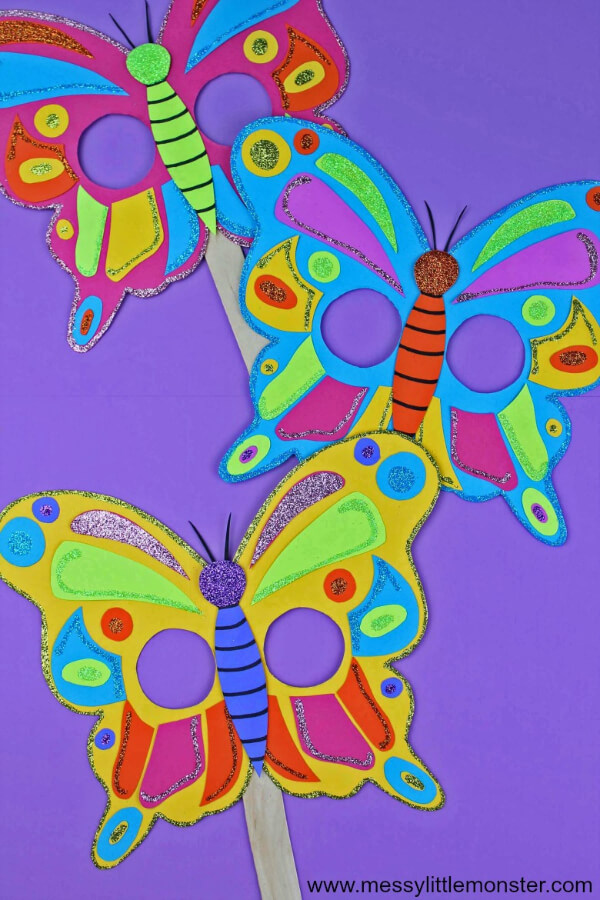
Image Source/Tutorial: messylittlemonster
This activity that we have brought for you is perfect for toddlers and grown-ups as well. It’s super easy and fun making this activity. It will also help you spend some fun time with your kids and ends up developing their motor skills as well.
Suitable age group:9-14 years
Supplies you need:
- Printable butterfly mask template
- Cardstock
- Scissors
- Glue
- Pencil
- Popsicle Sticks
- Glitter
Procedure:
- Start by downloading the butterfly mask template and printing it out on paper.
- Next, trace the butterfly template onto a paper and then cut it out and eye holes from the template.
- Now, we will begin by tracing the body parts of the butterfly and cutting it out.
- We will now start tracing the other body parts of the butterfly and decorate it with glitters.
- Next, glue it all on the main cutting of the butterfly.
- Paste the body of the butterfly.
- Cut small pieces of antennae and glue it at the top.
- Finish it off by pasting the popsicle stick at the back of the mask.
AND THAT’S IT, IT’S ALL DONE!!!
Read More: Educational Craft Activities for Kids
Butterfly Suncatcher
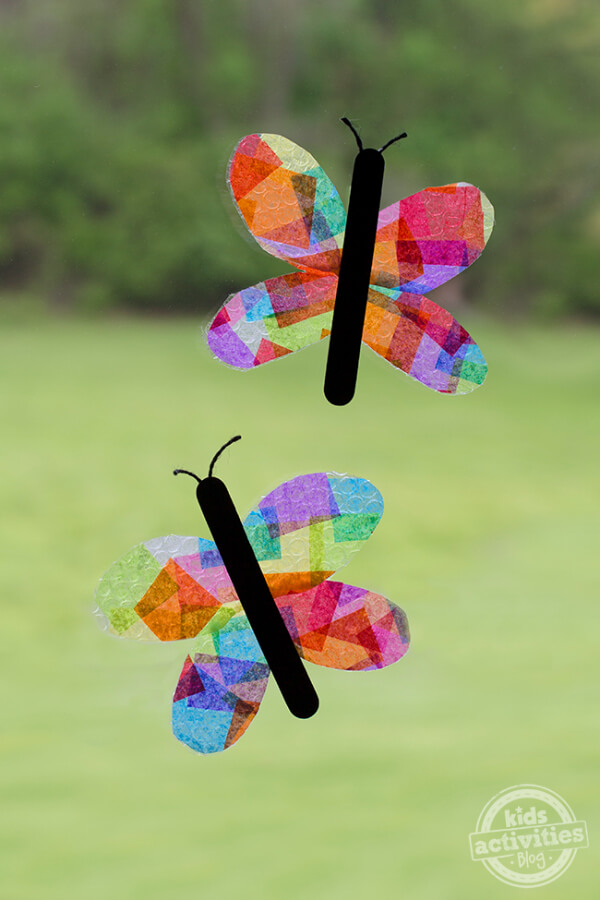
Image Source/Tutorial: kidsactivitiesblog
This activity that we have brought to you is one of the most exciting and also a fun decor piece to hang around in your home! It will naturally brighten up your house and will also encourage your kids to perform more and more activities and boost their confidence.
Suitable age group: 9-14 years
Supplies you need:
- Black twine
- Black paint
- Bubble wrap
- Wide craft sticks
- Tissue paper of various colors, cut into 1-inch squares
- Mod Podge
- Paint Brush
- Hot Glue and hot glue gun
Procedure:
- Start by decorating the tissue paper on bubble wrap with a mod podge and brush.
- Leave it to dry.
- Next, paint the butterfly stick with black paint.
- Once the butterfly wing is dry cut it out in the shape of a butterfly.
- Paste the butterfly wings at the back of the butterfly stick.
- Shape a black yarn into v and glue it at the top of the stick as antennae.
AND THAT’S IT, YOUR SUNCATCHER IS READY!!!
Origami Butterfly
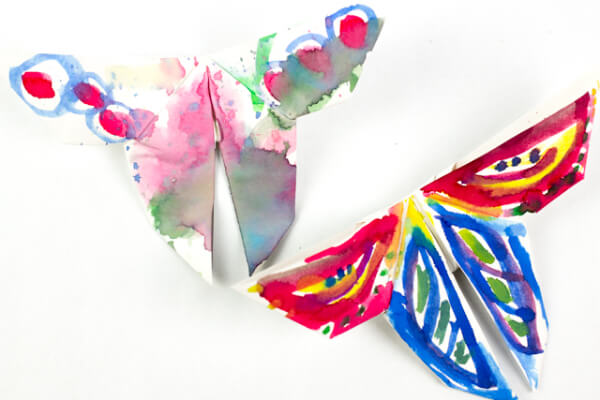
Image Source/Tutorial: pinkstripeysocks
Origami crafts are one of the best things that can happen to any child because they are so simple yet so intriguing. It gives us a vision of seeing everyday activities from a different lens. We can create so many things with only a mere sheet of paper which is so inspiring. One such activity that we came across is listed here:
Suitable age group: 9-14 years
Supplies you need:
- White sheet
- Glue
- Paint colors
Procedure:
- Start by folding a sheet diagonally from both sides so that you have an ‘x’.
- Fold the paper along the diagonals and you will get a triangle.
- Next, turn the triangle upside down and fold down the flaps on both sides.
- Now, flip the paper over and push the bottom area.
- Push the paper down on each side as well.
- Fold-down the popping triangle inside at the top and you’re done.
- Now comes painting, let your child be creative with the paint colors and decorate it as per your choice.
- Leave it to dry for some time.
AND THAT’S IT YOU’RE DONE!!!
Pipecleaner Butterfly
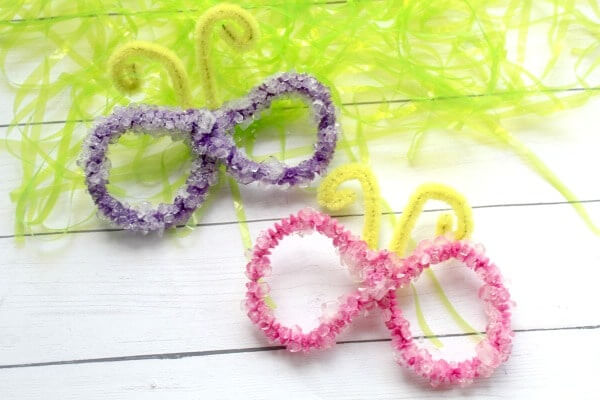
Image Source/Tutorial: fantasticfunandlearning
We all are aware that nothing beats getting out with the kids and exploring nature but in this period of coronavirus we all can’t really risk getting out but why to take away the pleasure of nature from the kids. So, here we have brought an activity for you where you can make these simple beautiful butterflies and that too with pipe cleaners. Here’s how:
Suitable age group: 9-14 years
Supplies you need:
- Pipe cleaners
- Scissors
- Pencil or chopstick
- Clothespins (optional)
- Borax powder
- Water
- Glass jar
- Hot glue
Procedure:
- Start by taking the pipe cleaners and creating the wings of the butterfly. To do this, we have created a shape of 8 with the pipe cleaner and then secure its center by twisting.
- Now, keep the wings aside and take a pan and start boiling water in it.
- Add half a cup of borax powder for every two cups of water you prepare then take it off the heat.
- Take another piece of pipe cleaner and tie it on the top of the wings and the other end to a pencil.
- Next, drop the wings into a glass jar and fill the jar with water and borax mixture. Let the pencil holding the wings rest across the jar.
- Leave the pencil to rest in the jar for 24 hours.
- After 24 hours, you will see crystals are starting to form on the pipe cleaner.
- After 2-3 days, you will see the design is perfectly formed on the pipe cleaners.
- Remove the wings from the glass jar and cut the pipe cleaner attached to the pencil.
- Set it to dry for some time.
- Once it’s all dried up cut an additional pipe cleaner for the antennae and fold it in the shape of v and twists it’s ends.
AND THAT’S IT, IT’S DONE!!!
Caterpillar And Butterfly Craft
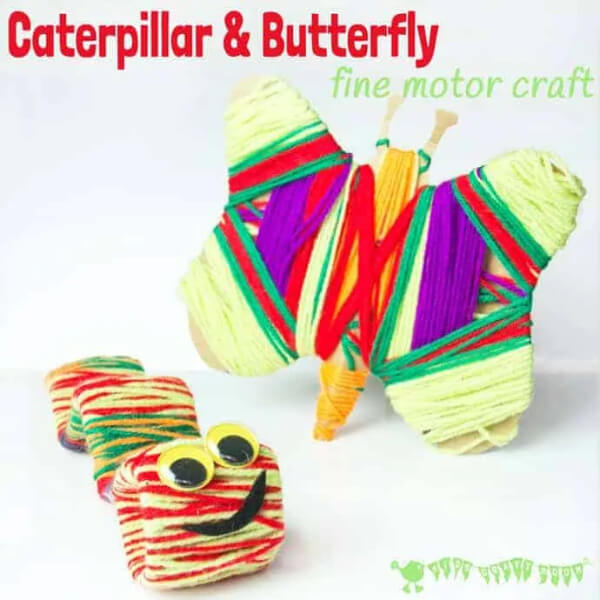
Image Source/Tutorial: kidscraftroom
Today’s activity that we have brought for you is a great activity for developing the motor skills of a child. While playing with the yarns and carefully draping them is a great exercise for hand-eye coordination and building the concentration of the same. Here’s how you can perform this activity with your child:
Suitable age group: 9-14 years
Supplies you need:
- Strong Cardboard
- Scissors
- Sticky Tape
- Yarn
- Googly eyes
- Glue
- Felt Scraps
Procedure:
- Start by drawing the shape of a butterfly and caterpillar on a strong piece of cardboard.
- Cut out the outline of the butterfly and caterpillar from the strong piece of cardboard.
- Now, we can move ahead and start wrapping the yarn across the cardboard cuttings.
- Secure one end of the yarn with tape and then start wrapping it round and round across the cardboard cuttings.
- We can also change the colors by wrapping different colored yarns.
- Finish it off by securing the end of the yarn by tucking it in somewhere where it is not clearly visible.
- Sum it up by adding googly eyes and a wide smile on the butterfly and caterpillar.
AND YOUR YARN-MADE CATERPILLAR AND BUTTERFLY ARE READY!!!
I hope if you were searching for what to do with your kids this spring season then you have found some good resources on our page and your search has now come to rest. Feel free to visit us anytime for more content. Do let us know in the comment section which was your favorite craft and what you enjoyed the most and do visit our sites for future references.
You may like these:
Elementary DIY Paper Craft Guides to Foster Creativity in Children

Encourage artistic growth with simple paper craft tutorials, designed to nurture creativity and fine motor skills in children through hands-on projects.
DIY: Step-by-Step Paper Craft Instructions for Kids
Provide kids with clear, step-by-step paper craft guides, helping them develop crafting skills and confidence while creating fun and imaginative projects.
Straightforward Bookmark Craft Projects for Children
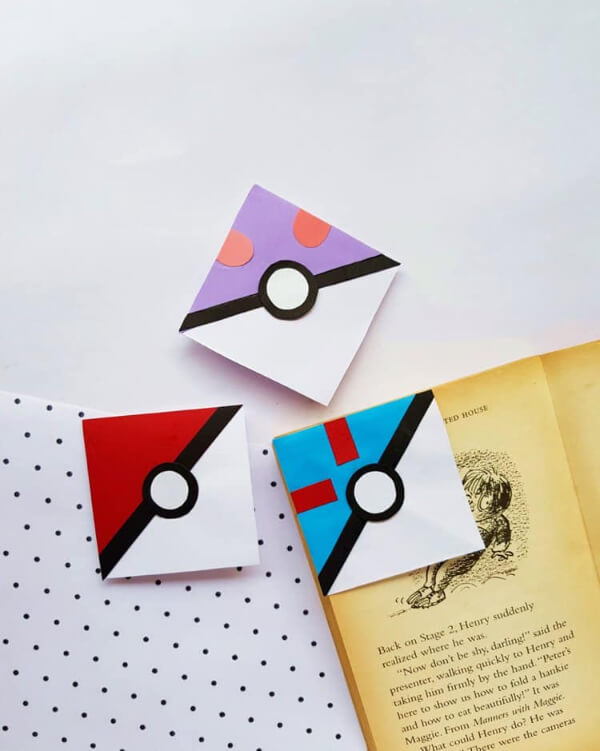
Inspire kids to create personalized bookmarks with easy craft ideas, combining creativity and practicality to encourage a love for reading and artistic expression.
Simple Origami Craft Concepts for Kids
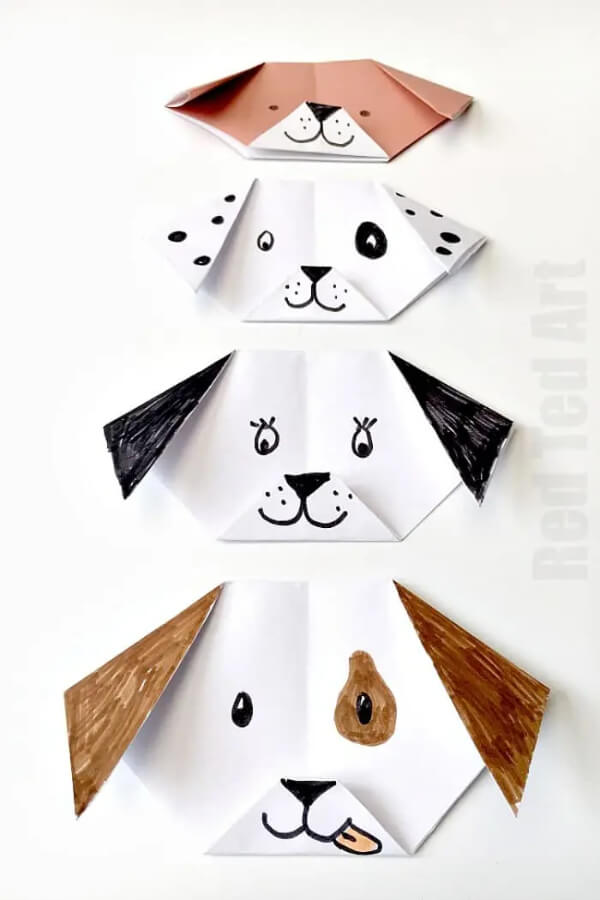
Introduce children to the art of origami with easy and engaging paper-folding projects that enhance creativity and fine motor skills.
DIY: Recycled Craft Ideas for Children
Encourage eco-friendly creativity with DIY crafts using recycled materials, teaching children sustainability while fostering imagination and resourcefulness.


