Easter bunnies become familiar in the 19th century. They are known to be the symbol of new life as they give birth to kittens.
As we know easter season is coming soon, so we need new ideas to do easter creativity. We had tried Easter baskets and eggs. Now, it’s time to try for bunny craft on your easter occasion.
You just have to give your little attention to creativity and innovation. You will find that you are the master of crafting! For this, you just have to follow some basic and needs guidelines. Here, we are giving some of these kinds of ideas that enable you to do your crafting creativity with perfection.
So, let’s start!
Contents
- Easter Bunny Crafts for Kids
- Rabbit Easter Cards
- Doily Bunny Craft
- Popsicle Stick Easter Crafts: Bunny, Sheep, and Chick
- Easter Rabbit Craft
- Simple Bunny Card
- Carrot Easter Card
- Easter Bunny
- Felt Fabric Bunny Craft
- Pom Pom Bunnies Craft
- Paper Plate Bunny
- Cardboard Tube Bunny Family
- Paper Plate Easter Bunny Mask
- Simple Bunny Craft
- Paper Plate Bunny Face Craft
- Cup Easter Bunny Craft
- Handprint Bunny Craft
- Sock Bunny Craft Procedure
- You may like these:
Easter Bunny Crafts for Kids
Rabbit Easter Cards
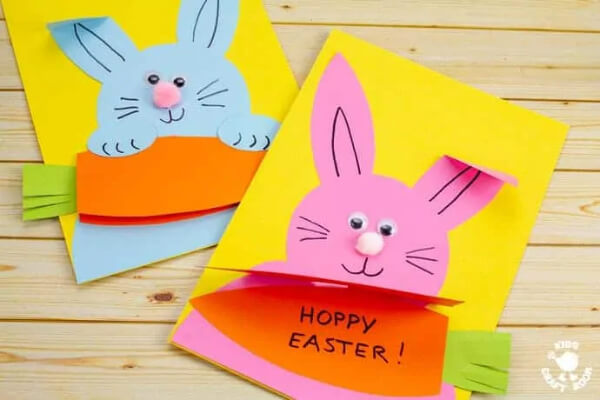
Image Source/Tutorial: Kids Craft Room
This bunny card is so adorable! In this card, a rabbit is peeping out from behind their carrots which makes the card more beautiful. You can give this card to your friend by writing some messages on it. Here is the way of making it!
Materials required:
- Bunny card
- Markers
- Glue
- Scissor
- Colored papers
- Small poms
Procedure:
- Download the prints of rabbit and carrots or you can make them on your own by drawing the shape of the rabbit.
- Cut the pieces of downloaded print and you will get the shape of a rabbit and carrot.
- Paste it on the colored paper. Also, paste the ears. You can half fold the ears to give an additional look.
- Take the carrot print and fold it in half to make a card. Paste the one portion on the lower side of the rabbit just like it is holding it.
- Make two paws of rabbit by using the same colored sheet of rabbit in an oval shape.
- Use your marker to draw the wickers, mouth, ears, and fingers of the rabbit.
- Write a message on a carrot card and give it to your friends!
Doily Bunny Craft
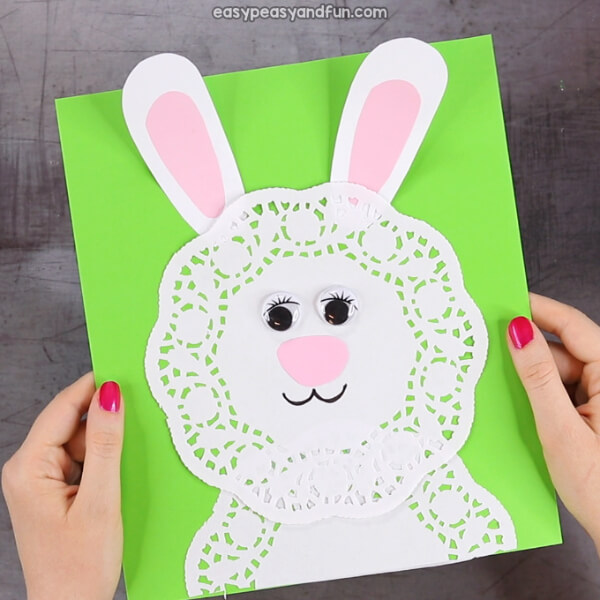
Image Source/Tutorial: Easy Peasy and Fun
For easter occasions, it is the best craft to try. It is easy and simple to make. Your kids will enjoy making this card. So let’s try them by following the given procedure.
Materials required:
- Two white doilies
- Colored papers
- Toy eyes
- Glue scissor
Procedure:
- Half-fold the one doily and cut it from the fold.
- Take a colored paper and paste this half-doily at the bottom.
- Then take another full doily and paste it on top of the first one.
- Cut out the shapes of ears by using white and pink paper. Also, cut the shape of the nose from pink paper.
- Paste the white ears first and then the pink ones inside it. Also, paste the nose.
- Now it’s the turn to make the eyes. For this, you can use toy eyes or you can draw on your own. Here the toy eyes are used.
- Draw the mouth.
Your beautiful easter doily bunny is ready!
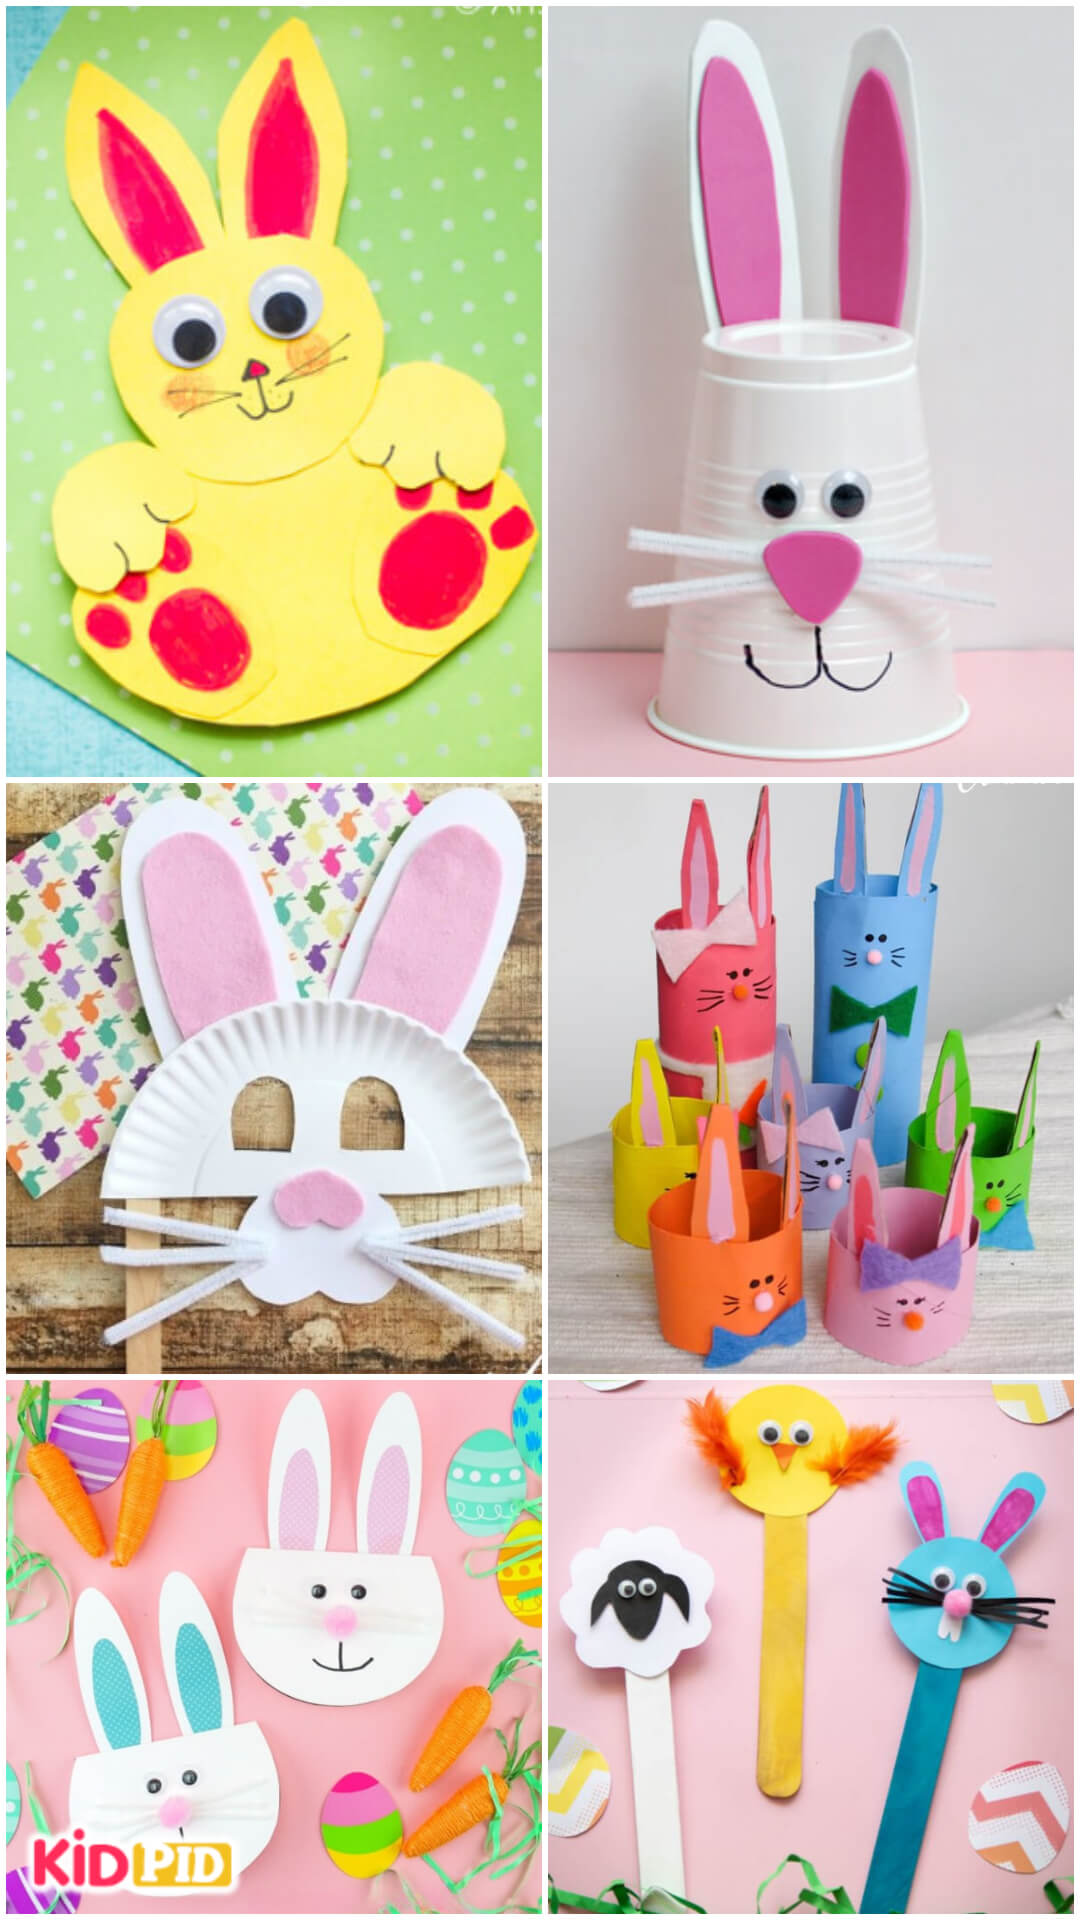
Popsicle Stick Easter Crafts: Bunny, Sheep, and Chick
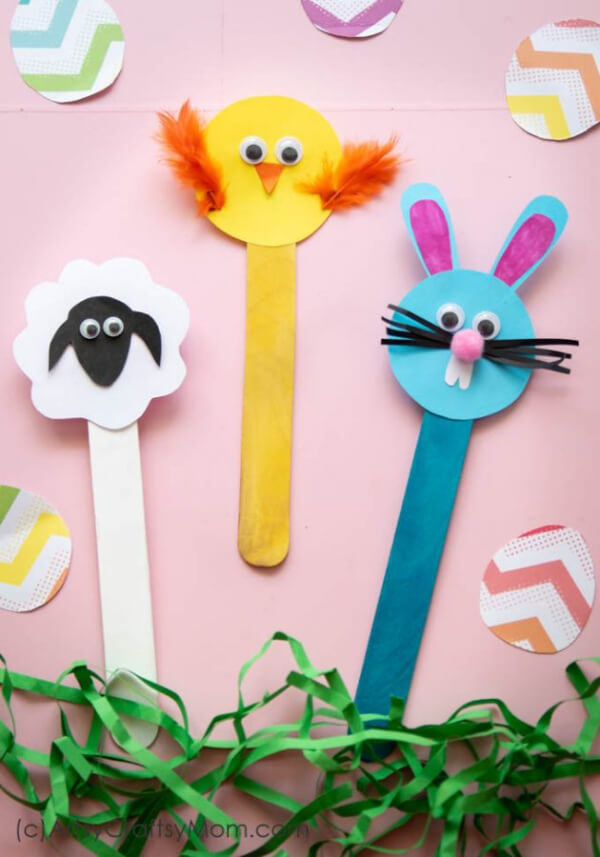
Image Source/Tutorial: Artsy Craftsy Mom
This craft is an amazing one. As the name suggests use your popsicle sticks for this craft. Guide your kid by using the given ways.
Materials required:
- Popsicle stick
- Colored papers
- Black quilling strips
- Pink pom pom
- Glue
- Scissor
- Googly eyes
- Marker
Procedure:
For bunny-
- Take colored paper. I used blue here and cut out a circle for the face and two ears according to it. Also, cut out 6 thin strips for wickers from black paper.
- Paste the ears on the back top of the circle. Take the eyes and pom for the nose and paste them accordingly.
- Now it’s the turn to paste the black strips for wickers. Paste them in the middle.
- Draw teeth by using a white chalk marker.
- Attach the bunny head to the popsicle stick.
For chick-
- Take a colored paper as I used yellow here. Cut a circle out of it to make the face.
- Cut out a triangle using an Orange sheet for the nose. Paste it in the middle. Also, paste the eyes.
- Now paste the crafty feathers on both sides.
- Paste a small feather on the back top of the chick.
- Take the stick and paste the chick on it.
For sheep-
- Take black and white paper and cut out the shape of a cloud from white paper, and the head of the sheep from black paper.
- Stick the head in the middle of the cloud.
- Paste this on the popsicle stick.
Your popsicle stick crafts are ready.
Easter Rabbit Craft
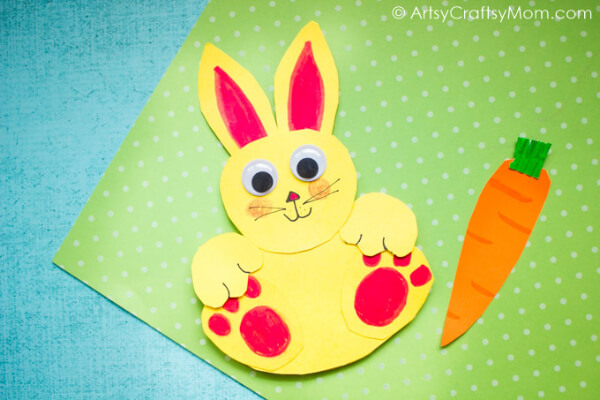
Image Source/Tutorial: Artsy Craftsy Mom
Making a rabbit is simple. You can make it by using your colored papers simply. Make it and give it to your kids for fun!
Materials required:
- Colored papers
- Glue
- Scissor
- Sketch pens
- Googly eyes
Procedure:
- Take the colored paper and cut a circle for the face. Also, cut out the ears and nose(triangle-shaped).
- Cut out different body parts. Cut two oval-shaped paws and two hands.
- Cut out the stomach by making a big circle.
- Now it’s the turn to paste all parts.
- Paste the ears on the top back of the face. Paste the stomach just below the face.
- Paste the paws on both the sides of the lower portion of the stomach and hands-on on the upper portion.
- Stick the nose and eyes.
- Use the red sketch to color the middle of the ears and paws to give them a real look.
- Use the black sketch to draw wickers and mouth.
- For additional material, you can make a carrot by using orange and green paper.
Your rabbit craft is ready.
Simple Bunny Card
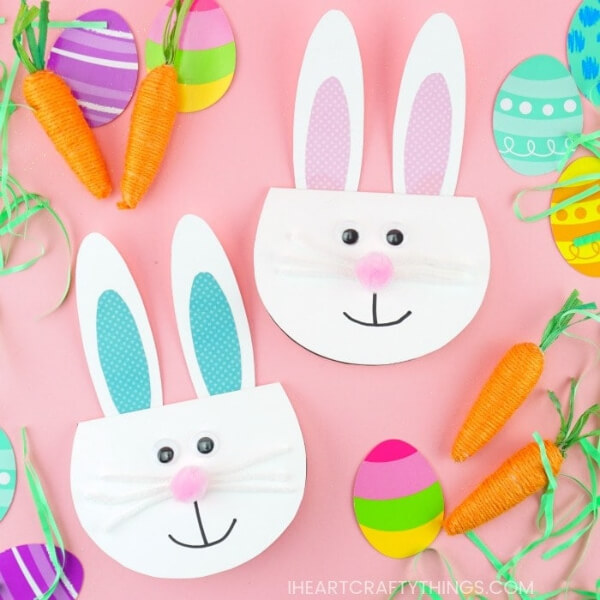
Image Source/Tutorial: I Heart Crafty Things
You can make bunny cards in a simple and easier way. Just follow the given procedure. After completing it give it to your friends and enjoy it!
Materials required:
- Bunny card template
- Printed colored papers
- Pink pom
- White yarn
- Googly eyes
- Glue
- Scissor
Procedure:
- Print the card template and cut it. Fold it along the line.
- Cut the ears template and paste them on the back top of the card.
- Use the printed paper to make the inside ears, and paste it.
- Stick the eyes and pom for the nose at their appropriate positions.
- Use white yarn to make the wickers.
- Draw mouth by using a marker
- Finally, your card is ready! You can write a wish on the card.
Carrot Easter Card
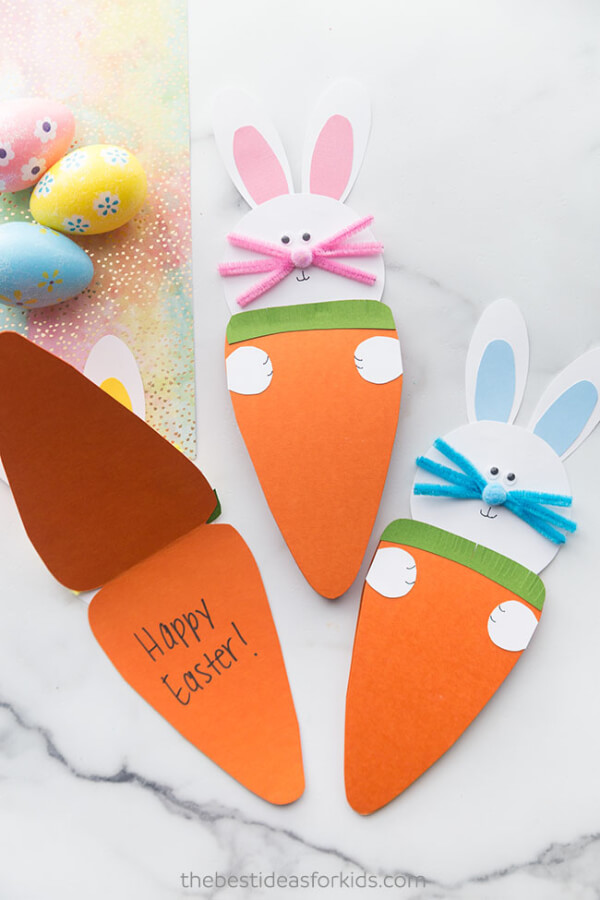
Image Source/Tutorial: The Best Ideas For Kids
Carrots are favorite for rabbits. So we can try Bunny’s favorite thing in our craft. You just need some simple things for this and a procedure which is given below.
Materials required:
- Colored papers
- Googly eyes
- Scissor
- Glue
- Printed template
- Pipe cleaners
- Pointed sharpie
- Pom pom
Procedure:
- Use the foldable template for carrots and cut them out.
- Fold the carrot from the line to make it like a card.
- Cut a strip of green paper and paste it on the upper portion of the carrot.
- Use white paper to make the Bunny’s face. So cut a circle and paste it on the top back of the carrot card.
- Use the same white paper to make the hands of the bunny.
- Now, make the ears on white paper, cut them, and paste them behind the top of the face. Use another colored paper to make the inside of the ears.
- Paste the eyes and pom for the nose.
- Stick the pipe cleaners to make the wickers.
- Use the marker to draw the mouth.
Your bunny is ready!
Easter Bunny
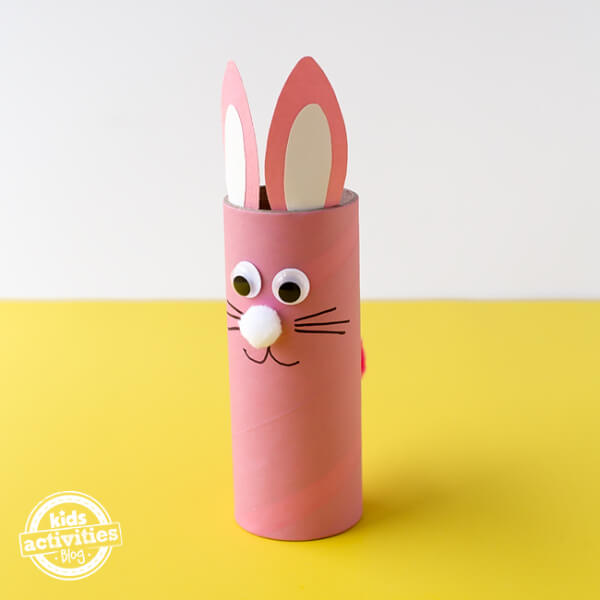
Image Source/Tutorial: Kids Activity Blog
Bunny crafts are the favorite of kids. It is a craft made using construction paper and toilet roll. It is easy to make. Follow the given guidelines.
Materials required:
- Toilet paper roll
- Construction paper
- Pipe cleaners
- Pom poms
- Glue
- Scissor
- Googly eyes
- Black marker
Procedure:
- Use your construction paper to make the ears of the bunny. Also, cut out the inner ears from white paper.
- Glue the ears at the top of the toilet paper roll.
- Paste the eyes and use a pom-pom to make the nose.
- By using the marker draw the smile of the bunny and also draw the whiskers.
- Use another pom-pom to make the tail of the bunny.
Felt Fabric Bunny Craft

Image Source/Tutorial: Blue Bear Wood
On this Easter occasion, you can make a bunny craft using felt fabric. Make it in a simple and easier way. You can gift this to your friends and have fun!
Materials required:
- Felt fabric
- Fabric glue
- Scissor
- Needle and thread
- Pink highlighter
- Bunny template
Procedure:
- Print the template of the bunny (having front and back parts) and trace them on the felt fabric by using a pencil. Cut out them.
- Use the needle and thread to stitch the face parts.
- Use a highlighter to make the blush of the bunny.
- Again, use a needle and thread to stitch the front and back parts leaving a small space for stuffing.
- Fill the pieces of felt fabric inside the bunny to make the stuff.
- After the completion of stuffing tie a knot.
- Make an egg-shaped blanket by using the template for a bunny(one big and the other small).
- Keep the top side of the smaller egg open.
- Stitch the front and back parts of it.
- Cut out 4 heart shapes from felt fabric(bigger to smaller). Paste them on one another on the front of the eggs blanket.
Pom Pom Bunnies Craft
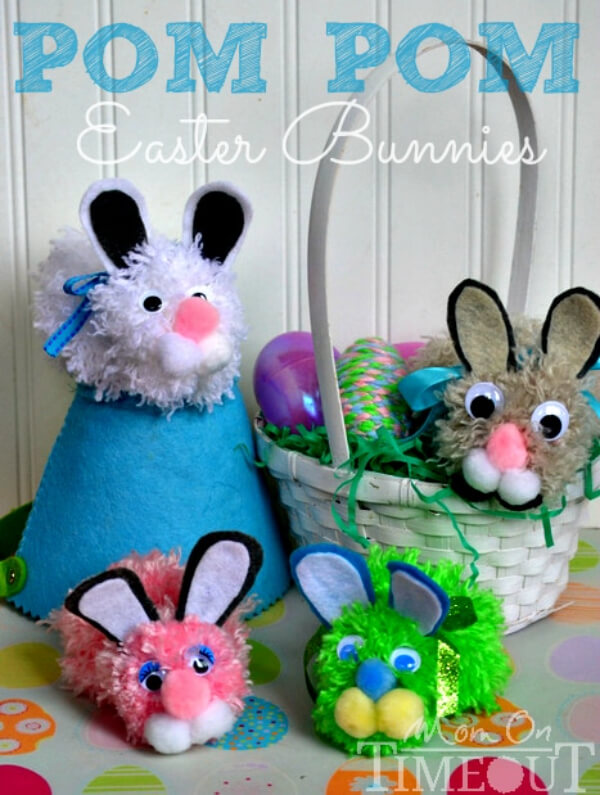
Image Source/Tutorial: Mom On Timeout
You can make your pom-pom Easter bunnies by using the following instructions. It is a stuffed craft that children like the most. So, give them a surprise!
Materials required:
- Felt sheet
- Googly eyes
- Small pom poms
- Ribbons
- Glue gun
Procedure:
- Glue the two pom-poms together according to the Bunny’s look.
- Take a ribbon and tie it at the center to make the head of the bunny.
- Use a pom-pom to make the nose of the bunny. Also, glue another two pom-poms of the same color to make the mouth. Paste all these pom poms to your Bunny’s face.
- Use felt sheets to make the ears. For this, you have to cut the shapes of the ears. Also, cut the inside ears using different colored felt sheets.
- Paste the googly eyes.
- Make other bunnies using the same ways.
Paper Plate Bunny

Image Source/Tutorial: Arty Crafty Kids
Get used and throw plates to make this bunny craft. Bunnies are popping up behind plates. It looks awesome! So, start by following the given ways.
Materials required:
- Paper plate
- Paint
- Staplers
- Construction paper
- Glue
- Sticky tape
Procedure:
- Take the paper plate and cut one-third portion of it. Cut the zig Zag line.
- Now, paint the back of the plate with different colors.
- Time to make a bunny. Use white paper to make the heart shape for Bunny’s face.
- Cut out ears from construction papers. Also, make the inner ears smaller than the previous one using a different sheet.
- Paste it at the top of the upside-down down heart.
- Cut out a small circle for the nose and paste it at the center of the face.
- Use a marker to draw eyes and smile.
- Paste thin striped thread to make whiskers.
- Paste the Bunny’s face at the back of the corner of the plate.
Your popping-out bunny is ready!
Cardboard Tube Bunny Family
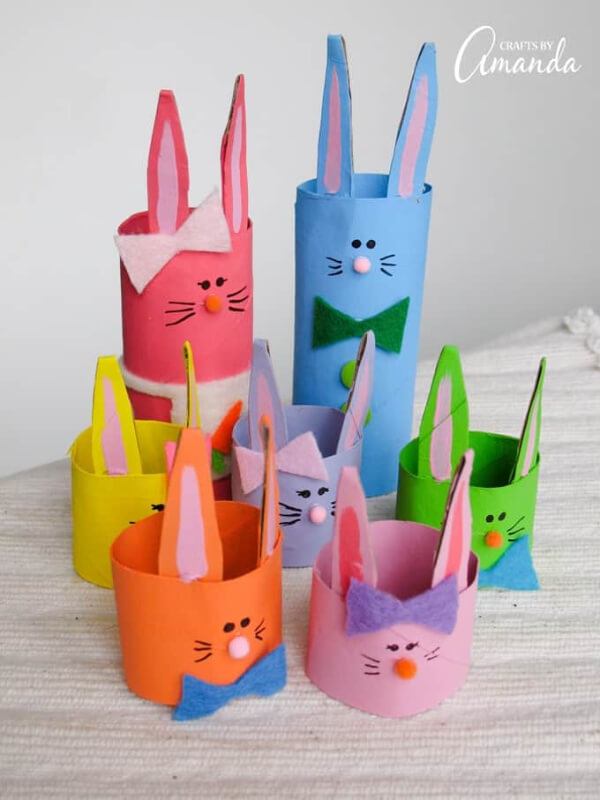
Image Source/Tutorial: Crafts By Amanda
We made bunny crafts in the upper section. Now we try for a bunny family. Yes! It is an interesting craft. It takes your time, but you will enjoy making the craft.
Materials required:
- Cardboard tubes (you can use toilet paper rolls)
- Acrylic paint colors
- Pom poms
- Marker
- Scissor
- Glue
Procedure:
- Cut the paper towel tubes in the given manner: 4.5″ (father), 2. 4″ ( mother), five 1/2″ ears.
- Cut the toilet tubes: four 1.5″ bodies and four 1/2″ ears.
- Cut one 1.5″ body and five 1/2″ears.
- You have five baby bodies, 2 adult ones, and 14 ears.
- Paint each tube with different color(also the inner part).
- Use the glue gun to paste the ears by squeezing them.
- Now, make the ear points by cutting the upper part of them.
- Paint the ears to make the inner portion ears.
- Draw eyes and whiskers by using a marker and stick the pom pom for the nose.
- Cut the bows from felt sheets and glue them on the apron. For baby, the girl bunny pastes the bow below the ears.
- For the mother, cut the apron from the felt sheet, and for the father to stick the buttons.
Your happy bunny family is ready to enjoy!
Paper Plate Easter Bunny Mask
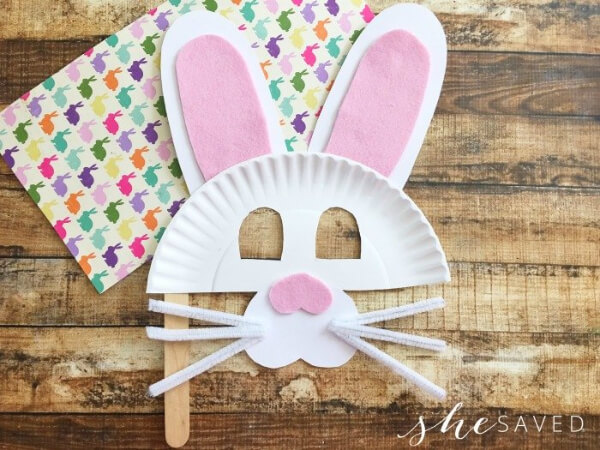
Image Source/Tutorial: She Saved
On easter occasions, you can try an easter bunny mask. When you give this to your kids they will definitely enjoy it. They can make it on their own because it is so easy to make. For knowing the procedure follow the given instructions.
Materials required:
- Paper plate
- White papers
- Pink felt sheet
- White pipe cleaners
- Craft stick
- Glue
- Scissor
Procedure:
- Cut the half of paper plate.
- Cut out the two oval ears and a heart from white paper.
- Paste the lower portion of the heart to the bottom of the plate.
- Cut another small heart from the felt sheet for the nose of the bunny and paste it on the previous heart.
- Use six pipe cleaners to make the whiskers.
- Now, cut the eyes on a paper plate according to the size of your kid’s face.
- Glue the craft stick at one side of the mask to hold it.
Simple Bunny Craft
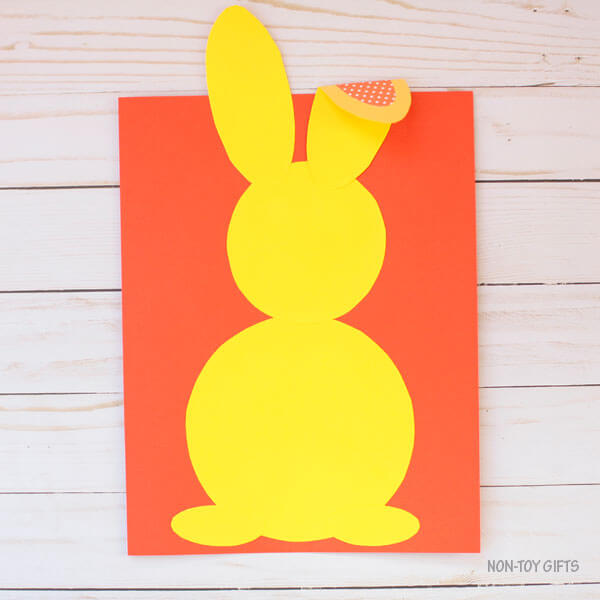
Image Source/Tutorial: Non-Toy Gifts
Try this easter crafting and shape crafting simultaneously for making an adorable craft. Simply cut the templates and glue them. Let’s start!
Materials required:
- Bunny shape template
- Colored papers
- Pom pom
- Glue
- Scissor
Procedure:
- Download the Bunny shapes and trace them on colored paper.
- Cut them all
- Paste all the shapes on a big piece of colored paper.
- First, glue the bottom of the bunny and then the face. Stick the ears on the small circle of the face.
- Fold one ear and paste the patterned paper on it.
- Glue a small pom-pom for the tail of the bunny in the middle of the big circle.
Your simple bunny is ready!
Paper Plate Bunny Face Craft
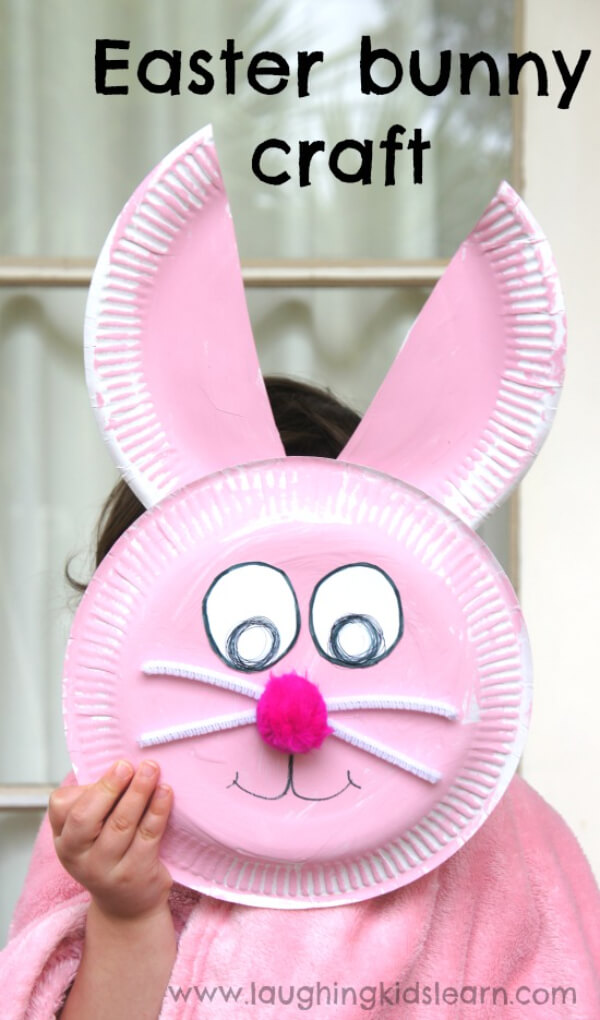
Image Source/Tutorial: Laughing Kids Learn
Use your plate to make the bunny face craft. You can reuse your used plate in the craft. It is an easier way of crafting. Start with the given procedure.
Materials required:
- Paper plates
- Pink pom pom
- Pipe cleaners
- Scissor
- Glue gun
- Paint colors
Procedure:
- Take a paper plate and cut it into half for the ears.
- Take another one to make the face of the bunny and color it at the back.
- Attach the ears at the top back of the face.
- Now, cut 2 circles from white paper and use a permanent marker to complete them
- Glue the pom pom for the nose below the eyes.
- Cut 4 pipe cleaners to make the whiskers of the bunny and attach them to the face.
- Draw the smile of the bunny.
Your happy bunny craft is ready!
Cup Easter Bunny Craft
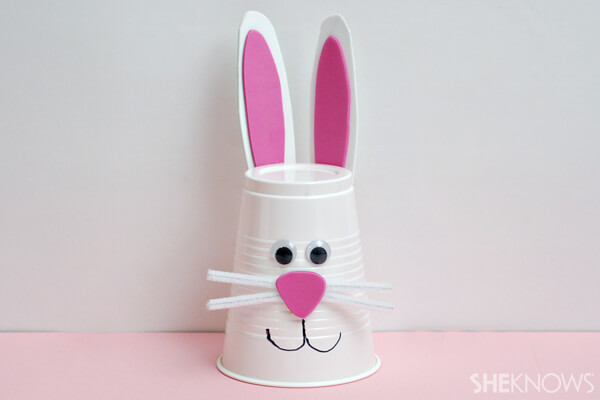
Image Source/Tutorial: She Knows
On holidays you can try making an easter bunny face by using a plastic cup. You will learn creativity as well as reusing the materials. Follow the instructions for help.
Materials required:
- Plastic cup
- White paper
- Pipe cleaners
- Pink Felt sheet
- Googly eyes
- Black marker
- Glue
- Scissor
Procedure:
- Take the plastic cup and stand it upside down.
- Cut out 2 oval-shaped ears from white paper and glue them at the top back of the cup.
- Use a felt sheet to make the inner ears smaller than the previous ones. The glue then on the bigger ears.
- Stick the googly eyes.
- Cut out a triangle-shaped nose from the same felt sheet and stick it below the eyes.
- Glue 4 pipe cleaners to make whiskers.
- Draw the mouth using a marker.
Handprint Bunny Craft
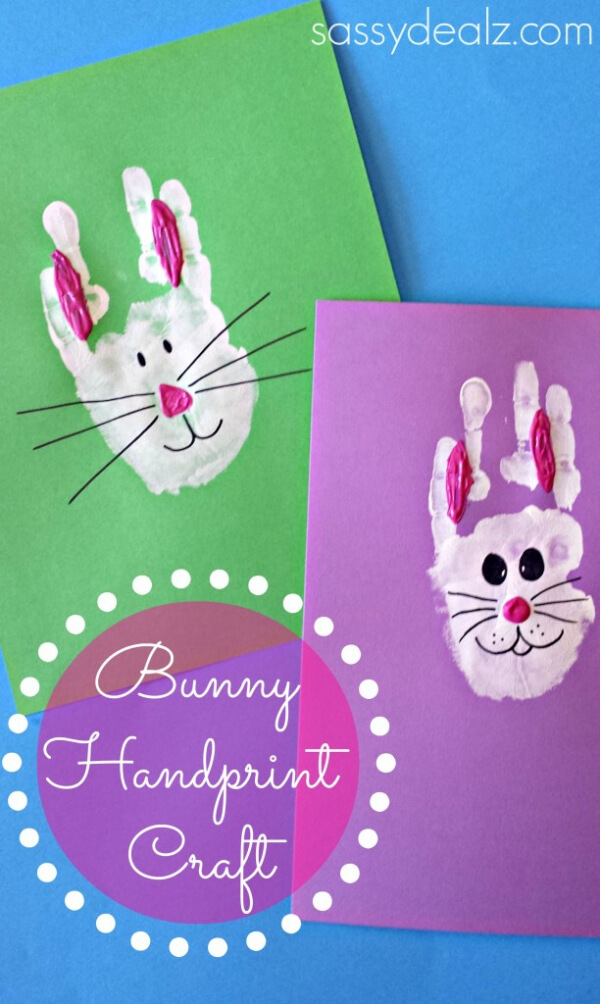
Image Source/Tutorial: Crafty Morning
Use handprints of your kid to make a beautiful bunny craft. Your kid will enjoy making this and learn new creativity. Tell them about the procedure and let them enjoy it!
Materials required:
- Construction paper
- Paint colors
- Marker
- Paintbrush
Procedure:
- Get the handprint of your kid by using white paint. Skip the middle finger and thumb. Combine two- two fingers together to make the print.
- Now, add pink paint to make the ears and nose of the bunny.
- Let it dry.
- Mark the small eyes and long whiskers to your bunny face.
Sock Bunny Craft Procedure
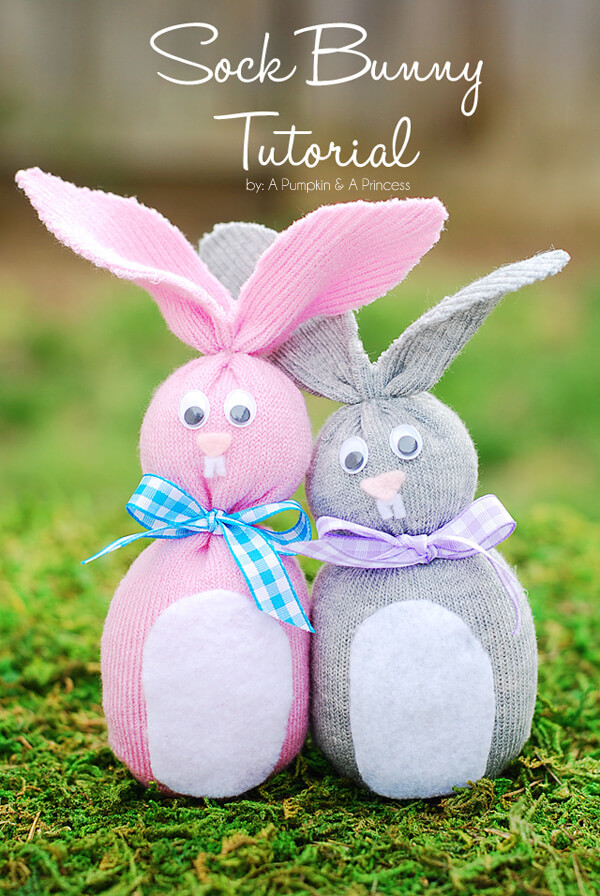
Image Source/Tutorial: A Pumpkin and A Princess
We had told the easter basket ideas. This easter, the occasion tries this sock bunny craft to give as a gift. This is adorable craft-making. Try following the given ways!
Materials required:
- Sock
- Felt
- Pom poms
- Eyes
- Rice
- Ribbons
- Rubber bands
Procedure:
- Fill your sock with rice according to the size of the bunny you want to make.
- Tie a rubber band on the neck and one on the top of the face.
- Cut out the shape of the belly of the bunny from the felt sheet and paste it on the sock.
- Glue the eyes.
- Cut out a triangular-shaped nose and teeth to attach to the face accordingly.
- Cut half of the top of the sock to create the shape of the ears. Shape the ends.
- Glue the pom pom to the back for the tail.
- Tie ribbons on the neck.
Your bunny is ready! Isn’t it so cute? Try another bunny using the same procedure.
For more creative ideas for the Easter occasion visit here. Check out on the daily basis for fun!
You may like these:
Mother’s Day Craft Projects for Children

Celebrate Mother’s Day with heartfelt craft ideas for kids, allowing them to create personalized and meaningful gifts that express their love and creativity.
Handprint Craft Ideas for Mother’s Day Suitable for Kids
Encourage children to create memorable handprint crafts for Mother’s Day, offering a personal and artistic way to show appreciation and love.
Thanksgiving-Themed Craft Activities for Children
Engage kids in festive Thanksgiving crafts, combining creativity and gratitude through fun projects that celebrate the spirit of the holiday.
Reindeer-Inspired Craft Projects for Kids
Celebrate the holiday season with creative reindeer crafts, perfect for children to make charming decorations and gifts while enjoying festive activities.
Bee-Themed Craft Activities for Children – Ideal for School Projects
Introduce kids to educational and fun bee crafts, ideal for school projects and teaching about the importance of pollinators in our ecosystem.