
You may not consider papercraft similar to building principal values in children but children fabricate various ideas and techniques from papercraft. Despite basic reasoning, your child will learn patience and a step-by-step guide to making something new, which is missing among kids today. Besides these main lessons, your kid will acquire the satisfaction of making something with their own hands. They will have the alternative to pass on that assurance with them all through life.
Kids love making things – be it papercraft or using it as an excuse for creating a mess around the room! Regardless, papercraft isn’t just about paper folding but also about being patient while your kid learns about it. Moreover, it’s a direct learning experience – something that impacts their underlying tutoring and capabilities.
A handmade animal will be engaging that too with the kid making his own choices – colours and shapes. Such paper animals will your kid to learn about different animals which live in the jungle. This will also teach them about jungles and animals.
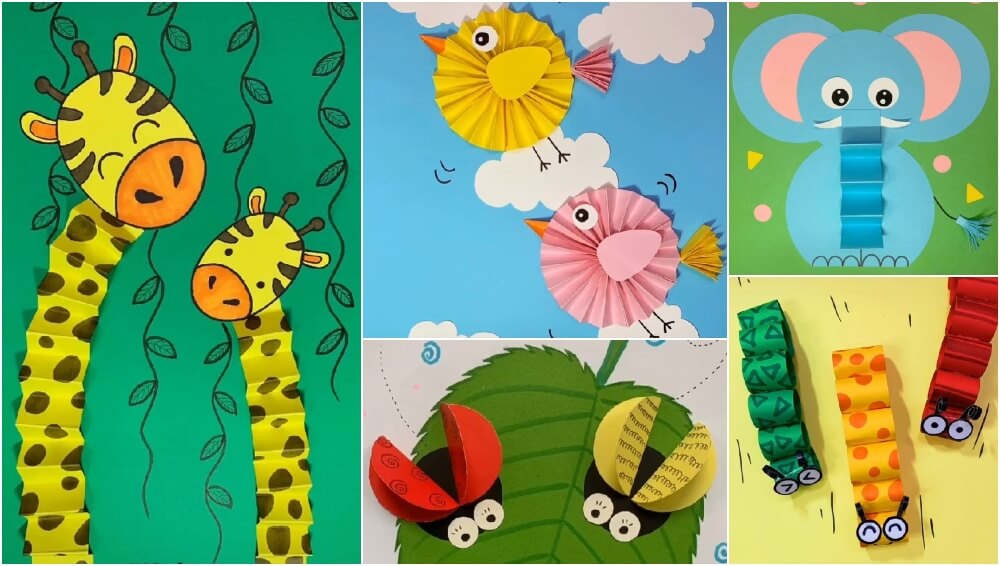
Easy Paper Animal 3D Crafts for Kids
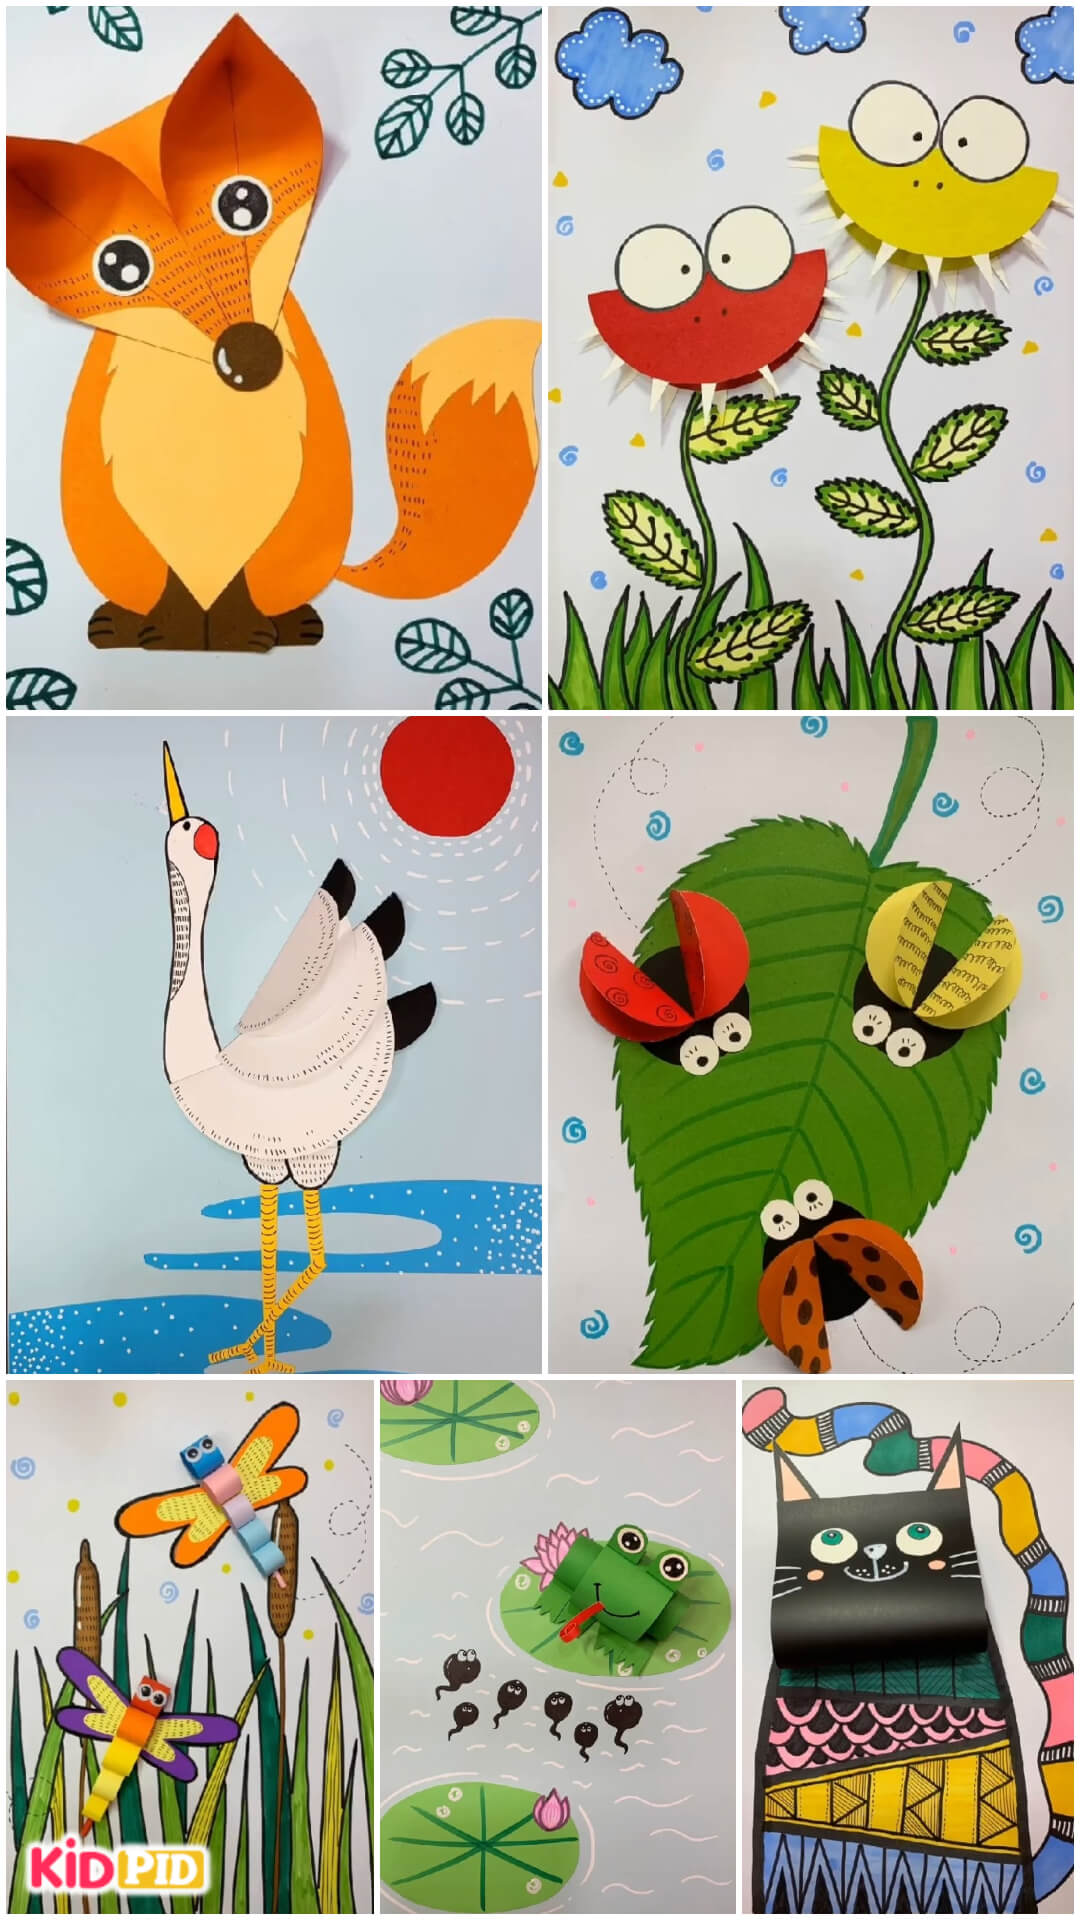
Easy To Make Paper Fox
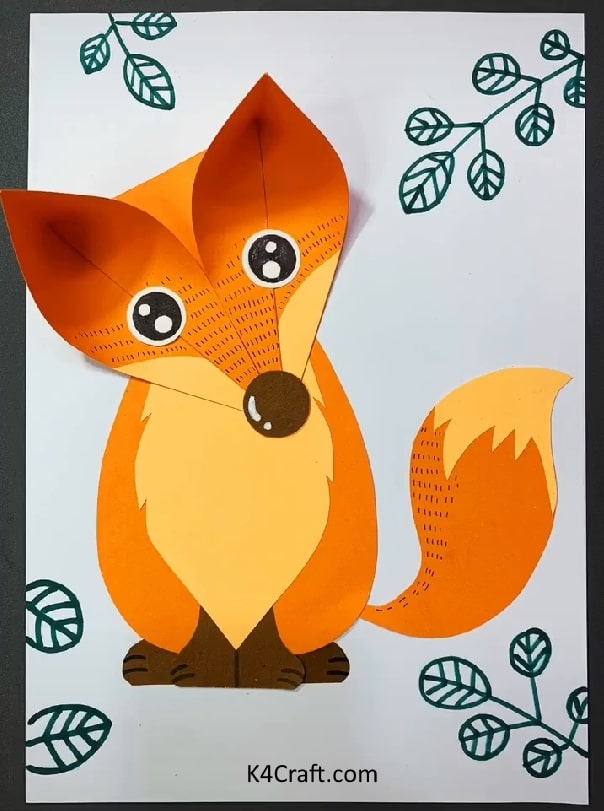
“Clever like a Fox!” – We all have heard this phrase which also shows that foxes are an important part of the jungle. These animals are clever and hold a special place as scavengers in the jungles. Such animals help the jungle by keeping the jungle free of dead animals. This paper fox in Ombre paper is super easy to make.
You’ll need:
- Brown Colored papers
- artificial eyes
- Glue and Scissors
To begin with, overlap the square piece of paper slantingly in alf. Next, overlap the square sheet corner to corner along the wrinkle. You will get a triangle. Crease this three-sided bit of paper down the middle. Join the two closures of the three-sided piece to get a large portion of the size of the past overlap. Press in this triangle and open one side fold made by the two layers of the paper. Crease the upper overlay in reverse. Press the upper sheet down. Press the centre and open the folds made by the two layers of paper. Press the upper layer in reverse. At the point when you have pressed the upper layer of the sheets in reverse, you’ll get two ears of the fox. Paste the two upper folds in the centre. Use the paste to stick the paper folds and finish it by staying the eyes and nose in their spots.
Your Fox is ready!
These pretty and easy paper foxes can be stuck in the dividers, almirah gateways, study tables, etc. These foxes will add a perch of creativity to your kid’s room. You can, in like manner, keep these foxes in the place as a decorative item.
3D paper Elephant
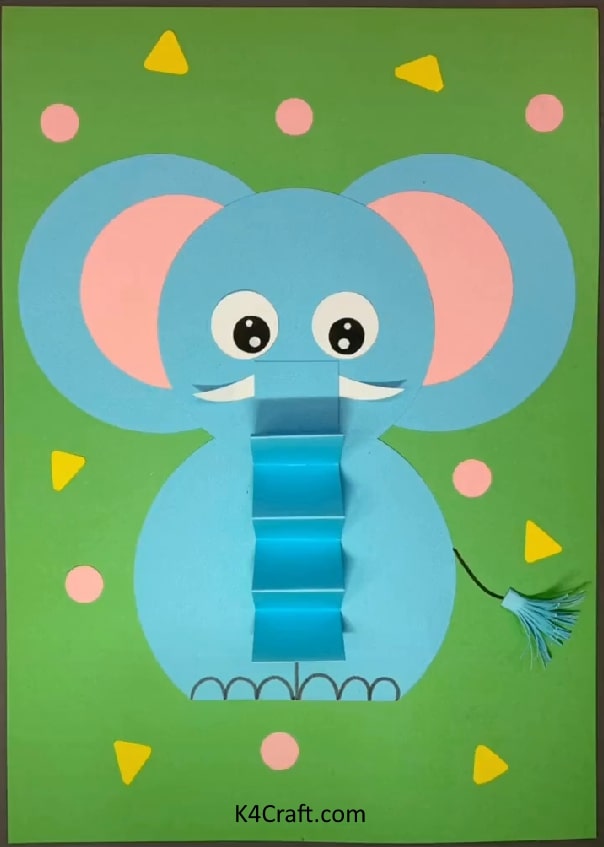
Elephants have been known to perk each other up when one is in trouble, and they oftentimes cooperate to take care of issues or help an elephant in tough situations. The Non-stop stomping of kids will surely make you think if you’re living with elephants! So why not channel their energy and enthusiasm into this 3D paper elephant craft instead! This elephant will help the kid to strengthen fine motor skills.
You’ll need:
- Blue and Pink paper
- Scissors
- Glue stick
- Black Marker Pen
First, you need to draw an elephant on a blue sheet in circles and cut it out. paste it one by one on the coloured sheet of your choice. (e.g.- green)
Now take a rectangular-shaped cut-off from the blue sheet. make sure it looks long enough. Now start folding the paper one by one starting from inwards to outwards. Do it until the paper ends. Now, open the sheet and the creases will make it look like 3D.
Paste it in the right place and you’re done!
The white flamingo
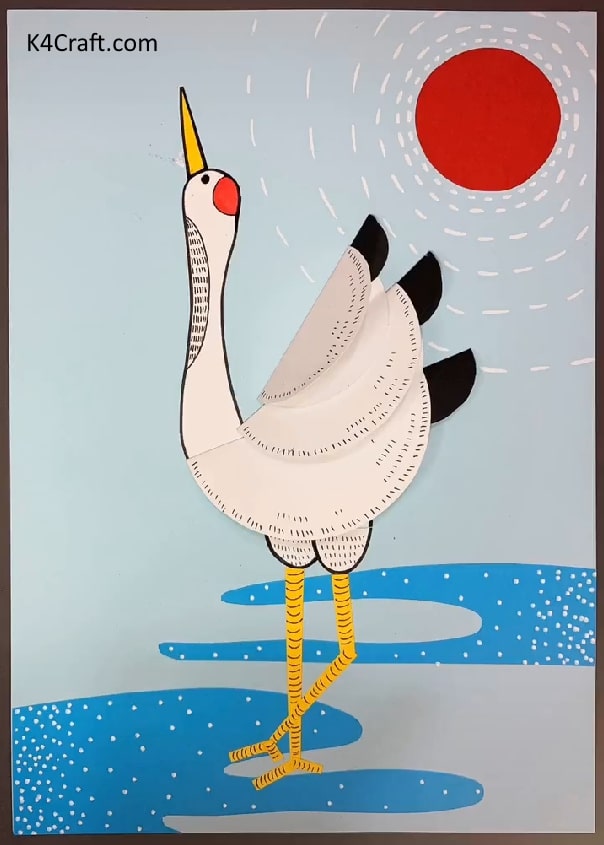
There are so numerous things to make from paper throughout the year – from bookmarks to other occasional crafts. This paper flamingo is one of those wonderful ideas to help your kid to make something different and learn some super interesting facts!
You’ll need:
- Colourful sheets
- Pencil
- Scissors
- Gluestick
- Black pen
Begin by drawing a flamingo first by using a pencil. Now start with the white paper and cut it exactly in the shape required for the mid part of the flamingo. Now cut two circles for the feathers and fold them from the centre to create a semi-circle. Now paste these two feathers. For the leg and the beak, use yellow paper and draw the legs and beak with a pencil first. Now cut them out and paste them in their respective places. The last step would be to use a black marker for touch-ups.
Your flamingo is ready!
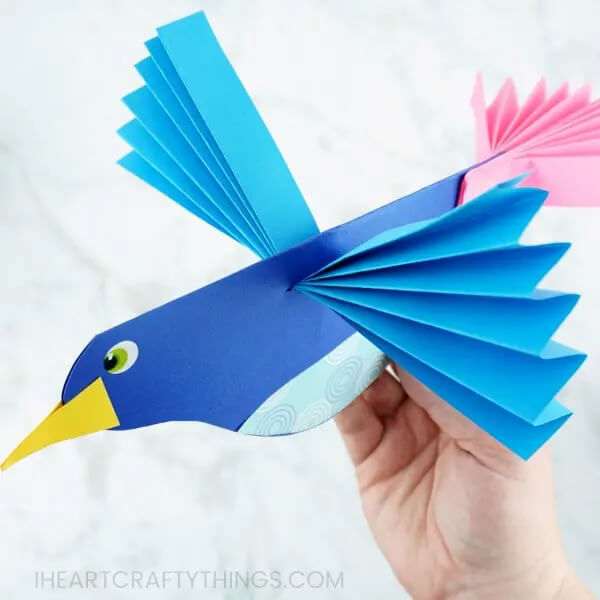
Colorful Paper Bird
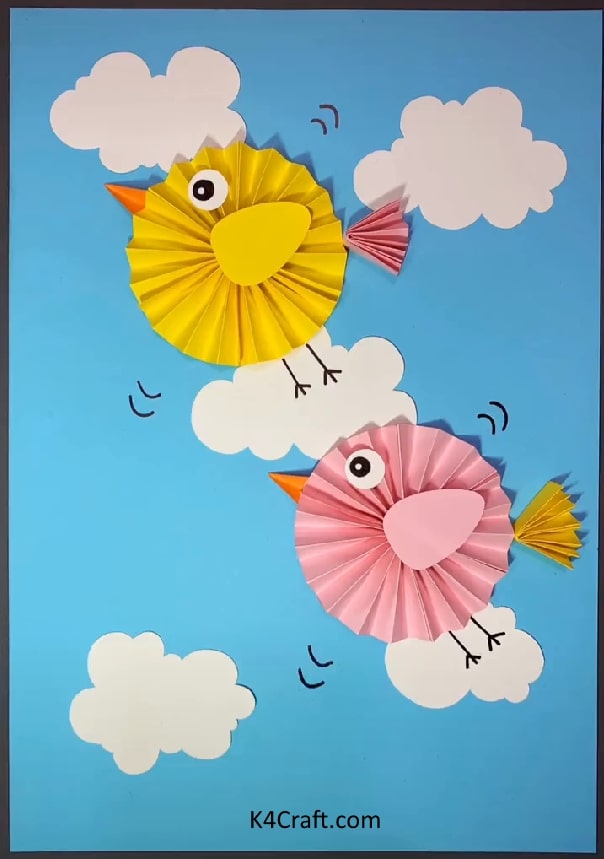
Springtime is the ideal season for sitting outside and seeing little birds go hop, hop, hop. This simple wrinkled paper fold craft is an ideal way to get some answers concerning birds with your kids. It is a simple paper craft for kids and adults as well. Kids will love flying their little birds all around the house. This wonderful paper bird can be made in any choice of colours it’s a papercraft that kids will love to make it their own.
You’ll need:
- CColouredpapers of your choice
- A scrapbook sheet (as a base)
- scissors
- stapler
- glue stick
Choose two pieces of colour paper for your bird and its wings. Fold both pieces of colour paper in an accordion fold. Choose whichever colour you want to be used. Make 2 sets of each colour so that they can be joined together to make it look like a circle. Now join the two sets together, make sure that it looks circular and staple them together carefully. Finish your bird craft by adding eye cut-outs on the face of the bird and you can also use artificial eyes an alternative for the same. You can also punch a hole in the top of the bird, add a string and hang it somewhere in your kid’s room or simply just paste it on the scrapbook sheet and keep it.
That’s it! Your easy paper bird is ready!
3D Ladybirds
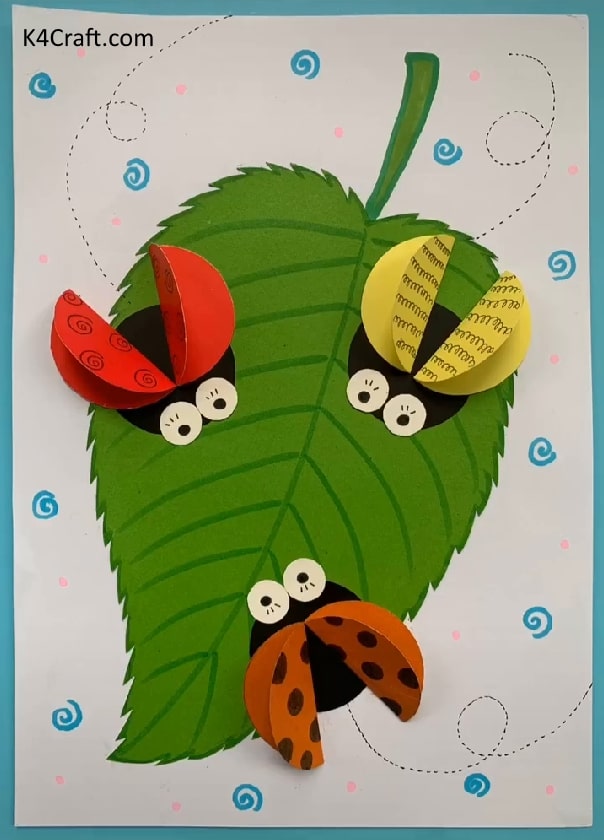
The unique black spots on the ladybug wings always made us all curious. Children will love to fly these ladybirds off the page as though the ladybugs are flying in real. With a couple of art supplies and a morning to evening of having fun with your little one, you will have this cute paper ladybird completed in a matter of time using your imagination and creativity with your kid.
You’ll need:
- paper in red and black (you can also choose your colours)
- Green paper for the leaf
- scissors
- Glue stick
- black marker
Begin by cutting out two sets of circles with red paper of the same size. Bend them in half and draw black dots with the black marker. Cut out a blackhead and glue all the pieces to a piece of paper. Add eyes made of white paper and draw on some cute designs on their back if you want! If your kids want they can add legs too just to make it look more real. Make 3 different sets of the same and finish it b sticking it to the green leaf made of paper.
Your ladybirds are now ready to fly!
Easy to make Paper Giraffe

”Why don’t giraffes like to go to the playground?” ”Because the monkeys use them for slides” Centred around that long neck, there is a wide variety of such giraffe jokes on the internet. Their long neck is one of the features that make this unique animal so different. Why not learn more about these animals through this fun activity and teach your kid about everything that makes the giraffe different.
You’ll need:
- Glue
- Scissors
- Yellow paper
- Black marker
Take a larger piece of yellow paper and do accordion folds of about 1cm equally. Now paste the giraffe’s face on the sheet of your choice and later add the folded sheet which is the long neck of your giraffe. Using the black marker, you can draw these little dots all over the neck. Your kid can choose whichever colour combination of cards he or she likes for the giraffe.
Let it dry and you’re done!
The 3D Frog
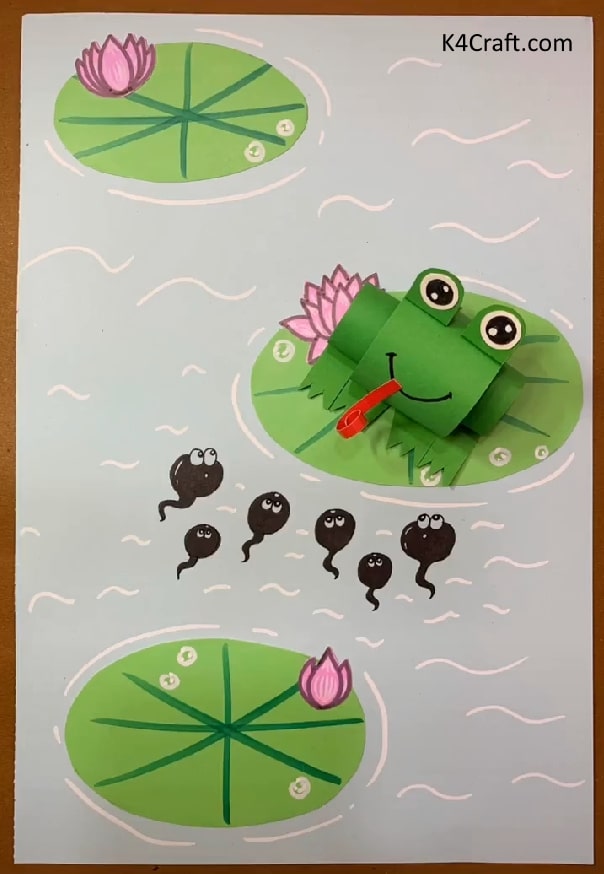
Did you know that Frogs breathe through the nose and their skin? There are so many fun Frog facts that your kid would love to know! You can make this adorable, springy frog utilizing just a bit of paper and some folding skills with your kid. This one doesn’t jump but it will look great displayed on the table or the wall of your room.
Let’s do some hopping and learn about frogs with this easy-to-make 3D Frog!
You’ll need:
- Green paper sheet
- Glue
- Scissors
- red paper strip for the tongue
Take the green sheet and start making a cylindrical shape out of one part and a semicircle from the other. Now, cut out 2 semicircles and a leg-like shape for the finishing. Paste the semicircle on top of the cylindrical cutout and paste the two on the leaf or the base of your choice. Paste the eyes and legs into their respective places and your frog is ready to float!
The 3D Caterpillars
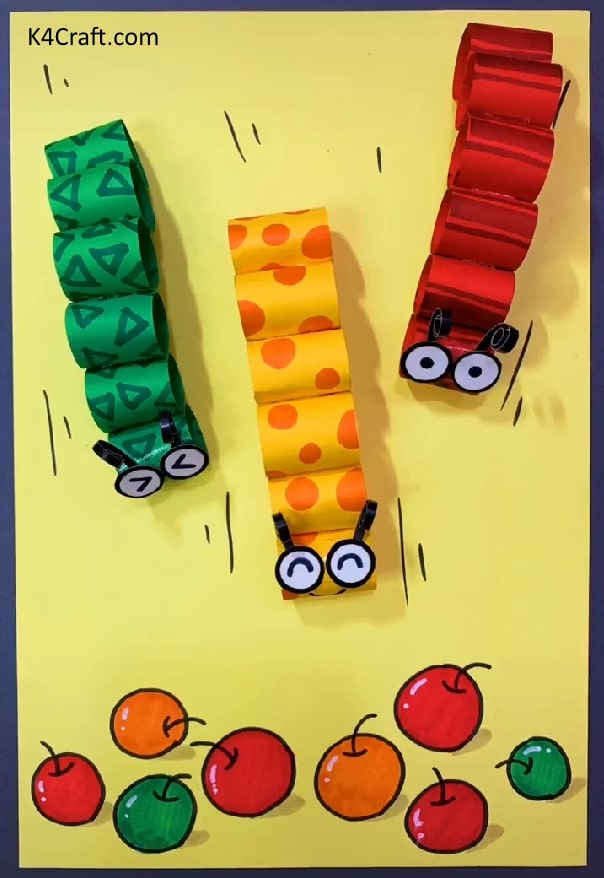
This caterpillar is best for educational purposes if you want your kid to learn something new!
You can use several such crafts to teach patterns and the life-cycle of a caterpillar. These are not only good for teaching purposes but also perfect for a “just for fun” type mood when your kid wants to do something fun!
You’ll need:
- scrapbook sheet for the base
- coloured papers ( of your choice)
- artificial eyes
- black marker
- glue stick
Collect the body parts of the caterpillar. To do this, use your Gluestick to add a stick toward the end of one of the rectangle-shaped cutouts. Fold the shape into a circle so the two ends are stuck together. Paste the one end of the caterpillar close to the furthest end of the leaf for the caterpillar head. Now paste the two eye stickers at the front for the eyes. Keep pasting the end part of every one of the caterpillar body pieces and paste them down together one by one. Let it dry for a while and you’re done!
You can make different caterpillars and make them look like a race!
Easy to make origami fishes
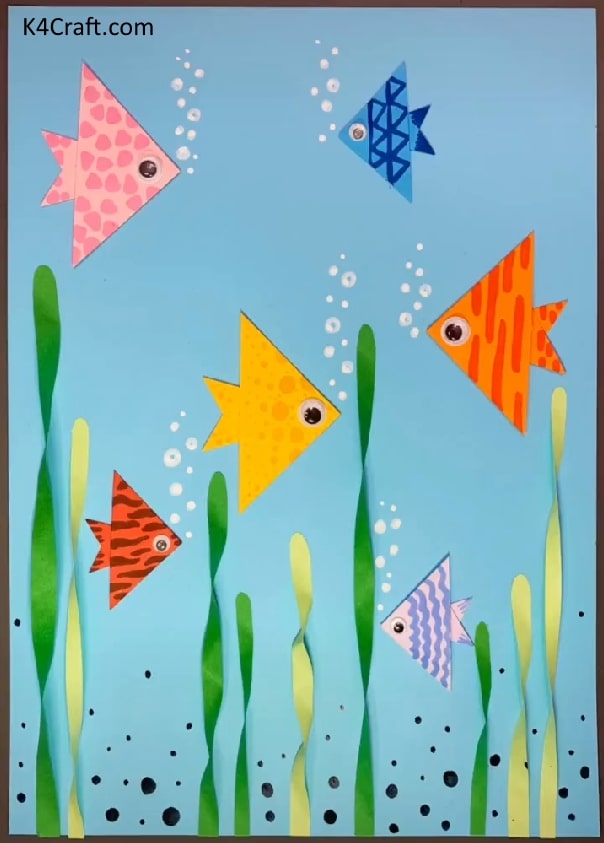
You may have seen them in the sea, in an aquarium and on your supper plate! Fish are amazing and entrancing creatures.
They are of various sizes, shapes, and colours, however, they all share a few things in common. Did you know that all fishes are vertebrates, which means they have spines and they all have skeletons that give them their shape and secure the organs inside their body?
You’ll need:
- Coloured paper or origami sheets
- Googly Eyes
- Gluestick
Begin by folding a square piece of paper diagonally on both sides and in half, on one side.
- Crease and unfold.
- Hold the paper as indicated from the centres and fold it towards the mid-centre to get a triangle shape.
- Do the same with the other corner and you’ll get the fishtail!
- Your fish is now all set to go deep down the ocean!
Paper Chicken Craft
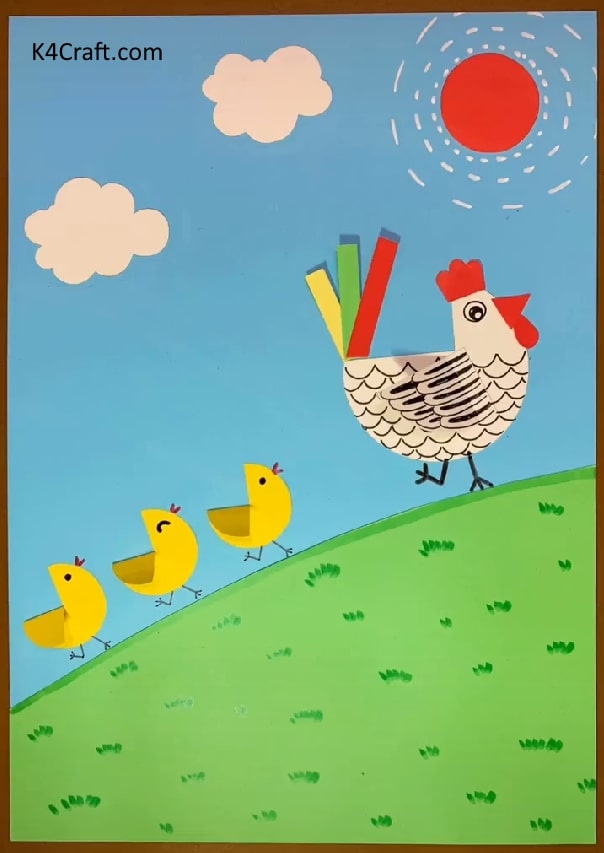
”Five little chickens by the old barn door, One saw a beetle, and then there were four.” Kids have heard such rhymes many times but what about the questions in their heads about the chicken and its family? This fun activity with your kid can be the answer to all his questions. This way, you can both have fun and learn some fun facts about chicken.
Moreover, Kids would love to make this mother hen with three baby chicks walking behind her.
It’s super easy and fun!
You’ll need:
- bright yellow and white paper
- green paper
- eye stickers/ you can draw if you want to
- glue
- scissors
Draw 4 circles and triangles on yellow and white paper, then cut them out. Draw the beak, the crown and the feathers and cut them too. Assemble the coloured pieces. Now make a small cut through the middle of the3 semicircles and fold the flap downwards ( refer to the baby chicks in the image) Add the red beak sand the chicken comb shapes on top of their heads. Glue the eyes or draw them if you want to. Fold their flaps downwards and you’re done! Finish it with the background and touch-ups according to your kid.
Two little Dragonflies
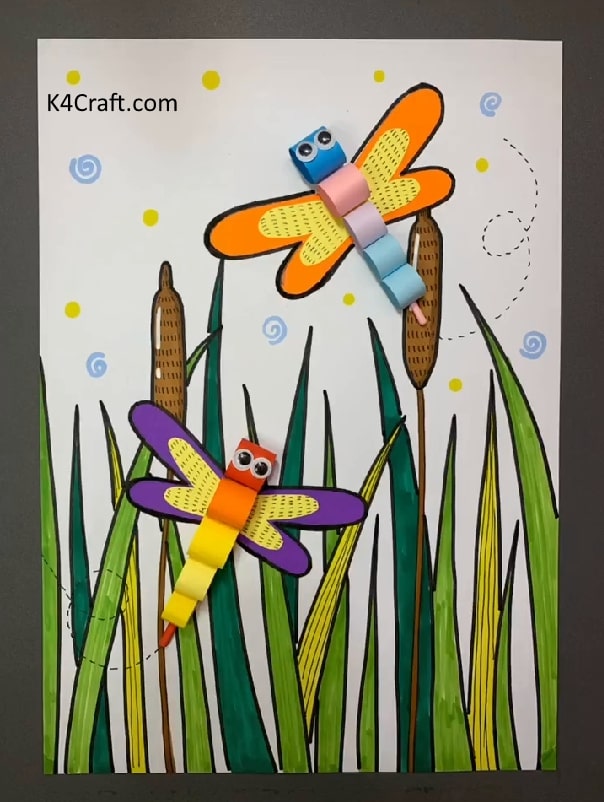
What shades of dragonflies live in your part of the world? Head outside for some insect watching with your little one and then return inside to make a vivid dragonfly craft to make the experience even more memorable. These little dragonflies will give a good time for your kid to play with, you can make multiple if you want to!
Fun Fact: Did you know dragonflies are one of the fastest flying insects in the world? They can reach speeds of over 30 miles p/h.
Let’s learn how to make these dragonflies
You’ll need:
- Blue paper
- purple paper
- yellow paper
- pink paper
- sticky eyes
- Glue stick
- Scissors
.Cut five rectangular pieces and assemble the five body pieces into circles. To do this, add a bit of glue towards the end of each paper strip. Fold the strip into a circle, covering the two ends and sticking them together. Paste the dragonfly wings close to the highest point of purple and orange paper. At that point add glue along the back crease of every one of the body pieces and paste them in a line down the focal point of the dragonfly wings to make the dragonfly body. (refer to the image) You can paste triangle grass pieces along the lower part of your blue white paper. The last step would be to add sticky eyes to your dragonfly.
Done!
The 3D Black Cat
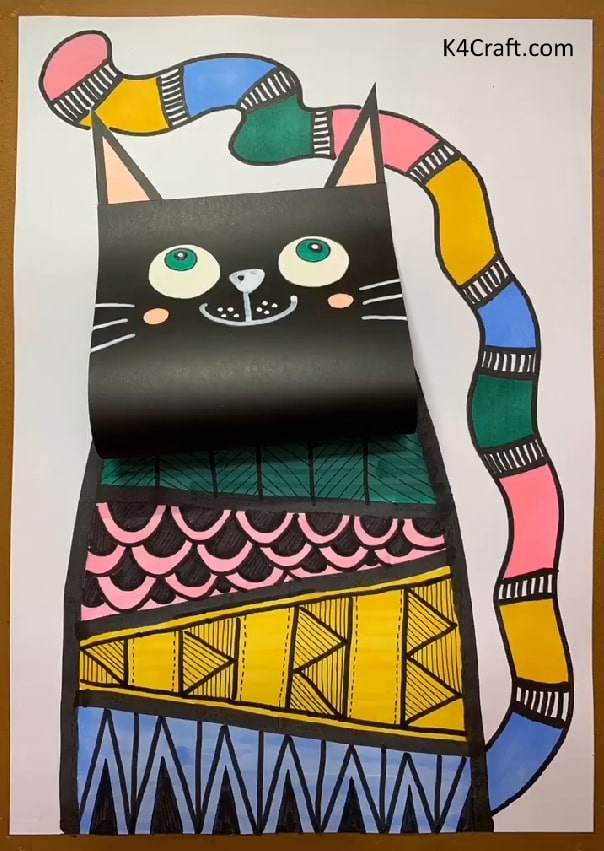
Since the hour of Halloween is here, dark cats have been a famous choice for Halloween. Sometime in the past, people accepted that black cats could move into the human structure to go about as spies for witches. In numerous societies, black cats are an image of good (and at times misfortune as well)
Without a moment to spare for Halloween, children can figure out how to make a pleasant paper bobblehead of black feline art. This simple DIY kitty make incorporates a free example, making it ideal for home or school.
You’ll need:
- Black paper
- Colourful markers
- scissors
- Glue stick
- White coloured pen
Cut out a paper strip from the black paper. Fold the ends of the long, thick paper strip towards the middle. Glue or tape the 2 flaps together to create a 3D half-circle shape. Glue the cat’s head to the accordion fold paper strip, then glue the accordion fold to the front of the cat’s body on the paper and you’re done!
3D Paper Flowers
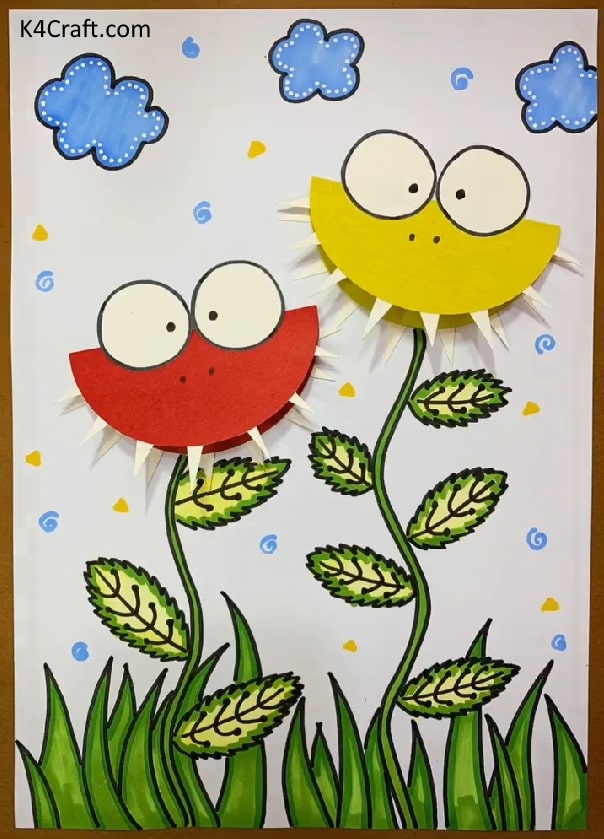
“If we could see the miracle of a single flower our whole life would change.”
– Buddha
Dissimilar to real flowers which can just pleasure us for not many hours, these paper-made blossoms are very durable and too without losing their appeal, cuteness, and durability. y
You can try to make some cute and adorable paper blossoms of your own with your kid. Neither you need any heavy supplies nor you’re supposed to be an expert and art master to make these paper flowers at home. All you require is nearly a unit of essential requirements like scissors, sticks, pins and so forth with paper as the basic material.
You’ll need:
- Colored Paper
- scrapbook sheet (for base)
- Scissors
- Glue
- Black marker
Take two sheets of different colours. Draw two circles of equal size and cut them out. Now fold these circles equally to make them look like a semi-circle. Now draw the leaves and grass on the scrapbook sheet. ( you can also paste the ready-made templates or cut-outs of the same) Now paste one side of the circle on the sheet which will make it look 3D. With the other part, cut out sharp teeth like the shape of the white paper and paste them one by one on the circle. (refer to the image above). Once you’re done, draw the eyes and the background for your flowers.
Your flowers are now ready to bloom!
We believe that this craftsmanship will bring a smile to your kid’s face. You can take a look at other articles on our website. Feel free to express your experience and views to us in the comments section below. We would love to hear from you!
You can check our website to bring more artistry to your kid.
We will keep bringing such captivating ideas for you. Up to that point, keep smiling.
You may like these:
Animal-Themed Craft Projects for Children to Create at Home
Encourage creativity with fun and easy animal-themed crafts, perfect for keeping kids engaged and fostering their artistic skills in a home environment.
Duck-Inspired Craft Ideas for Kids
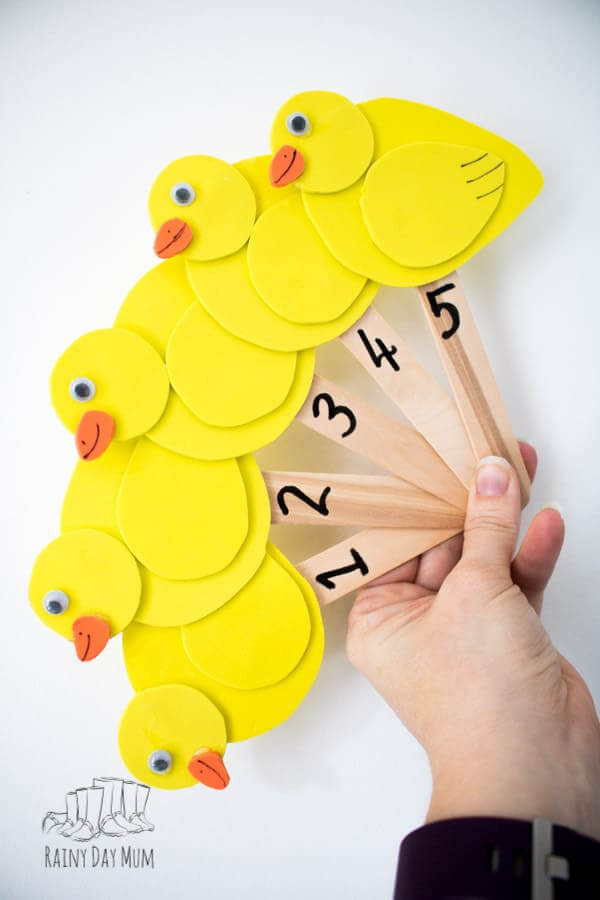
Explore delightful duck-themed crafts that combine simplicity and creativity, offering children enjoyable and educational crafting experiences centered around these charming animals.
Unicorn-Themed Craft Activities for Children
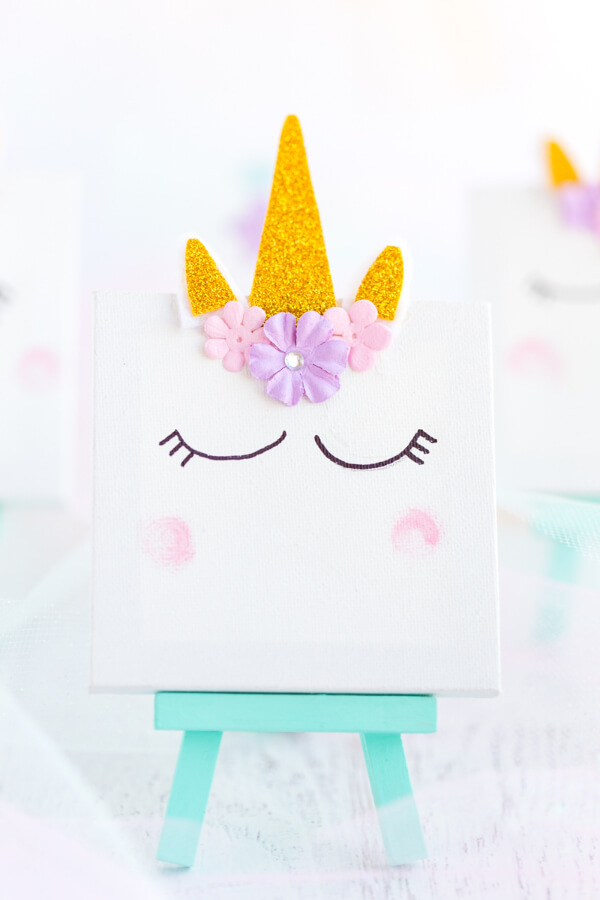
Spark creativity with magical unicorn crafts, providing children with enchanting projects that inspire imagination and artistic exploration in a fun and engaging way.
Penguin Craft Projects for Kids
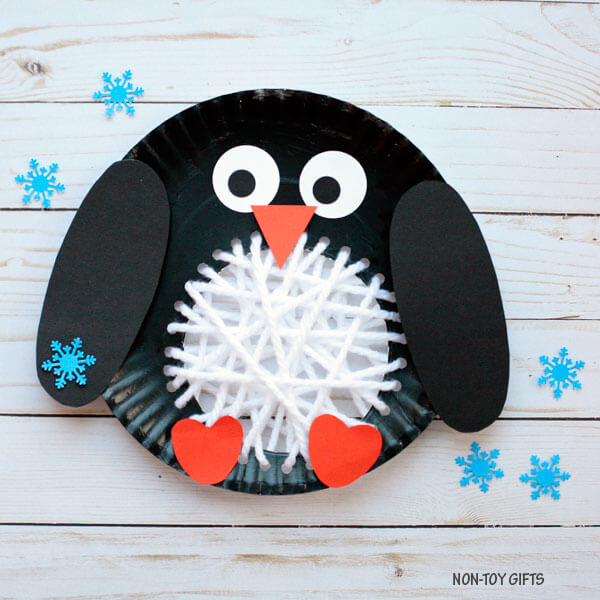
Engage kids in crafting adorable penguin-themed creations, combining fun and learning about these fascinating Arctic animals through creative and hands-on activities.
Dinosaur-Inspired Craft Ideas for Toddlers and Preschoolers
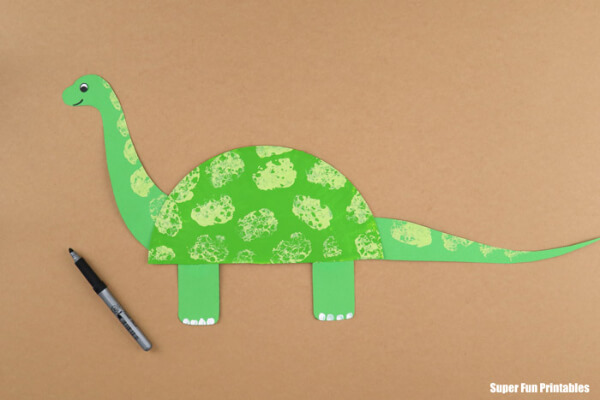
Introduce young children to fun and easy dinosaur crafts, fostering creativity and fine motor skills while sparking their curiosity about prehistoric creatures.


