Christmas is knocking on the doors! Here we come with some elegant and creative card ideas for Christmas to celebrate with family and friends. Let’s begin the fun!
Contents
- DIY Christmas Card Ideas
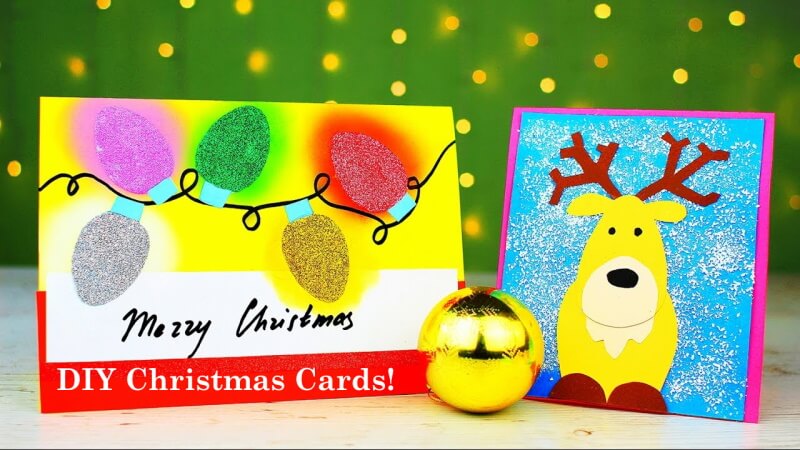
- Unique Christmas Card Tutorial: A Beautiful Reindeer
- Homemade Christmas Card Tutorial: Jolly Penguins
- DIY Christmas Card Tutorial: Glowing Light Garland Card
- Handmade Christmas Card Tutorial: A Wish Card!
- Easy Christmas Card Tutorial: Unconventional Christmas Tree Card
- Cute Christmas Card Tutorial: Cute Snow Mitten Card
- Tips to Use These Christmas Card Ideas
- More Christmas Craft Ideas
- You may like these:
DIY Christmas Card Ideas
Unique Christmas Card Tutorial: A Beautiful Reindeer
Materials:
- Pencil and eraser
- Yellow colour paper
- Light colour paper
- Brown colour paper.
- Bright pink colour paper. (For card base)
- A bright colour paper. ( For wish note)
- Craft glue
- Fake snow/ glitters
- Brush
- Black marker
- Scissors.
Procedure:
- Take a yellow colour page, draw the head and body of the reindeer with a pencil, the head should be like the size of an egg and the body must be bigger than it and the bottom will be straight.
- Add a pair of ears to the smaller egg.
- Cut out the shapes from the paper with scissors.
- Take a light colour paper and draw an oval muzzle with a pencil and also draw the chest of the reindeer.
- Cut them out with scissors.
- Define the oval muzzle with a black marker by mankind a nose.
- Add bead-like eyes to the reindeer face.
- Take a brown colour paper, draw the horns and hooves of reindeer and cut them out. The horn must be stylized.
- Take a bold colour paper, add a thick coat of white glue to it with a brush.
- Throw fake dry snow in it and let it dry for a bit. You can use glitters instead of snow.
- Attach all reindeer pieces to the page with glue according to the reference video.
- Take a bright pink paper for the card base, take another bright colour paper and put a wish note inside the card.
- Attach the deer cover to the front of the card with glue. Press a little to properly attach it.
- The amusing deer will be ready to distribute!
Homemade Christmas Card Tutorial: Jolly Penguins
The card with a number of jolly penguins for this xmas!
Materials:
- A colour paper
- Ruler
- Pencil
- Craft Knife
- Craft glue
- A brush.
- Red glitter
Procedure:
- Take a square paper and a ruler, measure 3/8 inches beyond the edge of the paper and mark with a pencil and then 1 inch.
- Repeat this up to the opposite edges of the paper.
- Join both edge point marks with pencil and ruler.
- Cut out the middle squares that are made on the page with a craft knife.
- Cover this paper with white craft glue by using a brush.
- Apply red glitter all over the page and shake off the extra glitters.
- Dry it.
- Take three colour paper strips with wide width, all the sizes must be the same. Apply glue on them and attach across the back of the squares behind the paper.
- Take white paper, draw small white jolly penguins on the paper with a pencil. The number should be nine.
- Define the outline of the penguins with a black pen. Leave the face and belly white.
- Cut out the penguins with scissors.
- Glue the penguins and attach them inside every nine windows.
- Take a bright card base, put another bright colour wish note page inside it.
- Take the penguins window and attach it to the front of the card with glue.
- These joyful snowdrift lovers will bring joy to the card receivers!
DIY Christmas Card Tutorial: Glowing Light Garland Card
Materials:
- A colour paper.
- A bright card base.
- A red wide colour strip.
- A white wishing paper strip.
- A colour paper for wish card
- Scissors.
- White glue.
- Colour glitters.
- Colour glitter ribbon
Procedure:
- Take a paper, draw a light bulb on it with a pencil and cut it out.
- Trace the structure of the light and make five of these same elements. And cut them out with scissors.
- Add glue on the bulbs.
- Take glitters of different colours, apply them on different bulbs.
- Take a bright colour card base, draw a curvy cord of lights on the paper with pencil.
- Define the cord lines with a black marker.
- Take a wide red strip, attach it on the bottom of the card with glue.
- Take a greeting white strip, attach it on the top of the red strip with glue.
- Take a thin glowing ribbon and decorate the greeting outline.
- Place the lights you made previously with glue into the cords.
- Mark the right places of the lights with a pencil.
- Take off the lights.
- Create a reflective light effect on the marked areas with pastel colours. Shade it with your fingers.
- Use the colour as per the lights colour.
- Attach the lights into shade areas with glue.
- Add a wish card page inside the card.
- This card will give a smile to the receiver!
Handmade Christmas Card Tutorial: A Wish Card!
Materials:
- Paper pasta( bow shape)
- Acrylic paint
- Paint brush
- White glue
- Glitters.
- A square shape paper
- A rectangular paper to make a card base.
- Chocolate colour bow.
- White paper for wish card.
Procedure:
- Take some acrylic paints, mix blue and yellow colour as we need a colour of a fur needle.
- Take some paper pasta, colour them with the colour you made.
- After the colour dried, add white glue on the edges of the pastas and apply some glitters to them.
- Take a square shaped paper, attach the pasta bows on it by forming a ring with glue.
- Take a colour rectangular page , fold it into half by making two squares. It will be the card base.
- Glue the bow tie decoration to the front of the card base.
- Take a chocolate colour ribbon bow and attach it on the bottom of the paper with glue.
- Add a wish card inside the card.
- Your receiver will be surprised to know what it is made of!
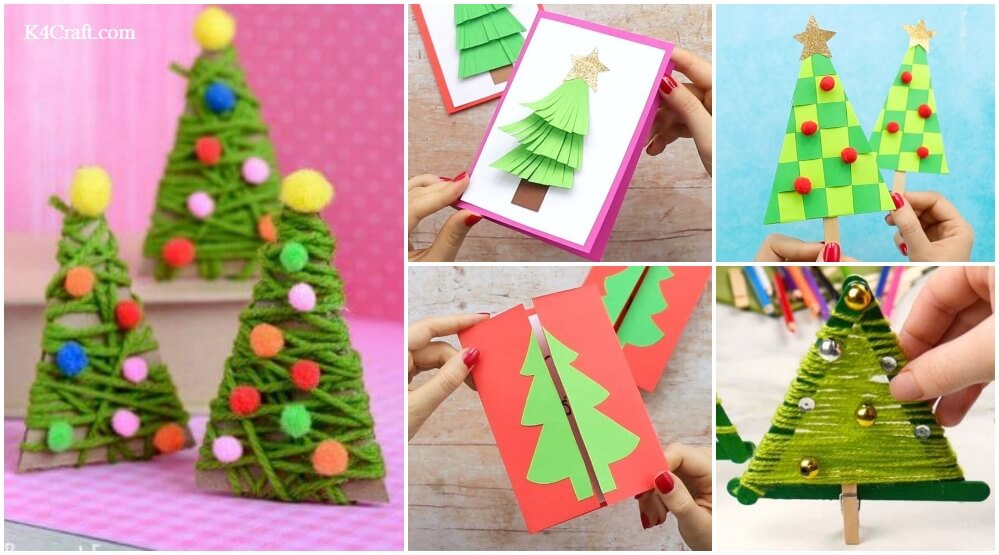
Easy Christmas Card Tutorial: Unconventional Christmas Tree Card
Materials:
- Colouring paper strips
- Scissors.
- Ruler
- A colour paper for the card base. ( Any colour/size)
- Double-sided foam tape.
- Cardboard
- Brown colour cardboard.
- Bright colour paper.
- A plastic star.
- Glitter.
- White glue.
- Wish card page.
Procedure:
- Take some colour paper, make strips and the depths of them about will be about 1 inch and cut them out from the paper
- Cut them out from the paper with scissors
- Take a colour card base, layout a Christmas tree in front of the card by using the colour strips.
- The strips should overlap one and another descending from the bottom upwards.
- Take a contrast colour page background for the strips.
- Apply the paper to cardboard and mark with a pencil.
- Cut the cardboard pieces out.
- Glue the paper strips to the cardboard pieces.
- Take brown cardboard, make a tree trunk on it and cut it out.
- Glue it on the front of the card.
- Take double-sided foam tape and place them on the sides of the strips and attach to the tree.
- Glue a star on the top and some glitter on the page.
- Add a wish card inside the card.
- This card will surprise the receiver!
Cute Christmas Card Tutorial: Cute Snow Mitten Card
Materials:
- Cardboard with the pattern
- Mitten stencil. ( You can Draw it/ print it out from the internet)
- Decoration stones and balls.
- Ribbon.
- Felt.
- Cardboard.
- Decoration lace.
- Glue.
- Scissors.
Procedure:
- Take cardboard with the pattern of the snow mitten, and a mitten stencil, draw it or print it out.
- Trace the stencil on the back of the cardboard with a pencil. It should be the card base.
- Cut it out with a scissor.
- Take three small felt squares, and the same size small square cardboard pieces.
- Trim the edges of the paper squares with scissors.
- Glue a piece of felt and cardstock into the card.
- Take a decorative lace and glue it around the mitten.
- Cut out the extra part.
- Glue the lace like a snowflake in front of the mitten.
- Add a big shiny bead in it.
- Make small bows with ribbon and attach them to the mitten.
- Decorate both sides of the mitten with a pearl bead, draw the stitches of the mitten by using a black pen.
- Shade the edges of the mitten with paint.
- Write a few words inside it.
- Your warm mitten card will be ready!
Tips to Use These Christmas Card Ideas
- To gift your guests – Add these beautiful DIY Christmas cards to your celebration and surprise your guests!
- To gift your friends in school
- To make as Christmas project for School
- To engage kids in creative activities at home during this festive season
More Christmas Craft Ideas
15+ DIY Christmas Tree Crafts for Kids
Christmas Craft DIY : How to Make 3D Paper Christmas Tree

You may like these:
Christmas Salt Dough Keepsake Ornament Concepts
Celebrate the season with salt dough ornament ideas, offering a fun and memorable way to create lasting keepsakes for holiday traditions.
Christmas-Themed Craft Projects for Children to Create at Home

Engage children in festive Christmas crafts at home, fostering creativity and holiday spirit through hands-on projects that bring joy and seasonal cheer.
DIY Artistic Christmas Decoration Ideas Collection
Discover a treasury of creative and handmade Christmas decoration ideas, perfect for adding a personal and festive touch to your holiday celebrations.
Santa-Themed Craft Projects for Kids

Engage kids in festive Santa-themed crafts, offering creative and enjoyable projects that celebrate the holiday spirit and inspire imaginative play.
Christmas Tree Craft Activities for Children

Encourage children to create their own Christmas tree crafts, combining creativity and holiday cheer through fun and hands-on festive projects.