
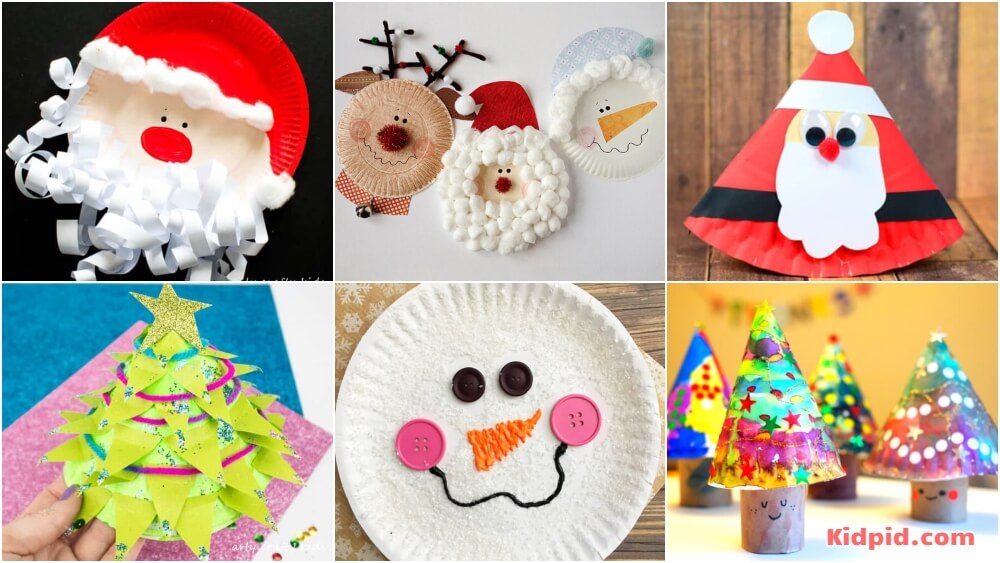
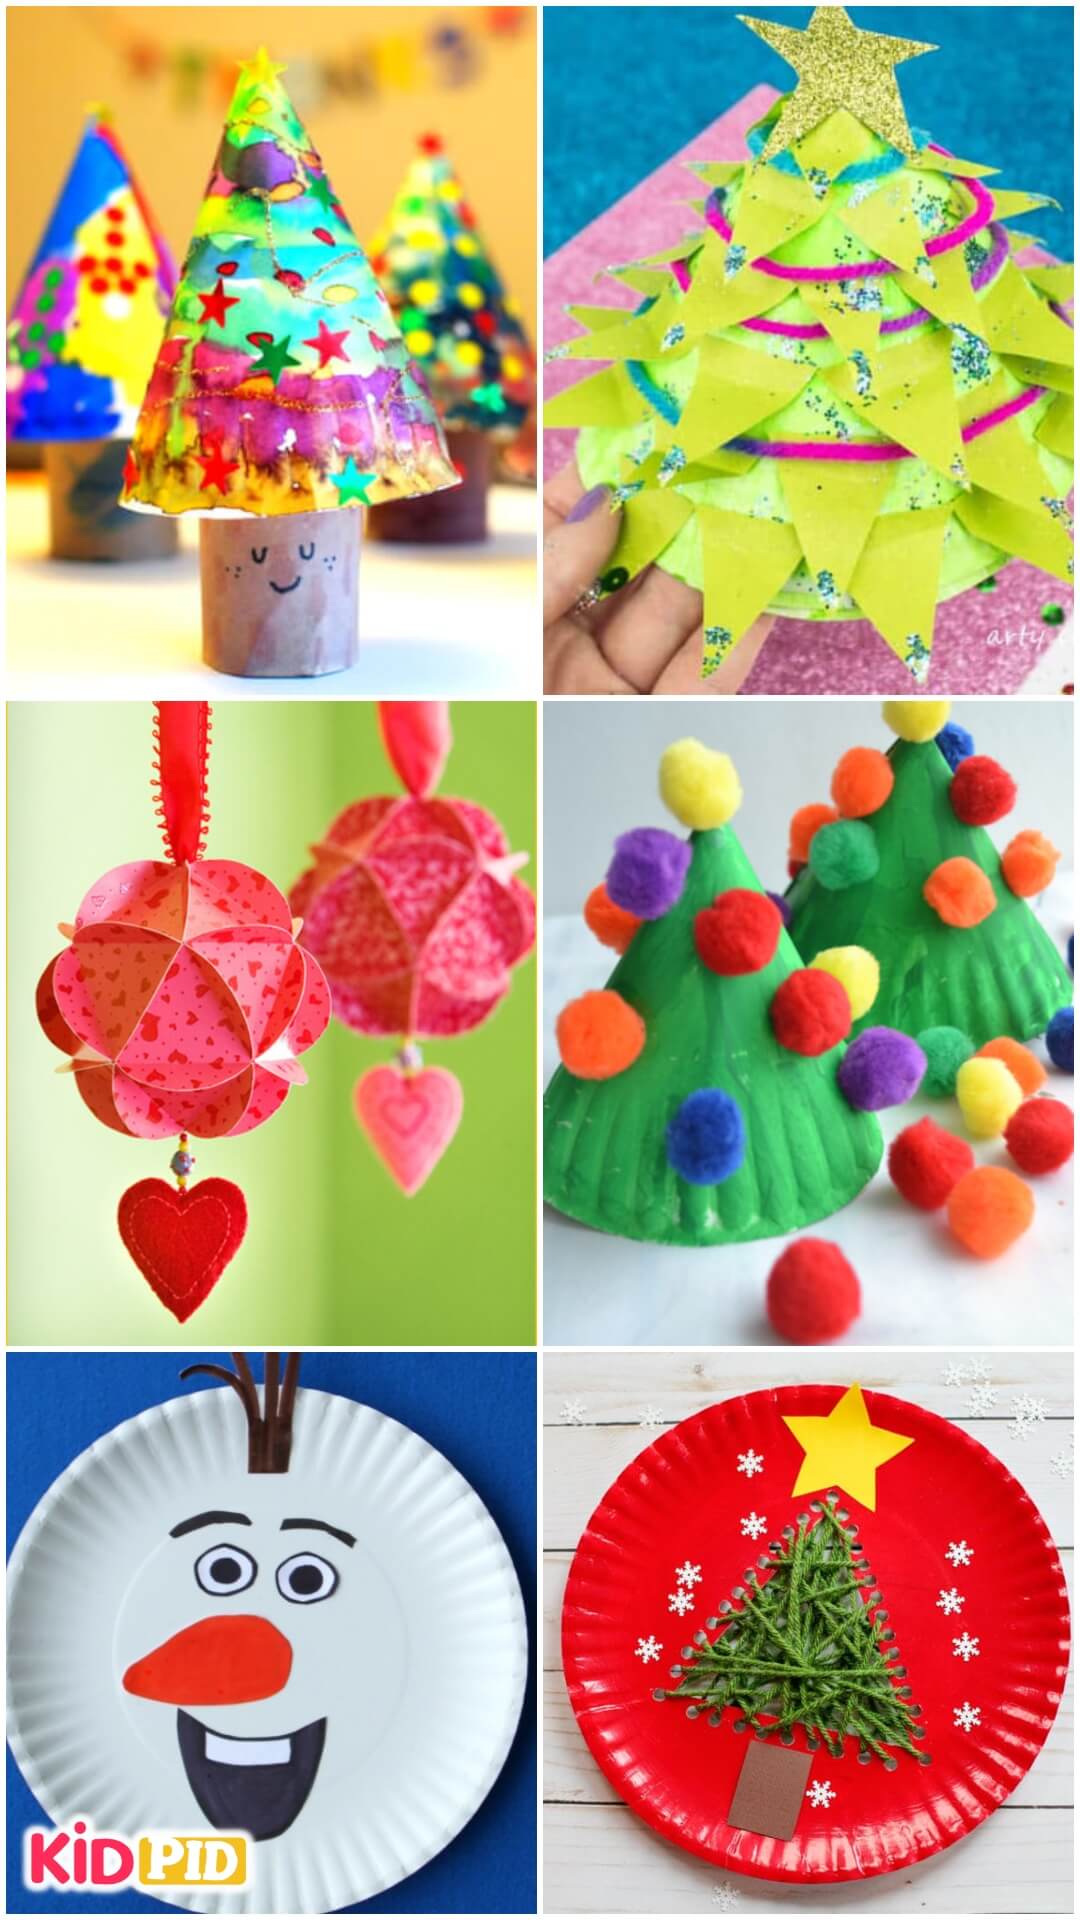
Christmas celebration takes a lot of work and preparation and we all know it. As Christmas is around the corner, and we all know how hectic it gets around Christmas, new year’s eve would just be a few days along. So, we have brought to you a list of activities which will not only help to distract your children and buy you some time to prepare for the festival, but rather it will help you in preparing for the decoration itself, and that too with the help of paper plates.
We can’t even imagine, what these cheap and small paper plates can do, and in no time. They are fun, easy to make, and are affordable. If you find any kind of trouble in finding these paper plates, then you can head to any stationery shops near your house. You can even find them on e-commerce sites, such as Amazon, Flipkart, Snap deal, etc.
Read More: Christmas Connect-the-dots Worksheet
Contents
- Activities To Perform With Your Child This Christmas
- Paper Plate Christmas Tree
- Paper Plate Christmas Tree Craft
- 3d Christmas Tree
- Zigzag Christmas Tree
- Easy-peasy Christmas Tree!
- Snowy Christmas Tree
- Paper Plate Christmas Wreath
- Pom Pom Wreath
- Paper Plate Santa Claus
- Rocky Santa
- Diy – Santa, Rudolph & Snowman
- Paper Plate Snowman Craft
- Snow Globe Craft
- Super Easy Snowman
- Paper Plate Christmas Elf Craft
- Paper Plate Reindeer
- 2 Layer Reindeer
- Diy Paper Globe
- Paper Plate Peppermint
- You may like these:
Activities To Perform With Your Child This Christmas
Paper Plate Christmas Tree
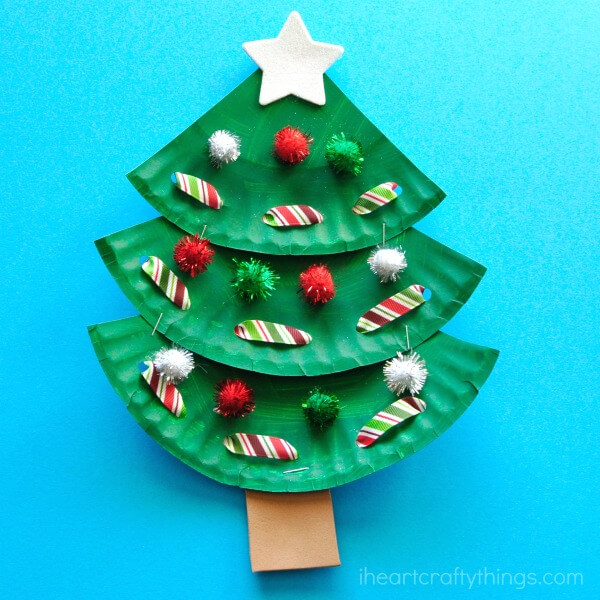
Image Source/Tutorial: iheartcraftythings
Crafts are one of the best things for children, they will learn how to follow directions, focus, and concentrate.
Material required:
- Paper Plate
- Green Acrylic Paint
- Paintbrush
- Scissors
- Hole Punch
- Yarn
- Stapler
- Brown card-stock paper or Brown foam sheet
- Star foam Sticker
- Sequins
- Glue
Procedure:
- To prepare this, you would require a paper plate and then start painting it green.
- Let it dry, and cut it into three portions.
- When you have three partitions, cut one of the sections a bit smaller than the rest of them.
- So, when you layer them together they form a Christmas tree.
- Now, punch 6 holes at the bottom of each section.
- Cut a 12-inch ribbon for each section and lace them through the holes.
- With the help of a stapler, punch all the sections such that it forms a Christmas tree.
- Staple the brown cut out from the paper at the bottom, acting as the base of the tree.
- Add the foam star sticker at the top of the tree.
- Now, we can decorate our tree as per our choice with the help of the sequins.
Paper Plate Christmas Tree Craft
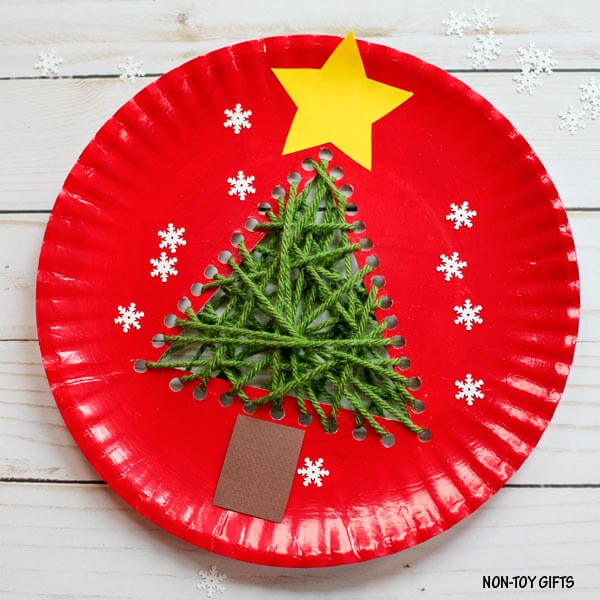
Image Source/Tutorial: Non-Toy-Gifts
Christmas craft is a great way of learning and especially when it involves needling. As you know needling requires a great amount of patience, and that is what your child is going to learn the most.
Suitable age group: 9-14 years
Material required:
- Christmas tree template – find it at the end of the article
- paper plate
- Red paint
- paintbrush
- scissors
- pencil
- Hole punch
- Green yarn
- Plastic yarn needle
- card-stock paper: yellow and brown
- glue
Procedure:
- To prepare this, you would require a paper plate and then start painting it red.
- Once the paper plate is dry, download the Christmas tree template, trace it on the paper plate and cut out the outline.
- With the hole punch, make holes along the three sides of the triangle.
- Cut a big piece of yarn, and tie one end with the needle, secure the other end at the back of the plate with tape.
- Start by threading the green yarn into the holes.
- Paste the tree trunk cut from the brown card-stock paper at the bottom of the plate.
- Secure the yellow card-stock paper star at the top of the Christmas tree.
- Add white card-stock smaller stars in the background for the snowy effect.
3d Christmas Tree
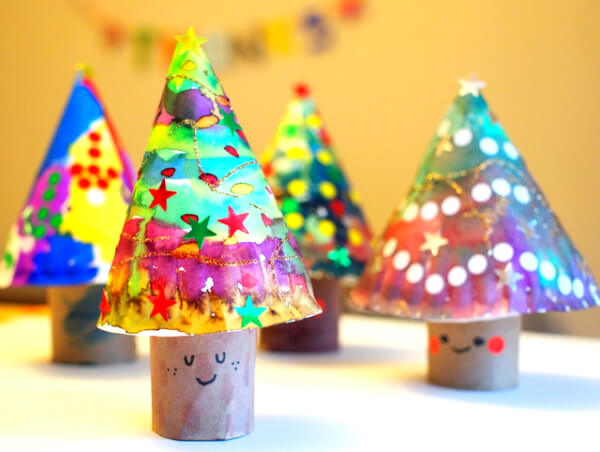
Image Source/Tutorial: pinkstripeysocks
If your children love painting as well as Handcraft, then this is the perfect craft for you. They’re super amazing and easy to make and they might improve your children’s concentration as well.
Suitable age group: 9-14 years
Supplies you need:
- Paper plate
- Toilet rolls
- Paint colors
- Hot glue
Procedure:
- Take a piece of paper and cut it in half.
- Then roll it up from one end in such a way that forms a cone.
- Take a toilet roll tube and paste it inside of the cone with hot glue.
- As soon as the tree is ready, now grab your watercolors and start decorating the trees of joy.
- Once, you are finished with the painting, let it dry for some time.
- Now, add some stars and circles, stickers, and some glitter, for a more radiant effect.
Zigzag Christmas Tree
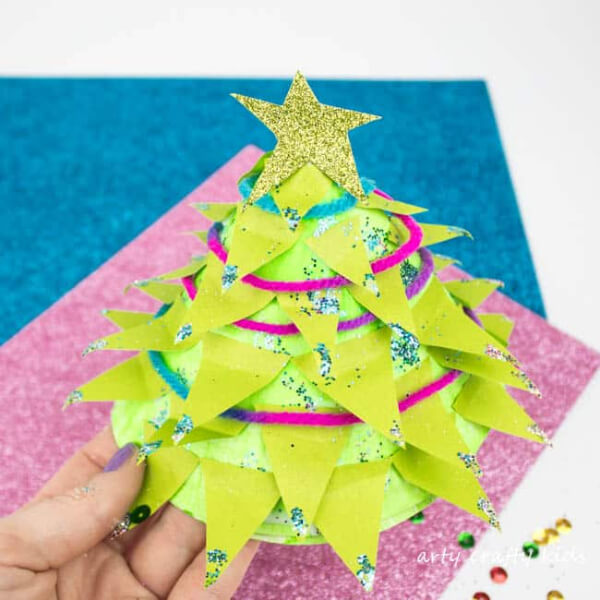
Image Source/Tutorial: Arty Crafty Kids
When kids use their fingers for crafts, they are developing their motor skills, as they use those small muscles in their hands. In this activity, your child will have to wait for the outcome and it is a great lesson for them to learn.
Suitable age group: 9-14 years
Material required:
- Paper Plate
- Green paint
- Green construction paper
- Glitter (plate or glitter tray recommended)
- Yarn or String
- PVA Glue
- Scissors
- Stapler
Procedure:
- Create a slit from the edge of the paper plate to the center.
- Twist the paper plate towards the center, thus creating a cone.
- Now, paint the cone green and leave it to dry.
- Cut a few pieces of construction paper into strips.
- Cut the strips into triangles.
- Create a small fold at the straight edge of the triangle.
- Start gluing the triangle pieces along the fold with the help of PVA glue.
- Start the gluing process from the bottom of the paper plate.
- As shown in the image.
- Add some glue to the tips of the green paper, sprinkle some glitter on it.
- Add a piece of yarn between the paper and finish it with a paper star at the top.
Read More: Christmas Math Worksheets for Kids
Easy-peasy Christmas Tree!
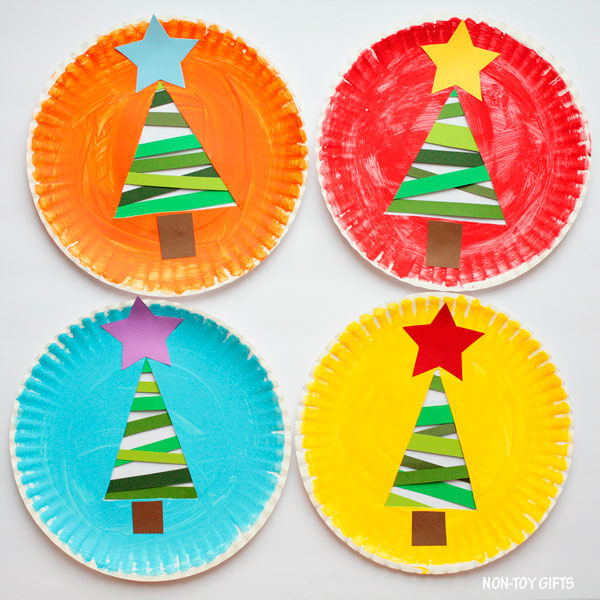
Image Source/Tutorial: Non-Toy-Gifts
Christmas is a festival of happiness, and also especially it’s for the children, so this Christmas we should all devote ourselves to these fun activities with the children. It will also improve the parent-children relationship.
Suitable age group: 9-14 years
Material required:
- Christmas tree template – find it at the end of the post
- Paper plate
- any color craft paint
- paintbrush or sponge brush
- scissors
- pencil
- Green construction paper
- card-stock paper: yellow and brown
- glue
Procedure:
- Start by painting your paper plate with the color of your choice.
- Draw a triangle in the middle of the paper plate and cut it out.
- Cut some paper strips of different widths and lengths, and with several shades of green.
- Turn the face of the paper plate upside down and start gluing the strips on the triangle.
- After this, cut a square brown paper for the tree trunk, and turn around the plate and paste it at the bottom of the tree.
- Add a star at the top of the tree for a beautiful effect.
- Build some more trees by following the same pattern.
Snowy Christmas Tree
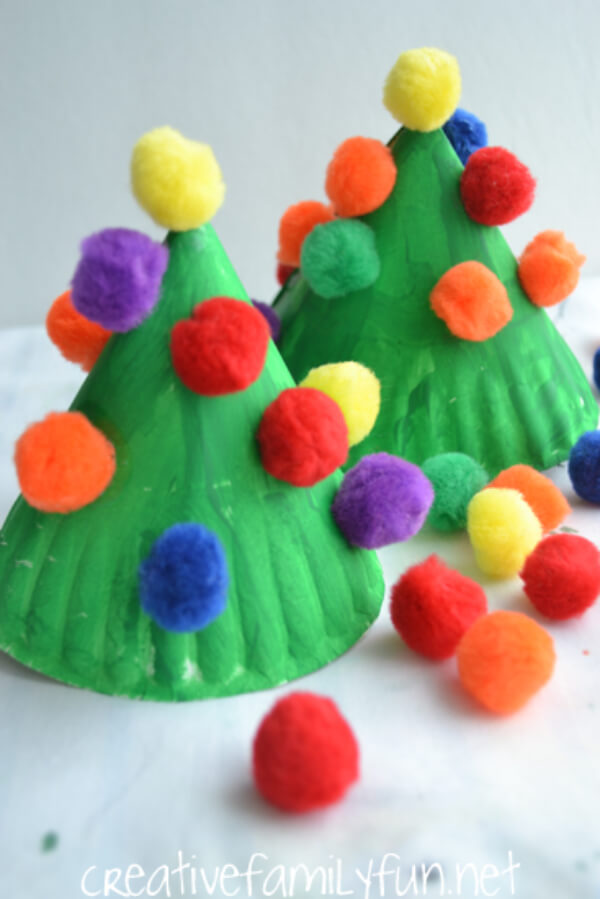
Image Source/Tutorial: creativefamilyfun
Who doesn’t like snow in December! But it’s going to take a bit of time till the snow arrives, so why don’t we create our own little snowy Christmas tree to give our children the perception of the same.
Suitable age group: 9-14 years
Material required:
- Paper plate
- Green paint
- Cutter
- Pom poms
Procedure:
- Create a slit from the edge of the paper plate to the center.
- Twist the paper plate towards the center, thus creating a cone.
- Now, paint the cone green and leave it to dry.
- With the help of hot glue, add some pom-poms to the tree.
Paper Plate Christmas Wreath
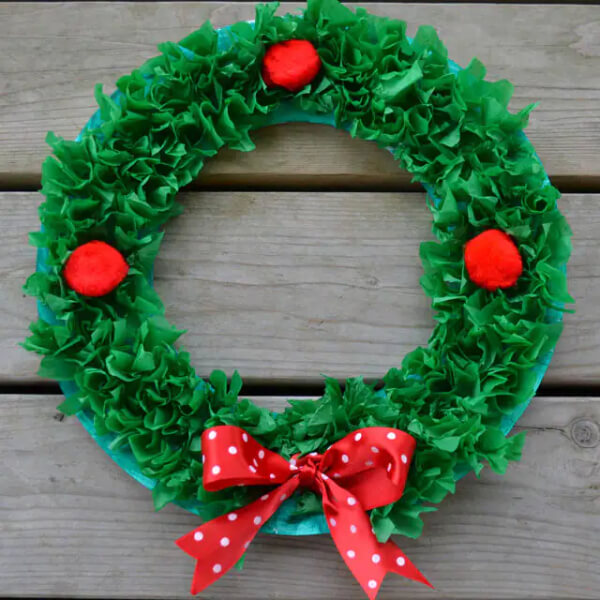
Image Source/Tutorial: cbc
Making tissue paper wreaths and hanging them proudly for the guests to see will build your child’s confidence and the urge to make more crafts and be better at this.
Suitable age group: 9-14 years
Material required:
- Green tissue paper cut into 1-inch squares
- Green paint and a paintbrush
- Pencil
- Paper plate
- Red pom poms
- White glue
- Ribbon
- Scissors
Procedure:
- To prepare this, start by cutting out the center of the paper plate.
- Now, paint the wreath with green paint.
- Let it dry for some time.
- Once, the wreath is completely dry, take small cutouts of green tissue paper and wrap it around the edge of the pencil and dip it in the glue.
- Start attaching the green tissue paper to the wreath.
- Continue this until the entire surface of the wreath is covered as shown in the image.
- Now, attach red pom poms to the wreath with glue.
- Add a red-colored bow at the bottom of the wreath.
Pom Pom Wreath

Image Source/Tutorial: BlogmeMom
As our toddlers are old enough to engage in crafts and build their fantasies, we should also encourage them to do this on their own and with a little bit of our help. It will build their motor skills and help them grow.
Suitable age group: 9-14 years
Material required:
- Paper Plates
- Green paint
- Glitter pom poms
- Christmas ribbon
- Hole punch
- Foil
- Glue
Procedure:
- To prepare this, start by cutting out the center of the paper plate.
- Take a foil paper and roll it to make a ball, dip it in green paint, and now thump it on the wreath for the effect.
- Let it dry for some time.
- Now, punch a hole at the top of the wreath.
- Slide a Christmas ribbon through the hole to make it a hanger.
- Paste, pom-poms throughout the wreath with the help of glue.
Paper Plate Santa Claus
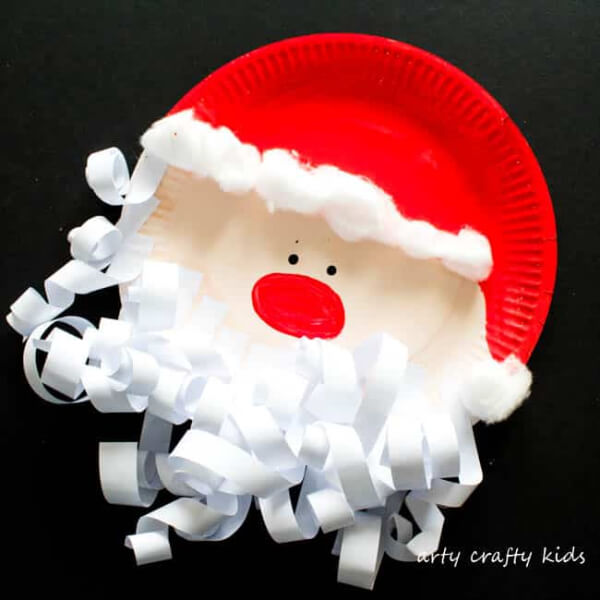
Image Source/Tutorial: Arty Crafty Kids
Kids love Santa Claus, especially when it involves art & crafts. This festive season, help your children in building their own Santa with a paper plate, ringlets, and paper beard.
Suitable age group: 9-14 years
Material required:
- Paper Plate
- Paint
- Cotton Wool
- White Paper
- PVA Glue
- Scissors/paper cutter
- Paintbrush
- Pencil (for curling)
Procedure:
- Take a paper plate, divide it into two parts, for Santa’s face and his hat.
- Paint half of the area of the plate with red color imitating his hat.
- Leave it to dry.
- Cut multiple strips of 1cm width from the A4 size sheet.
- Curl the strips with a pencil in a downward direction to make a roll.
- Paste, the curls at the rim of the paper plate, making a double layer of curls.
- As shown in the image.
- Paint the nose with red paint and the googly eyes with black.
- Finish it up by adding some cotton on the edge of Santa’s hat.
Read More: DIY Christmas Card Ideas
Rocky Santa
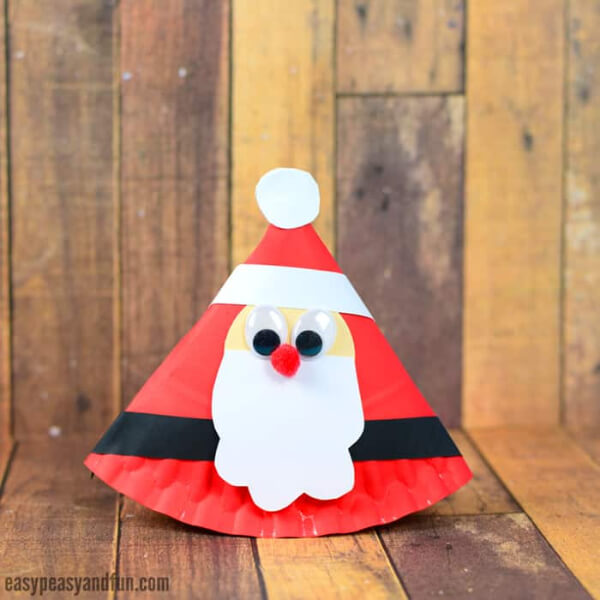
Image Source/Tutorial: Easy Peasy and Fun
Rocky Santa! The name itself has a kick in it, then who are we to stop our kids from making it. You can easily build this Rocky Santa by simply following the steps mentioned below.
Suitable age group: 9-14 years
Material required:
- paper plate (one paper plate will make two Santa’s)
- red paint
- beige paper (or beige paint)
- white paper
- black paper (or black paint)
- Wiggle-eye stickers or googly-eyes
- glue (older kids can also use a stapler for the paper plate)
- scissors
Procedure:
- Start by painting the paper plate red.
- Leave it to dry for some time.
- Cut the paper plate from the middle such that it gives you two halves.
- Using, one half for a cone, and secure it with glue at both ends.
- Cut a circle out of beige paper.
- Cut the beard out of a white paper.
- Glue the circle on the cone.
- Add, the beard at the rim of the circle.
- Cut a strip of 1cm width from black paper and place it at the back of the beard on the cone.
- Cut a white strip of 1cm width and glue at the top of the big circle.
- As shown in the image above.
- Stick googly-eyes on the beige-paper circle and a red pom-pom for the nose.
- Cut a small white circle, and place it at the top edge of the cone.
Diy – Santa, Rudolph & Snowman
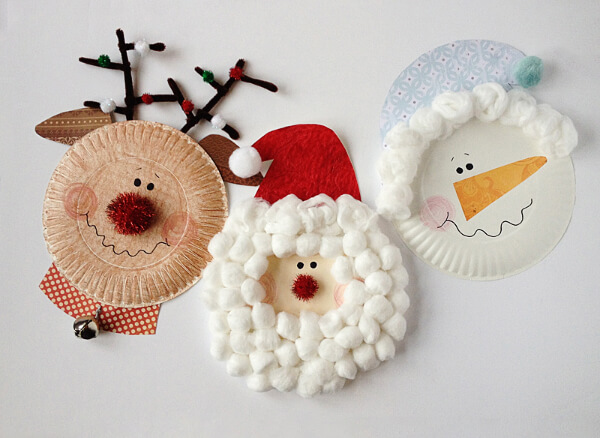
Image Source/Tutorial: kixcereal
Whether you’re crafting with a toddler or a school-aged child, this activity here is going to be a lot of fun. As cotton balls and white glue have always been a kid’s crafting-bestie, and you’ll be shocked to know what all you can build with the help of just these two. Take a look:
Suitable age group: 9-14 years
Material required:
- 3 paper plates
- Cotton balls
- Scrapbook paper or construction paper
- Black Sharpie marker
- Crayons: brown, peach, dark pink
- 4 brown pipe cleaners
- 2 large pom-poms (can use cotton balls)
- 1 large glittery red pom-pom
- 1 medium glittery red pom-pom
- 4-inch piece of ribbon
- 1 large jingle bell
- 8 small glittery pom-poms
- White craft glue
- Tape
Procedure:
- Take three paper plates, turn them upside down.
- Color one of them with brown color and the center of another plate with peach color.
- First, we’ll make the Rudolph.
- Download a pattern from the internet and cut Rudolph’s ears and paste it on the top-back.
- Paste a large glittery pom-pom, on the center of the plate.
- Cut the collar from the red paper and attach it at the bottom and backside of the plate.
- Take image reference.
- With dark pink color, draw rosy cheeks of the Rudolph.
- With a black marker, be creative and draw the eyes, eyebrows, and smile.
- As for the antlers, you would require 3 brown-colored pipe cleaners.
- Take a pipe cleaner and bend it in half.
- Similarly, cut another pipe cleaner in half, and then again bend it in half.
- Twist the smaller pipe cleaners around the larger pipe cleaners; two on the right and two on the left.
- Repeat the same steps and make another pair of antlers and paste it on the top back of the paper plate.
- For the Santa, Use the plate the one with the peach color in the center.
- Cut the hat of the Santa from a red paper, and paste it on the top of the plate.
- Paste a white pom-pom at the end of the hat.
- Glue a glittery red pom-pom on the center of the plate.
- With the black marker, draw the eyes and eyebrows of the Santa.
- Use glue to cover the entire outer area of the Santa with cotton balls imitating the beard.
- Now, comes the snowman!
- For this, download a blue color pattern from the internet and cut it in the shape of a hat.
- Attach the hat with the help of the glue at the top of the plate.
- Cut the snowman’s nose in the shape of a triangle from orange paper, and paste it in the center of the plate.
- Using the black marker, draw eyes, eyebrows, and smile of the snowman.
- Glue a glittery blue pom-pom at the end of the hat.
- Finish it off by adding some glue on the rim of the hat and attaching some cotton balls to it.
Paper Plate Snowman Craft
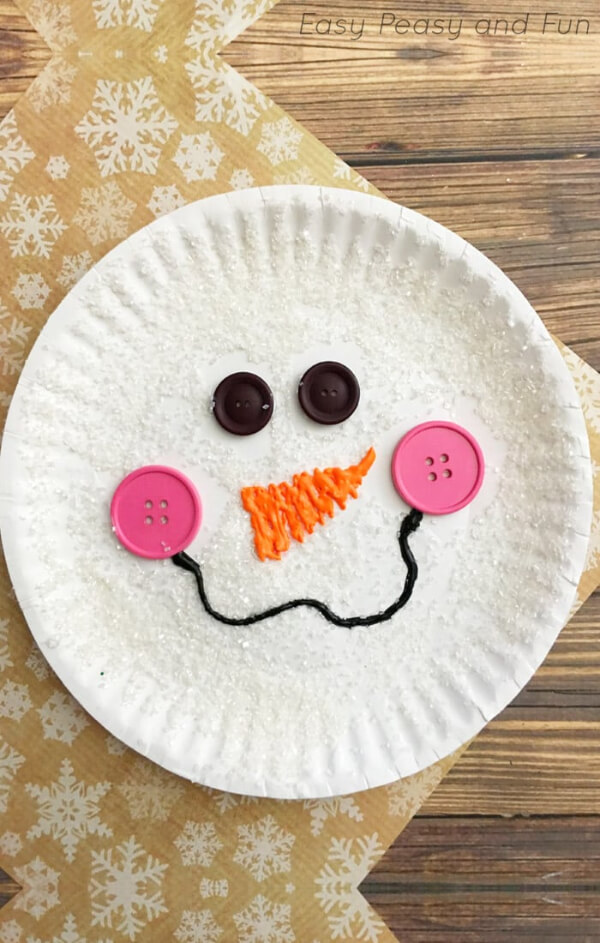
Image Source/Tutorial: Easy Peasy and Fun
One of the biggest worries of a parent is while trying to build a snowman their child should not eat snow. Keeping that in mind, we here brought you a cool and entertaining activity in which you do not have to worry about the snow and you can build one with your child.
Suitable age group: 9-14 years
Material required:
- paper plates
- medium-sized black buttons
- large pink buttons
- white shimmer sugar or glitter
- mod podge
- puffy paint
- paintbrush
- low temp glue gun kids can handle
Procedure:
- Paste the two black buttons on the paper plate at the top middle imitating the eyes of the snowman.
- Then again paste the two pink buttons below the eyes imitating the cheeks.
- Paint the entire surface with mod podge and then sprinkle some white shimmer sugar on it.
- Use the black marker and join the two pink buttons with the wavy smile.
- With the help of orange puffy paint, draw the nose of the snowman in a triangle shape.
- As shown above.
- Leave it all to dry for some time.
Snow Globe Craft
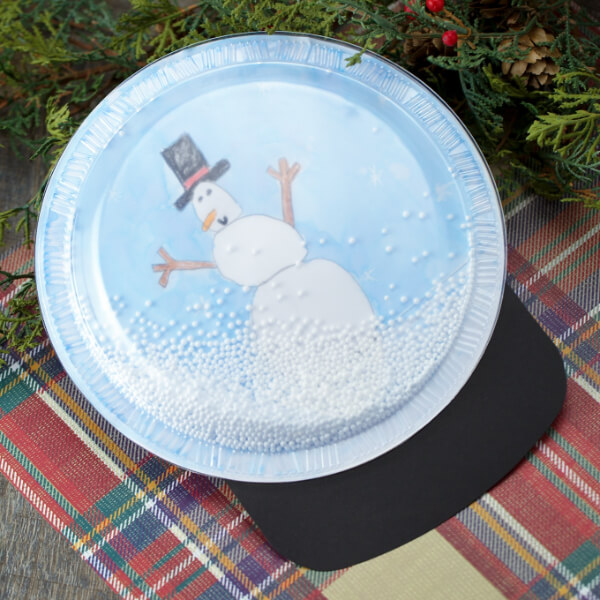
Image Source/Tutorial: Fireflies and Mudpies
As Christmas is just a few weeks away, let’s try and make a toy or decor for the Christmas tree by using a paper plate. It will encourage and nourish kids’ development and soft skills as well.
Suitable age group: 9-14 years
Material required:
- Plastic plate
- Snow globe template
- Clear plastic plates, 7-inch
- Black construction paper
- Glue
- Crayons
- Watercolor paints
- Styrofoam craft snow
- Scissors
Procedure:
- Download the snow globe template from the internet.
- Using tracing paper, let your kids draw the picture on the snow globe template.
- Make them color it as they like.
- Now, let them paint the background in the picture with watercolors.
- Leave it to dry for some time.
- Let the kids cut out both parts of the snow globe.
- Paste the base at the back of the snow globe base.
- Put 1-2tb of styrofoam craft snow in the middle of the globe.
- Glue the plastic plate to the snow globe and leave it for some time until the glue dries.
- As soon as the glue is dry, your snow globe is ready and your child can easily shake, rotate or even flip it.
Super Easy Snowman
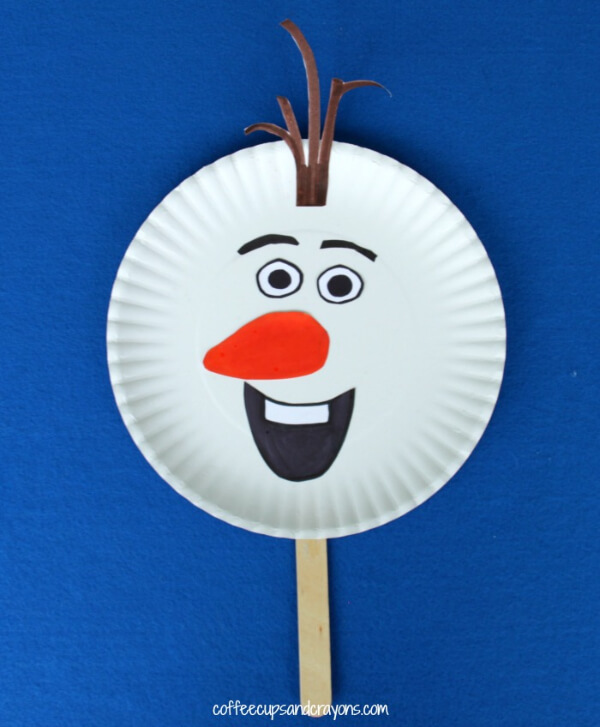
Image Source/Tutorial: coffeecupsandcrayons
Are you looking for an easy and fun snowman craft? then you’ve come to the right place. These helpful step-by-step instructions will help your children to work on their concentration levels as well.
Suitable age group: 9-14 years
Supplies you need:
- Paper plate
- Brown paper sheet
- orange paper sheet
- Glue
- Ice cream stick
- Black marker
- Scissor
Procedure:
- Take a paper plate as the base and consider it as the face of the snowman.
- Using the black marker creates the eyes, eyebrows, and smiley mouth of the snowman leaving the space of the nose.
- Now, cut a carrot-shaped nose from the orange paper sheet with scissor.
- Paste the nose in the middle of the plate.
- Pick an ice cream stick and glue it in the bottom and at the backside of the paper plate.
- As for the antlers, draw the shape of the antler on a brown paper sheet.
- Cut the outline of the same and paste it on the top of the paper plate.
Paper Plate Christmas Elf Craft
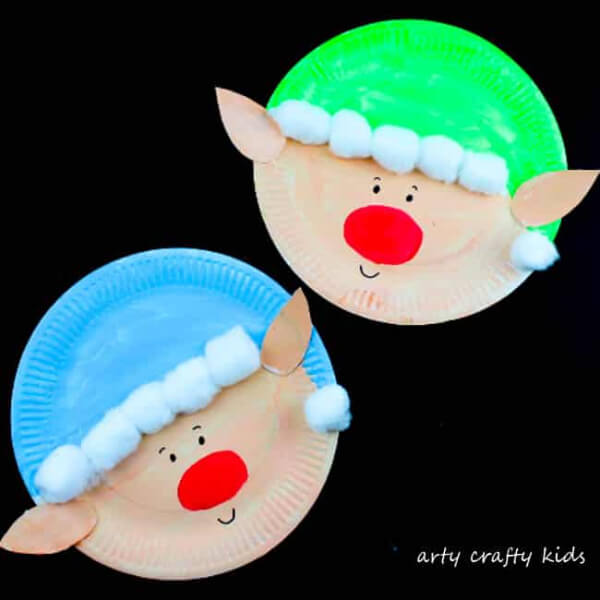
Image Source/Tutorial: Arty Crafty Kids
As we are very- well aware that every Santa needs some help and what better than an Elf itself. So, here we have come along with an activity to make the little helpers that are Elfs.
Suitable age group: 9-14 years
Supplies you need:
- Two Paper Plate
- Paint
- Cotton Wall Balls
- Scissors
- Black Marker
- PVA glue
Procedure:
- Start by painting half of both the paper plates with a skin-colored shade.
- Then paint one half of a paper plate with blue paint and the other half of another plate with green shade.
- Both the colors act as their hats.
- Glue some cotton balls on the edge of both hats.
- Using a black marker, draw the eyes, eyebrows, and smile of the elf.
- As for the nose, take a red marker and draw a large ellipse.
- Cut out two elf ear shapes from a paper sheet and paint them with a skin-colored shade.
- Glue the ears onto the elf with PVA glue.
Read More: Christmas Addition Printable Worksheets for Grade 2
Paper Plate Reindeer
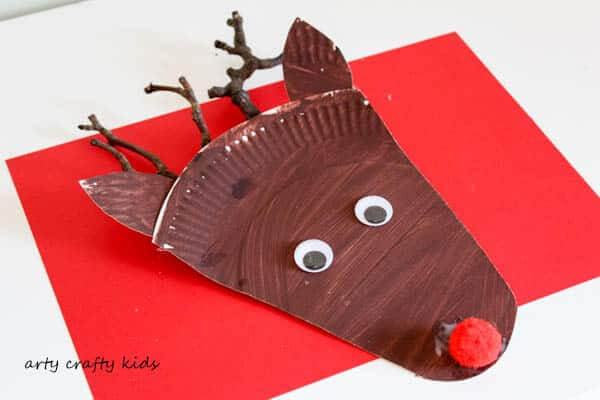
Image Source/Tutorial: Arty Crafty Kids
Every Santa needs a ride to travel along and distribute the gifts and what better than the reindeer itself. It’s super easy, uses minimal supplies, and can be put up in no time. Your child can easily pair it up with any Santa Claus.
Suitable age group: 9-14 years
Supplies you need:
- Brown paint
- Googly eyes
- Red pom-pom
- Twigs
- PVA glue
- Scissors
- Tape
Procedure:
- Start by painting the paper plate with a brown color and letting it dry for some time.
- After that, cut out a big triangle from the paper plate.
- From the Extra part, cut out the ears of the reindeer and keep them separated.
- Now, flip the triangle and secure the ears and twigs with the help of tape.
- Finish the reindeer by adding googly eyes and a red pom-pom on the triangle.
2 Layer Reindeer
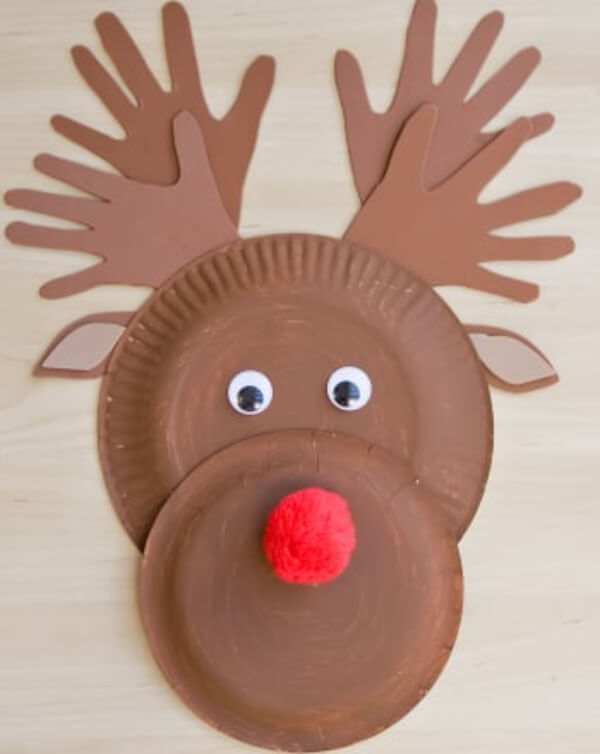
Image Source/Tutorial: education
A popular way to treasure any child’s physical growth is by making art & crafts. As we all know Christmas is just around the corner, Why not build some cool reindeers for Santa Claus to help them commute the gifts to the kids?
Suitable age group: 9-14 years
Supplies you need:
- 2 paper plates
- Brown paint
- Googly eyes
- Red pom-pom
- scissors
- Glue
- Tape
- Brown paper sheet
- lavender paper sheet
Procedure:
- Start by painting the two paper plates with a brown color and letting them dry for some time.
- From the brown sheet cut out the ears of the reindeer.
- Now, flip the paper plate and with the help of the tape, secure one paper plate to the front bottom of the other paper plate.
- After this, attach the ears at the back of the paper plate at the top.
- Glue googly eyes on the first paper plate and red pom-pom on the bottom plate.
- As for the antlers, make an outline of your palm from the brown paper sheet and cut out 4 outlines of the same.
- Tape the first two antlers at the back of the top plate on the right and left sides.
- For the second pair of antlers, tape the antler at the back of the first antler on both sides in a slightly upward position.
- Cut a slightly small measure of the ear than the previous one from a lavender paper sheet and glue it on the ears.
Diy Paper Globe

Image Source/Tutorial: hwtm
We have exclusively brought to you a very cool activity in which you can easily make a globe with just a paper and hang them around in your house. To be more precise, as Christmas is just around the corner you can make these in no time and hang them on your Christmas tree. It will keep your child occupied as well as they will be helping you out in decorating the tree.
Suitable age group: 9-14 years
Supplies you need:
- Pink papercraft
- Hot glue
- Christmas ribbon
- scissor
Procedure:
- Cut out 20 circles of diameter 4cm from a pink craft paper.
- Take a circle, and start bending the creases towards the middle such that it makes a triangle out of a circle.
- Now, repeat the same steps with all the remaining circles.
- Once you’re done, with the help of a hot glue gun and put the glue onto one side of the folding and then take another circle and join them both together.
- Repeat the gluing procedure with 5 circles at a time each, it will kind of give you a shape of a flower.
- Once you’re done, put the hot glue on the downward crease and start joining another circle.
- Repeat the gluing procedure with 5 circles at a time each, it will kind of give you a shape of a flower.
- Now, make a star by joining all the endpoints with the glue.
- Add the star to the remaining structure with glue and your globe is ready.
- Add a ribbon to the top of the globe.
Paper Plate Peppermint
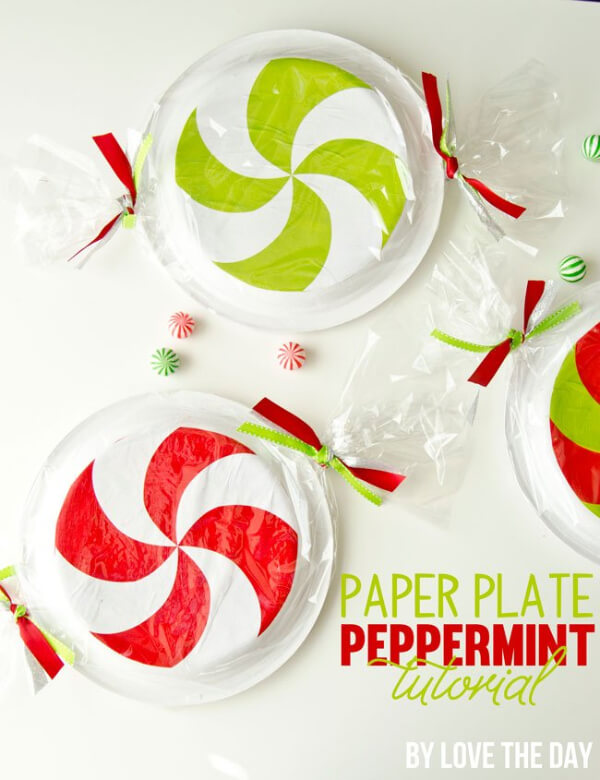
Image Source/Tutorial: designdazzle
Peppermint is considered to be a brand new way of celebrating Christmas and they are into the latest trends as well. Adding them to your Christmas decor will also elevate your house’s elegance. Here is a short activity by which you can do a two-minute craft and decorate your Christmas.
Suitable age group: 9-14 years
Supplies you need:
- Paper plate
- Peppermint template
- Plastic cover
- Christmas Ribbon
- Scissor
- Glue
Procedure:
- Start by downloading the peppermint template and printing it out.
- Cut out the template in the shape of a circle.
- Flip the paper plate and glue the template at the back of the plate.
- Now, cover the whole plate upside down with a plastic cover.
- Twist the extra leaving plastic cover in a bow-like manner.
- Secure the bow at both ends with a Christmas ribbon.
I think if you’re scanning google to find some activities for your children then you might have found some cool ideas and your search has now come to a stop. We all are amazed that what these small crafts could do. I hope you did like our article and will visit for future references. Do let us know in the comment section which was your favorite activity.
You may like these:
Accessible Christmas Decorations through DIY Projects
Discover a range of accessible DIY projects for Christmas decorations. These initiatives encourage creativity and provide an opportunity to personalize your holiday environment with charming and festive elements.
Simple DIY Christmas Craft Concepts for Children
Engage children with simple DIY Christmas craft ideas. These projects foster creativity and allow young ones to create festive decorations, enhancing their holiday experience while developing artistic skills.
Straightforward Popsicle Stick Christmas Crafts for All Ages
Explore straightforward popsicle stick Christmas crafts suitable for all ages. These enjoyable activities promote creativity and can be easily customized, making them perfect for family bonding during the holiday season.
Popsicle Stick Christmas Crafts Tailored for Children
Delight children with popsicle stick crafts specifically designed for them. These engaging projects inspire creativity and provide a fun way for kids to produce unique holiday decorations and gifts.
Straightforward Laurel Wreath Crafts for Children
Introduce children to straightforward laurel wreath crafts. These enjoyable activities encourage artistic expression while allowing children to create beautiful decorations that celebrate the festive spirit of Christmas.


