Craftwork is not limited to kids, in fact, it’s not confined to any age limit. By doing craftwork our creativity increases. We are in school, and college and mostly spend our days in reading and writing alone. This action connects to the left brain which is the logical side of the brain.
The right hand relates to the left brain and most people are right-handed people. Then how do we activate the right hemisphere of our brain which deals with visuals, art, creativity, imagination, feelings, etc? Balancing both will be great, won’t they? Then why don’t we start this process from the initial stage itself? With this kind of craftwork, we can make kids engage fully and can spend more time with them instead of allowing them to dwell on mobile phones. Replace mobile with craftwork through which they’ll do physical activity.
Every kid loves nature so let’s start our craftwork from that. Especially different dark colors will attract them. Let’s think about where we can see various colors of attractive natural phenomena. Got it! it’s nothing other than that RAINBOW!…. Here you can see a bunch of rainbow craftwork for toddlers, preschoolers, and small-age kids. Try to create crafts with the things existing in your home. If you recycle things like these it’ll make your kid think innovative and they used to recycle waste things and come up with wonderful ideas.
Contents
- Colorful Rainbow Crafts for Kids
- Rainbow Keychain
- Rainbow Wand
- Cloud Craft
- Abstract Art Craft
- Edible Slime And Make Rainbow
- Water Xylophone
- Heart Rainbow
- Dough Rainbow
- Toothbrush Rainbow
- Fish Rainbow
- Sand Rainbow
- Cork Rainbow
- Pom Pom Ornaments
- Abstract Heart Rainbow
- Rainbow Dollar
- Rainbow Hairclip
- End Of Rainbow
- Rainbow Notebook
- Shamrock Rainbow
- Rainbow Stick
- Telescope Rainbow
- Rainbow Fun
- Rainbow Blower
- Twig Art
- Cardboard Mobile Rainbow
- Bread Rainbow
- You may like these:
Colorful Rainbow Crafts for Kids
Cloud And Rainbow
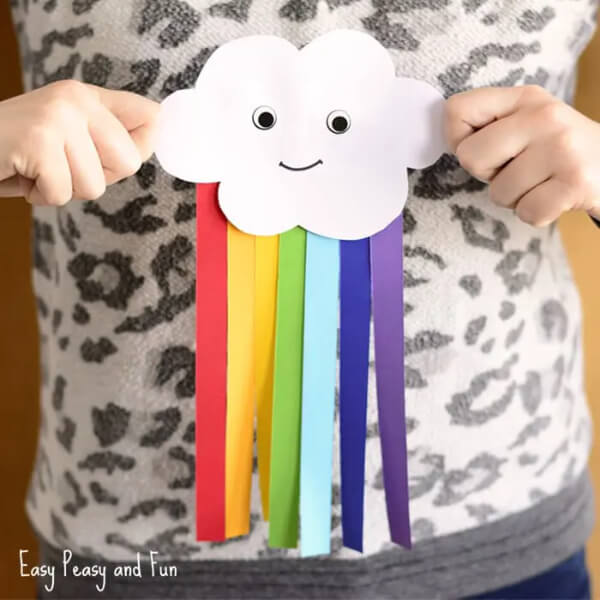
Image Source/Tutorial: Easy Peasy and Fun
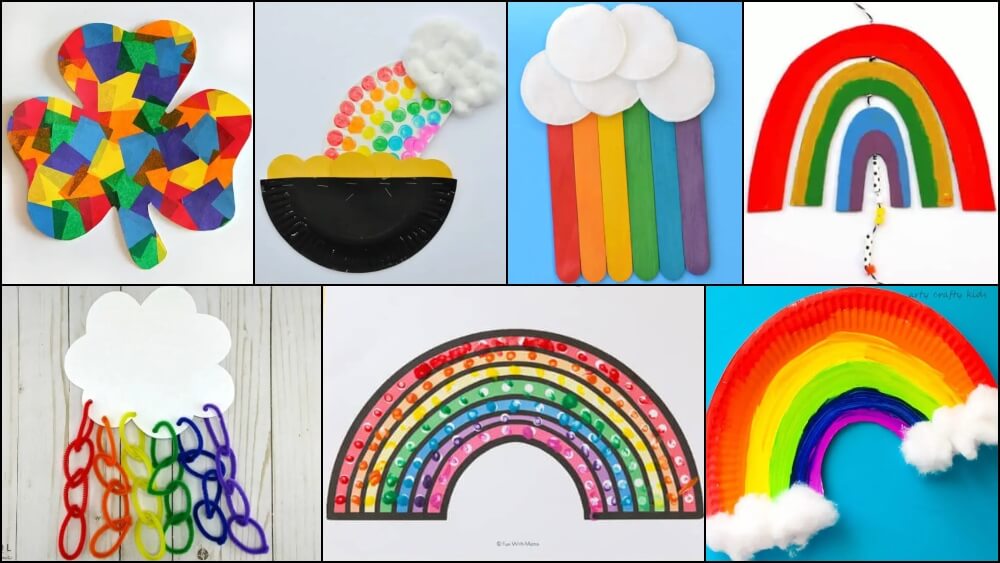
This craft is suitable for the age group of 5-8. The requirement for this craft is white and colorful paper, scissor, glue, and a black marker. It’s simple to craft and easy for kids too. Draw a cloud shape on a white sheet and cut it correctly. If the kid could handle scissors then guide them to cut properly as well as carefully. Cut color papers in a lengthy rectangle-shaped structure. As we know RAINBOW is made up of seven colors, paste the colorful strips of paper on one side of a cloud. Paste a wiggle eye sticker on another side of the cloud if you have one, it will be catchy and interesting for kids, Otherwise, draw eyes. Draw a mouth with a smile. Here we go, now it’s the time to glue it on the walls as a decoration.
Colorful Rainbow
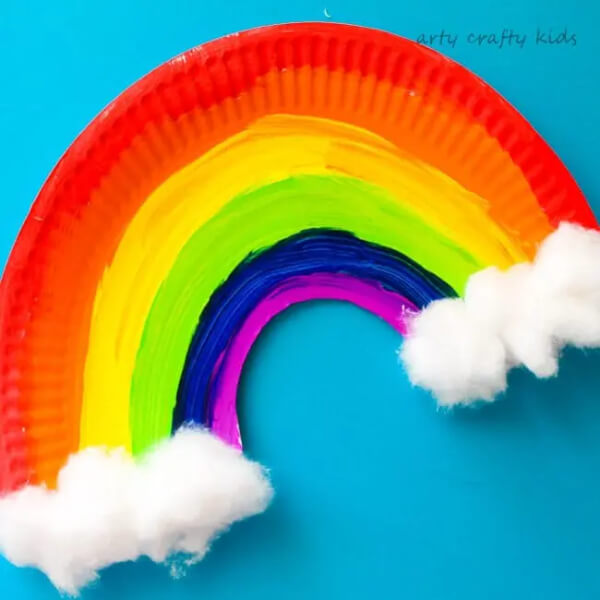
Image Source/Tutorial: Arty Crafty Kids
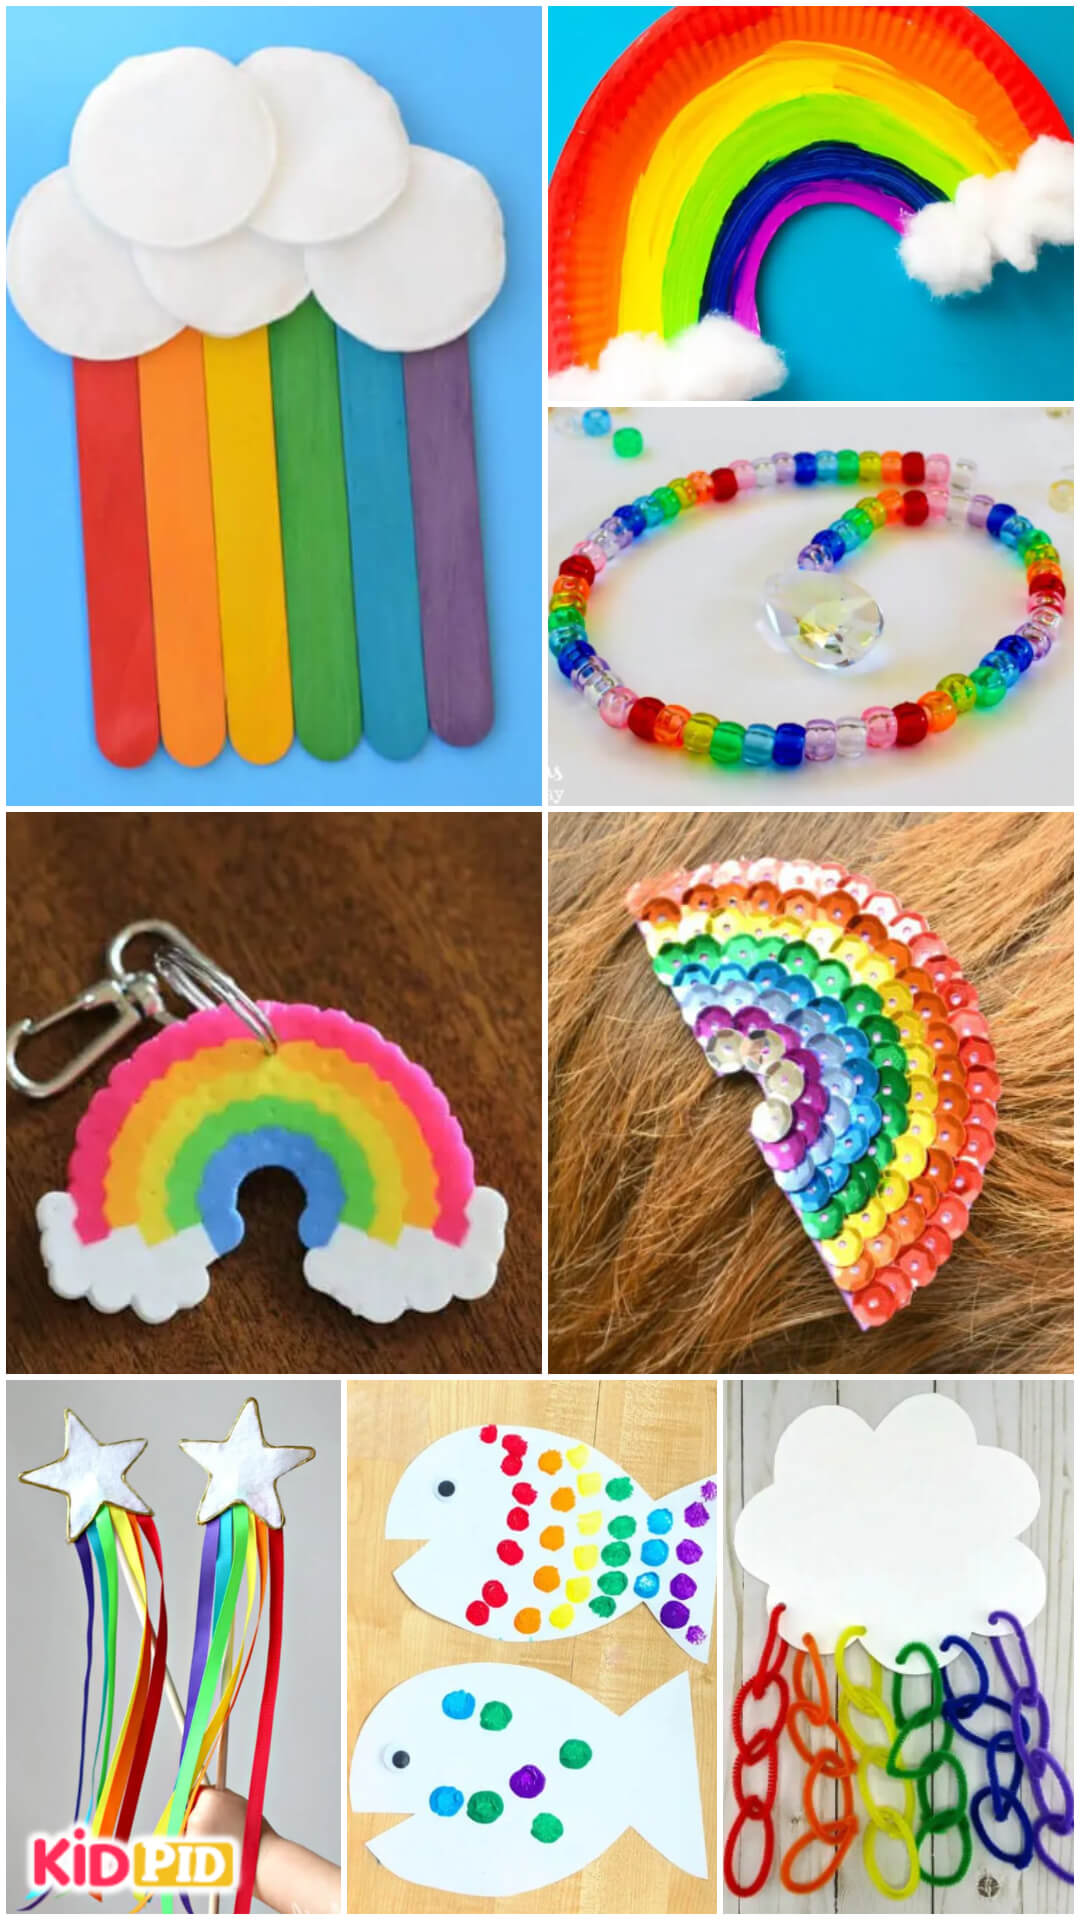
This craft can be done by preschoolers. It’s enough to have a paper plate, paint, glue and cotton wool, and scissors. Cut the paper plate into two halves and then cut a small semi-circle from the center as shown in the below picture. Now paint it with different colors like in RAINBOW. Paste cotton wool on the start and end of the rainbow so that it’ll make a cloudy feel.
Pom Pom Craft
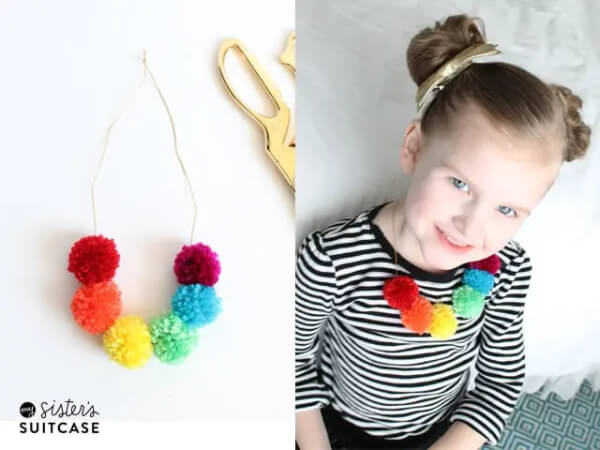
Image Source/Tutorial: My Sister’s Suitcase
If you have a little girl then you can help her to make a pom poms necklace or hairband. If you have a boy child, you can create a pom poms bracelet. The requirements are colorful yarn, thread, scissors, and a pom poms maker or you can also use a spoon to make pom poms. But using a spoon to make pom poms is a difficult task for kids. So going with pom poms maker will be better. As rainbow has different dark attractive colors, you can try this with those colors. This will attract the attention of kids and will make them engage in the craft. Make beautiful pom poms in different colors. Tie them with thread and wear them around your child’s neck. Use plastic thread which is suitable for hairbands and bracelets.
Rainbow In Bead Prism
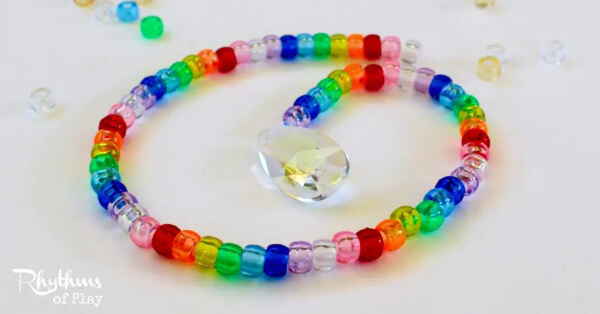
Image Source/Tutorial: Rhythms of Play
This is a simple and easy craft. You just need colorful pony beads, a crystal teardrop prism or heart prism, a plastic needle, and a monofilament line or thread. This will make your kid learn about patterns, and counting and get to know color recognition. Don’t give this craftwork to toddlers and preschoolers because there is a chance to swallow them. So this craft will suit the age category of 5-10. Tie one end of the thread or monofilament line to the plastic needle. Place the crystal or heart prism at the end of the line and start to string the beads one by one. Follow rainbow colors or set a pattern like yellow, red, orange, green, pink, blue, and repeat. Do this until you reach the particular string length and tie at the end of the string. Hang this on the window side so that we can see the sunshine reflection. You can use this craft for birthday parties as well. Demonstrate this practice which will help your kid to finish this craft smoothly. Modeling is better than instruction, isn’t it?
Rainbow & Shapes
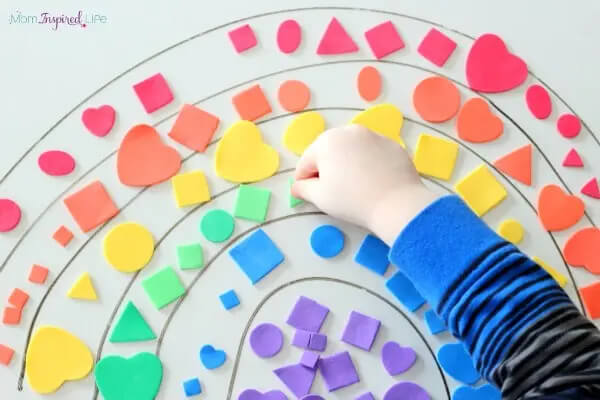
Image Source/Tutorial: Fun Learning For Kids
This craft will teach your kid shapes, colors, and patterns. The requirements are paper, foam shapes, and markers. Draw semi-circles like a rainbow on the contact paper with a pencil and then trace the line with a marker. If it is a pencil and the line didn’t go well it’s pretty easy to rub it and redraw. You can draw lines in pencil and ask your child to trace with a marker. This will give good practice for drawing. Group the colors of foam shapes which will help your kids to recognize colors and arrange them in the rainbow line. Craft is doing with things you have so if you don’t have foam shapes, you can use paper to cut and paint like foam shapes. Now ask your kid to place the shapes and ta-da! here we go with the craft.
Handprint Rainbow
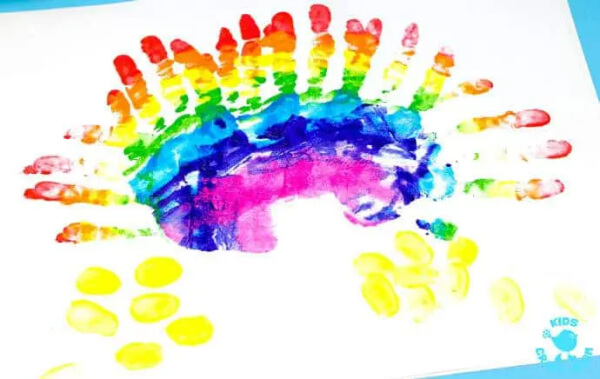
Image Source/Tutorial: Kids Craft Room
This craft is suitable for preschoolers and toddlers. You just need white paper and paints in different colors. This craft doesn’t need much effort compared to any other craft. Use a plate to pour the paint and blend them. Now it’s time to make your kid explore colors and blend them. This improves their fine motor skills. Dip your kid’s little hand on the plate which contains different colors and press them onto white paper. Like rainbow ask your kids to press their hand in an arc format. Here is our rainbow. If you want to make it yellow or any color paints it with one fingertip and mark it on the paper for fun.
Rainbow In Clothes
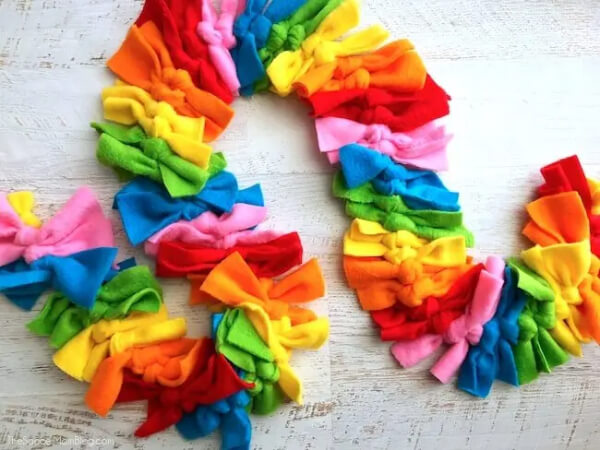
Image Source/Tutorial: The Soccer Mom Blog
If you wish to gift your child a rainbow-colored knotted fleece scarf then this is the one you need to spend time on. You just need the different colored fleece and scissors. No sewing is required. Cut a long strip of fleece based on your required length. Keep it apart now and cut other color fleece 12 in each color in a measurement of “7 1/2, 2 1/4 “. Now tie the small piece of fleece to a larger one and repeat the process until you get like in the below picture. You can demonstrate this to your kid to ask them to follow what you are doing. You can use this as a way and allow your creativity to make new innovative crafts.
Rainbow Painting

Image Source/Tutorial: Fun With Mama
If your kid is a preschooler then buy a Q-tip painting sheet. If they could draw then make them draw a rainbow with a marker. With the help of a Q-tip painting sheet, your kid can make a colorful craft, and will also help them to build color recognition. The requirement to do this task is having with Q-tip sheet, paint, and cotton buds. By dipping cotton bud in paint ask them to place the dipped bud in the white circle of the respective color.
Cylindrical Rainbow
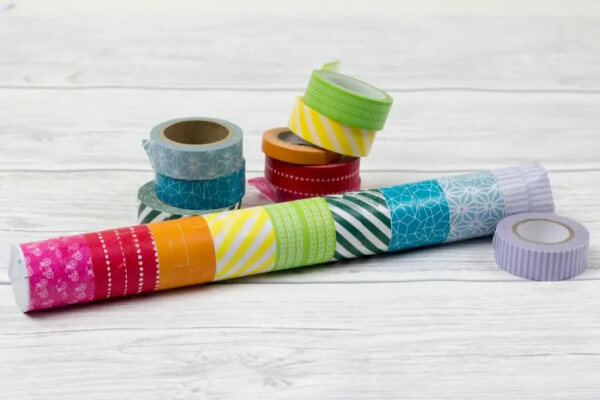
Image Source/Tutorial: Mum in the Madhouse
This craft can be done with waste or recycling materials. We just need cylindrical tubes and colorful tapes. Toddlers and preschoolers love to make and hear sounds. So to produce the sound we can add rice or beans into the tube and close the opening and ending. Roll the white tape around the cardboard and roll colorful washi tape. Instead of tape, you can also paint the cardboard with different colors. 3-8 age old children can make this craft.
Rainbow Keychain
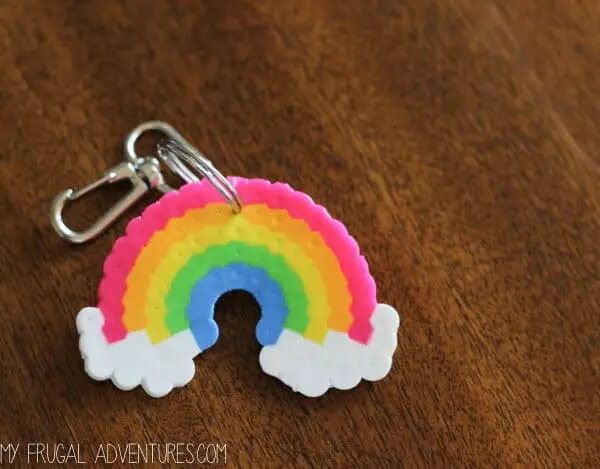
Image Source/Tutorial: My Frugal Adventures
This craft is suitable for the age group of 6-10. It’s pretty interesting and we can use this keychain for kids’ backpacks kid’s can also gift this to their friends. Making a craft with love and care by spending time and then gifting them to their parents or friends as a sign of love is always greater than simply buying things from a shop and gifting them. To do this you need Perler beads, circle pegboards, iron, and a keychain hook. Arrange the beads in the shape of a rainbow with different colors on the pegboard. Use unique colors for each layer of the rainbow and add white beads at the start and end of the rainbow to make clouds. Now cover the pegboard which consists of beads with a piece of paper and iron them carefully. Pre-heat the iron box at medium range and gently press on the beads over the ironing paper. Then you’ll get the shape and you have two ways to attach the keychain. One is removing one or two beads before ironing to make space for a keychain. The second is to make a hole after ironing the beads with a hammer or some other tool. It’s best to go with the first type. That’s all!
Rainbow Wand
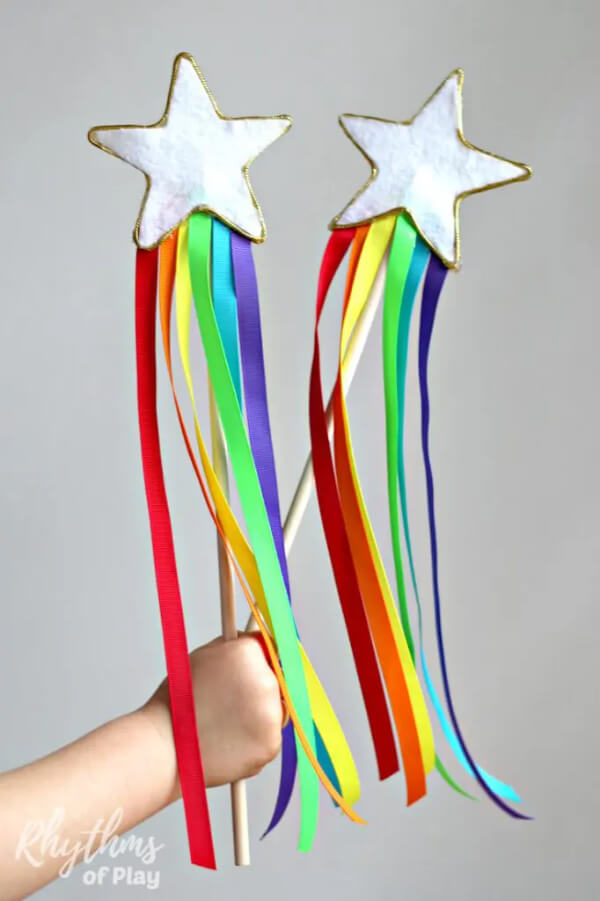
Image Source/Tutorial: Rhythms of Play
You don’t need any fancy items to buy. You can create this rainbow wind with the things available in your home. The requirements are stiff felt or cardboard, colored ribbons, glue, any wooden stick, star cookie cutter or scissor, and colored paper. Take cardboard or felt and cut it with a star cookie cutter, if you don’t have a cookie cutter then you can draw a star shape in the cardboard and cut smoothly with scissors. Paste a glittering paper preferably white color and highlight the border color with some glitter. Keep that aside and let’s work on the bottom part of the craft. Take a wooden stick with at least 20cm and if you want to color then do it. If you have color ribbons then cut them to the length of the stick or else you can use unwanted clothes. Now paste the ribbon and stick it to the back side of the star. We are ready with our wonderful craft.
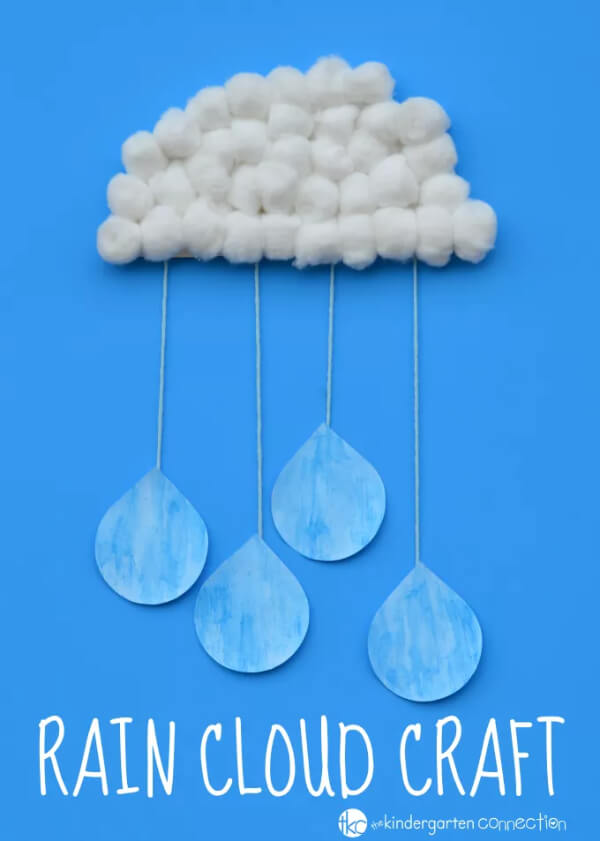
Cloud Craft
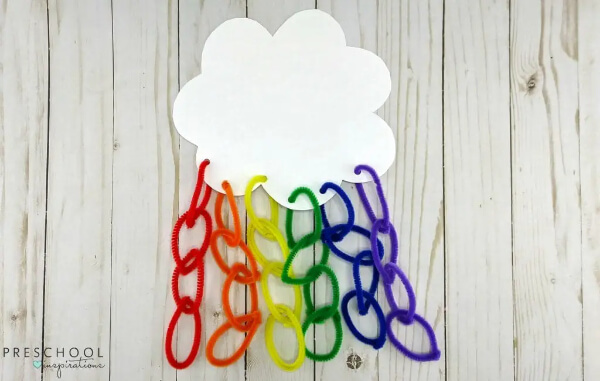
Image Source/Tutorial: Preschool Inspirations
This is easy and doable for preschoolers. Just four things needed to make this craft. There is white paper, pipe cleaner with different colors, scissors, and punch holes. Ask your kid to draw a cloud on white paper and guide them to cut it correctly if they couldn’t handle scissors then you cut and give that to them. Make holes with punch holes at the bottom of the cloud to hand colorful locks. Now cut the pipe cleaner into small pieces and thread one piece into the hole and bend it and make a circle. Use the same color for that line as given in the image. Thread the other red piece into the previous one and repeat the process two more times. Apply the same process for other colors too. Here we go!
Abstract Art Craft
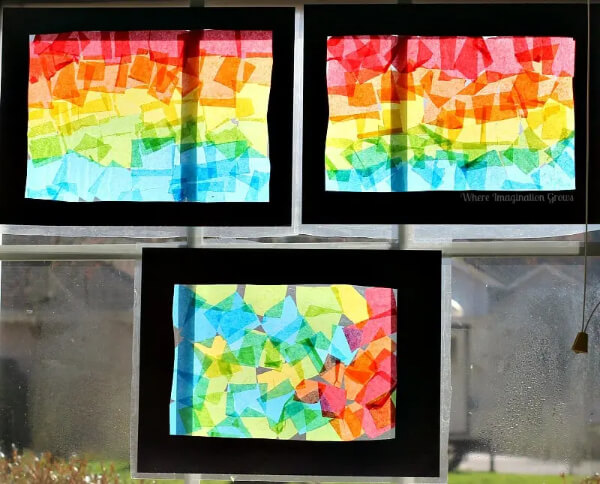
Image Source/Tutorial: Where Imagination Grows
This can be done by preschoolers. You just need contact paper, construction paper, and scissors. To make the frame take contact paper and paint the corners black color with thick width to make the frame feel or you can simply use black tape. Now ask your little kids to cut down the construction papers into small pieces. The shape of those small pieces doesn’t matter here. Paste them with or without order. This will create abstract art with a stunning look with less work. What’s in it of always going in a predefined or instructive way? Creativity blossoms when it is without order. Now hang this craft in your kid’s room to feel their pride and confidence.
Edible Slime And Make Rainbow
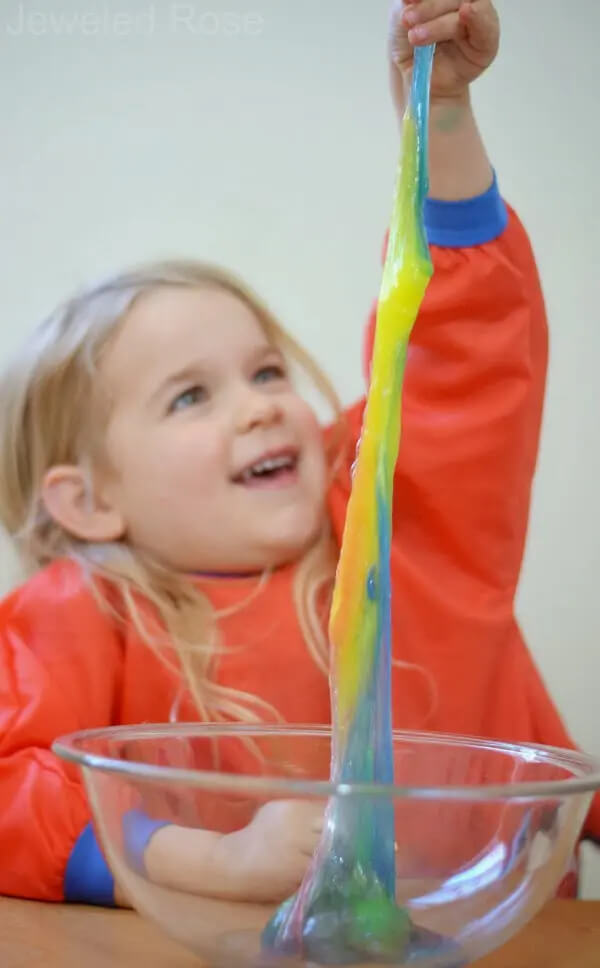
Image Source/Tutorial: Growing a Jeweled Rose
Are you worrying to give slime to your kids because there is a chance to eat it? No worries hereafter! You can make edible slime but it’s not advisable to eat a lot. Just one or two tastes won’t make your kid unhealthy. Psyllium husk powder and water are things needed to make this slime. Food coloring and flavor oil are optional. Mix 1 tablespoon of psyllium and 1 cup of water. Mix them thoroughly and place them in the microwave oven. Heat it until you get a boil of that mixture and allow them to present in the oven for 1 more minute. Stir it and allow that to cool. After cooling it’ll get thick so wait until it gets to that state. Make sure the center part gets cooled and do this process for other colors also. We can store this slime also but not sure for a longer period. Now give it to your child to make fun of this and stay cool without any tension or worries. Give different colored edible slimes and they’ll create rainbows and much more with this.
Water Xylophone
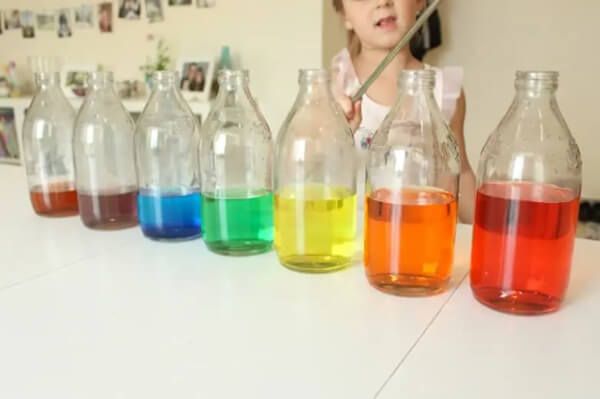
Image Source/Tutorial: Mama Papa Bubba
I couldn’t say this is a craft like others but it’ll help to bring talent and interest to your child. Take glass bottles like shown in an image and fill them with water and add drops of food coloring. Arrange them in line and give your kid a spoon or chopstick or hard plastic straw or metal straw. Usually, children like sounds of any kind and think that playing themselves will make them happy, won’t it? They’ll try to create the tone of their favorite songs, they will replicate that and later they’ll create their own tunes. This may temp their hidden talent in music who knows. Seeing colorful waters and different kinds of sounds will increase their interest.
Heart Rainbow
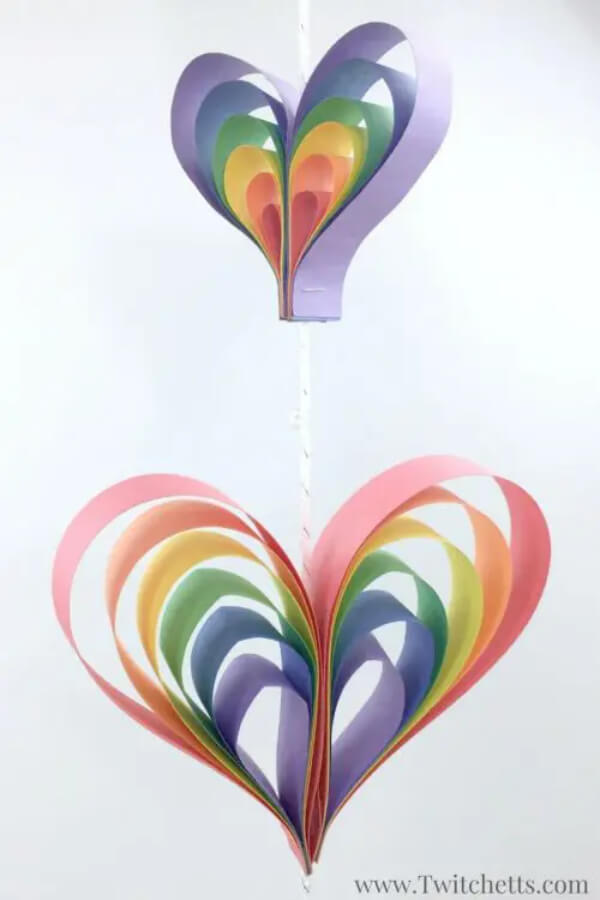
Image Source/Tutorial: Twitchettes
This craft can be done by all age groups of kids. This craft requires very less items and is easy to create too. With some more decoration adults can use this for valentines day too, Sounds good! isn’t it? You need construction paper, string, scissors, glue, cloth pins(optional), and a stapler. As per your required heart shape cut a long strip of construction paper of different colors and lay them on the table like one color over another with space so that you can see each color. Take them and trim off the colors that hang over the bottom strip. Create a teardrop from the smallest and innermost strip and then fold other strips like the previous one. And secure it with a stapler. This is half part of the heart. Repeat the same process to get another half of the heart. Apply the glue on the sides of the 2 halves and place a string in-between them now merge the heart. To make sure those 2 parts stick together tightly use a cloth pin. Make the different sizes of the heart and hang them out. We are ready with a 3D heart rainbow.
Dough Rainbow
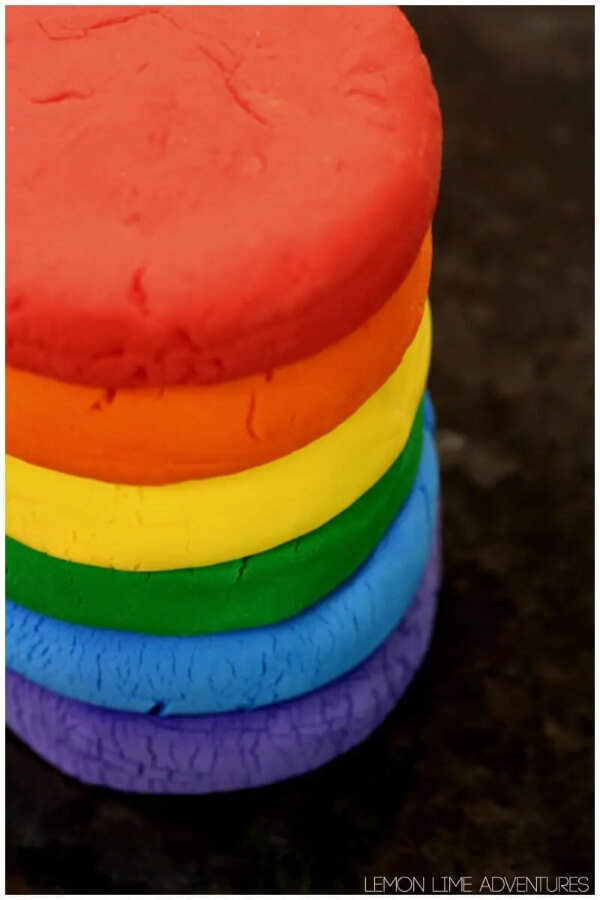
Image Source/Tutorial: Lemon Lime Adventures
To make this colorful dough you need only 3 products which are baking soda, corn starch, gel food coloring, and water(i didn’t count this). Mix all the listed ingredients in a pan and place it on the stove. Stir constantly then slowly add hot water. Stir well till you get the liquid consistency like milk and don’t let stop the stirring process then add gel food coloring. Allow the coloring to mix well and after a few seconds, you can start to see the bubbles. Slowly the liquid turns into a solid state. Let the dough get to cool and try doing this to get other colors as well. Place them one above the other.
Toothbrush Rainbow
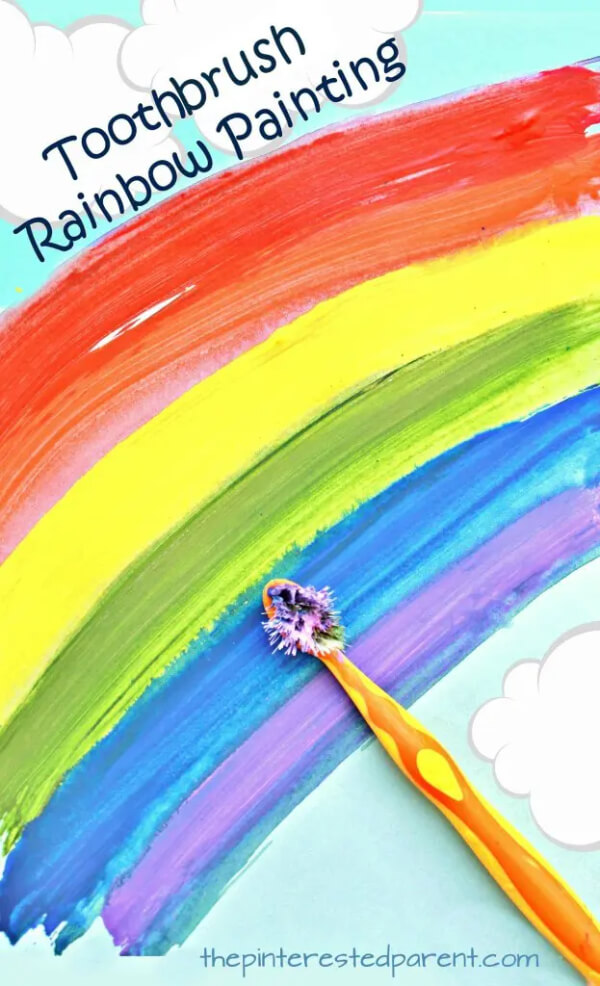
Image Source/Tutorial: The Pinterested Parent
Every habit is hard at first so kids will feel the same for brushing. Show them they could do fun with toothbrushes. A toothbrush, acrylic paint, and white paper are enough to make this fun craft. Be ready with different colors like red, orange, yellow, green, blue, and purple. Pour the paint into small cups. Give old useless toothbrushes to your kid and ask him/her to dip the brush and draw an arc on the white paper. If the paint is too thick then add a touch of water before dipping into the paint to thin them out. If you wanna decorate more then ask your kid to draw clouds near the rainbow paint. The cloud shape may not be but whatever the little buds are doing is always filled with cuteness.
Fish Rainbow
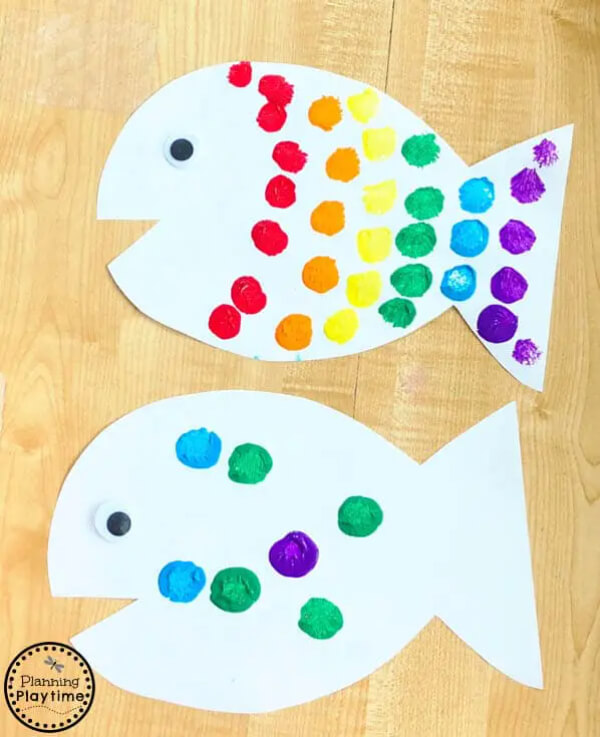
Image Source/Tutorial: Planning Playtime
This craft will boost your kid’s drawing as well as painting activity and it’s just enough to have paper, scissors, paint, and wiggle eye. The first step is to draw fish on white paper and using scissors cut it smoothly. Now we are almost done with the craft. If you wiggle the eye glue it on the paper otherwise draw the eye with the marker. Paint different colors on fish. If your kid is a toddler ask him to press(like a dot) cotton bud dipped in paint towards the fish. If your kid is older than a toddler ask him to color the fish.
Sand Rainbow
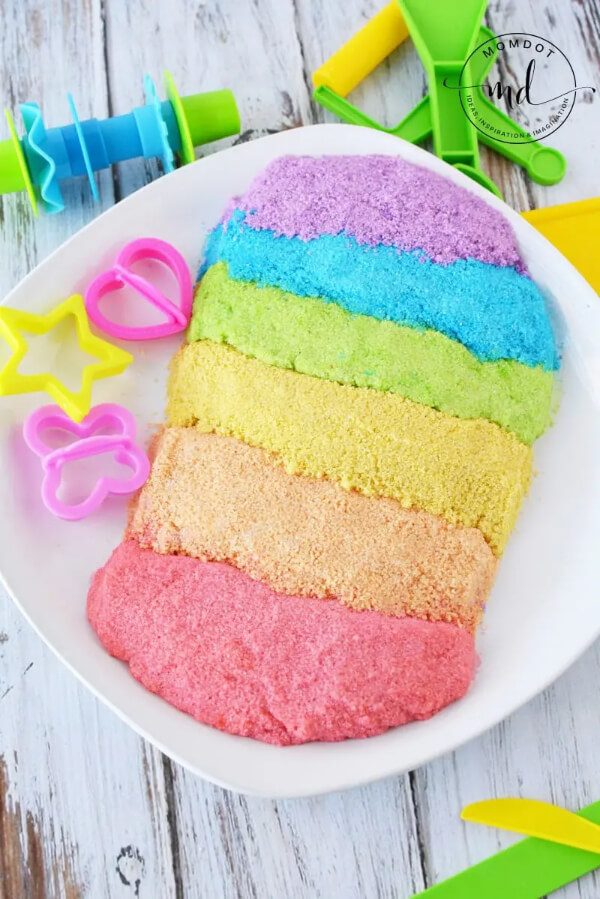
Image Source/Tutorial: Mom Dot
This craft image seems interesting isn’t it? Let’s dive into this craft and see how to create this sand rainbow. When you bring your kids to the beach they used to build houses on beach sand and why not even adults will do that? But we can’t go daily there so why don’t let your kids show their creativity in the sand at home? To do this you need color and sand. You can buy kinetic sand online or else you can make it in your home. White sand, corn starch, hand soap, and water. Add white sand and corn starch in one bowl and add water and hand soap in another bowl. Now add this color to the sand and stir well. The measurement is up to you based on how you want the consistency of the sand. If you want moldable sand then use sand, baby powder, and vegetable oil instead of soap and corn starch. Do this for other colors too and instruct your kid to make a shape. Collage the rainbow colors of sand on the plate and draw shapes like stars, and butterflies on that. This can be done by toddlers, and preschoolers and make sure they won’t put that into their mouths.
Cork Rainbow
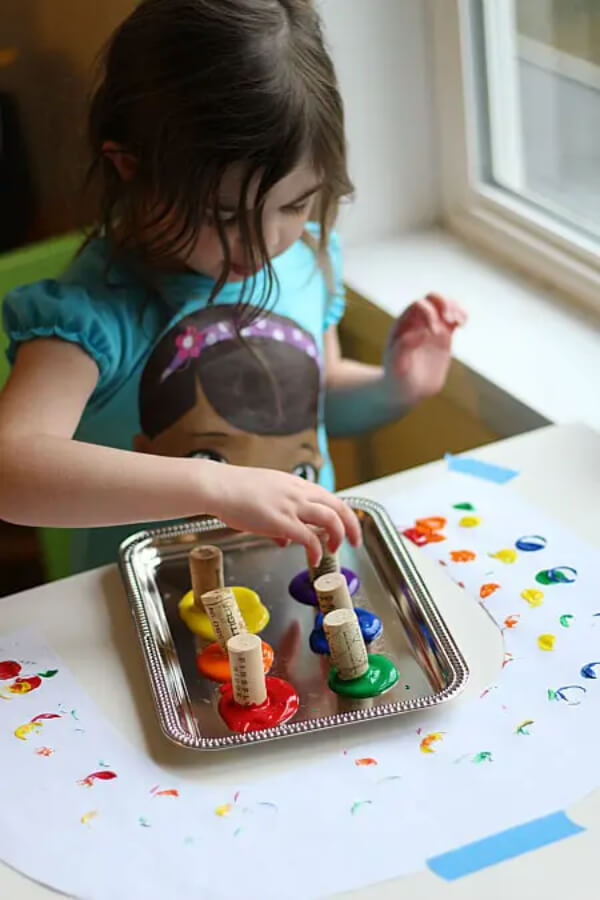
Image Source/Tutorial: No Time for Flash Cards
Toddlers and preschoolers are the right fit for this craft. The things needed for this artwork are white paper, acrylic paint, and cork. Have separate cork for each color. Cut the white paper in the shape of a big arc to represent the rainbow and ask your kid to dip the cork into the paint and press it towards the rainbow arc paper. Though this may seem very simple craftwork your kid will start to enjoy the process.
Pom Pom Ornaments
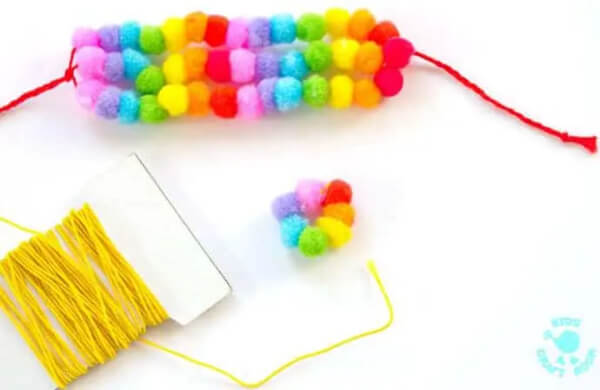
Image Source/Tutorial: Kids Craft Room
This can be done by any age category. If your kid is older enough to make pom poms you can ask them to plaint it otherwise you order it from online platforms like amazon. It’s also possible to commercialize your craft at a reasonable price, this will make your kid more confident in themselves. If you are about to make pom poms then use a pom poms maker else you can also make them with kitchen items like spoons. There are many youtube videos for how to create pom poms at home without a pom poms maker. For toddlers and preschoolers use a plastic needle which is safe to use. Instead of single color try multicolor which will be more attractive, especially for kids. With the help of thread and needle plaint 3 layers by leaving the thread in both front and back of about 10cm based on your wrist. Tie a knot as shown in the below picture and wear it as a pride of your work. Similarly, make a ring that will require a minimum no. of pom poms.
Abstract Heart Rainbow
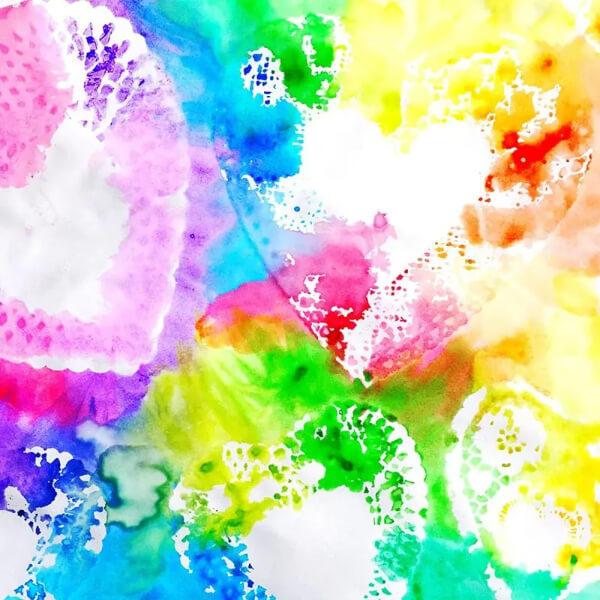
Image Source/Tutorial: Raising Kinley
To create this craft you need white paper, paint, and a brush. Just allow them to paint whatever comes to their mind with various colors ranging from yellow to purple (rainbow colors). There is no age limit for the craft. Based on the kid’s age we can see the shape, pattern, and finesse of the art. That’ll help your kid to practice more on painting. The more we spend on a particular work the more will become experts.
Rainbow Dollar
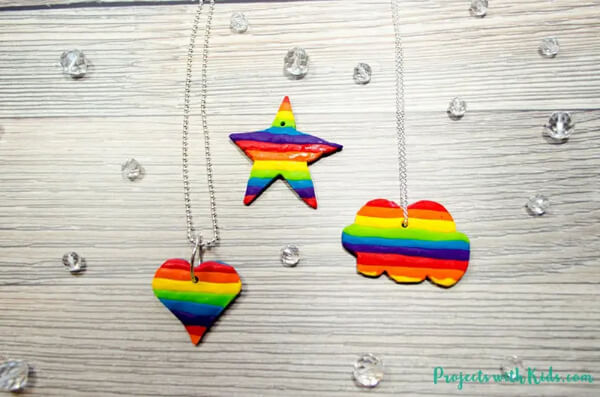
Image Source/Tutorial: Sunshine Whispers
This is simple as well as attractive craftwork. The task is just to cut and paint. You need cardboard, scissor, acrylic paint, a punch hole, and a dollar chain. This can be done by kids of all ages. The perfectness and decoration correspond to the age of the kid. Draw the patterns you want like heart, star, and cloud in the cardboard, and cut them neatly. Now paint with various rainbow colors like in the below image. This would improve the art of painting and finesse. Make a hole with a punch hole and add a dollar chain to that. You can wear this or can make them hand on the wall. Also can decorate with these at birthday parties.
Rainbow Hairclip
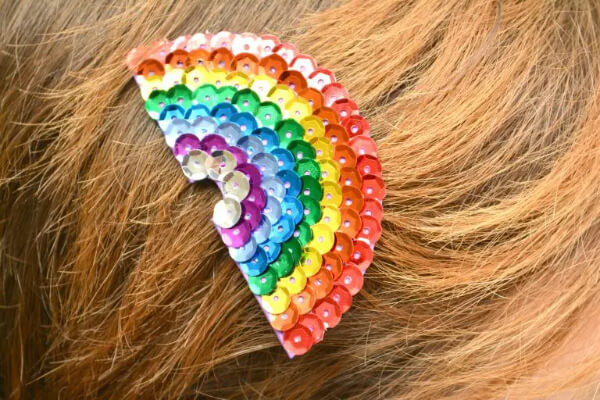
Image Source/Tutorial: Surviving a Teacher’s Salary
Creating and showcasing our craft is one kind of happiness and creating and wearing our craft is another way of happiness. If you have a girl child you can make and you can guide your kid to make rainbow hairclip craft. Kids can also gift this to their friends(girls), and sisters. Sequins of rainbow colors, glue, purple craft foam, hairclip, white paper, and pencil. Firstly draw a rainbow on white paper with a pencil according to the size of your hair clip. Setting that as a base trace purple craft foam. Now in the order of rainbow color paste the red sequin on the outermost edge of the foam and sequentially place the red sequins one after the other. Follow this procedure for other colors to like in the image given below. Glue the hairclip on another side of the foam and let it dry. Ta-Da your craft is ready now!…
End Of Rainbow
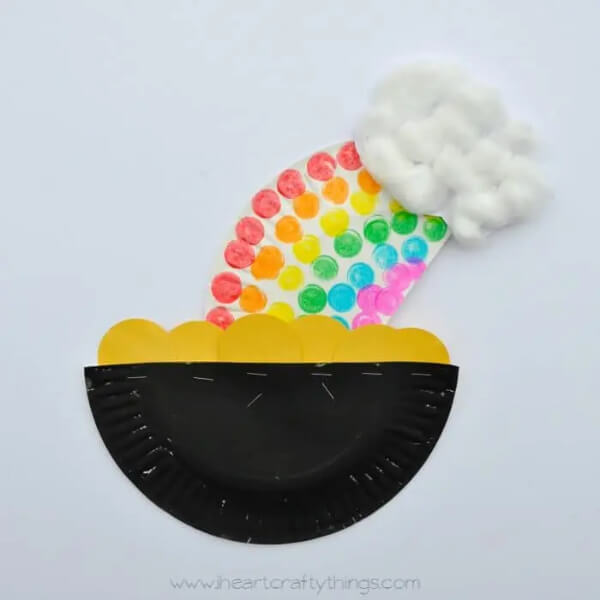
Image Source/Tutorial: I Heart Crafty Things
We don’t know where the rainbow will end so let’s create ourselves the end of the rainbow as a golden pot. To create this craft you need a paper plate, white paper or cardboard, cotton wool, glue, paint, a stapler, and a scissor. Cut the paper plate into two equal halves. Paint black color in one half and set that aside to dry. In another half make a rainbow with a dot maker otherwise paint an arc with rainbow colors successively. Cut cloud shape in white paper, stapler it with a rainbow plate, and paste cotton wool on top of that. Make circles or semi-circles in cardboard and paint them with yellow color. Attach them with a black plate by using glue or a stapler. Now merge the two-part so we’ll get a golden pot rainbow.
Rainbow Notebook
Image Source/Tutorial: Pink Stripey Socks
From toddlers to preschoolers can do this craft. Construction paper, scissors, colored pencils, markers, and a stapler are needed to make this. Fold the colorful construction papers into half and arrange them from red to purple as shown below image, you can arrange them in any color format based on your wish. Cover them with white paper and using a stapler attach all of them. Draw eyes, nose, and mouth to look good. If you want to color the front white page with color pencil.
Shamrock Rainbow
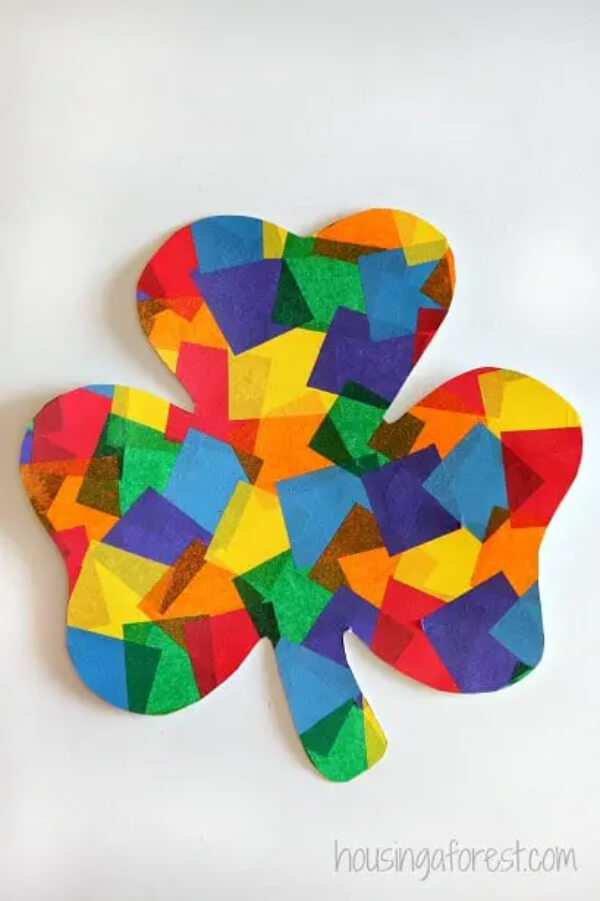
Image Source/Tutorial: Housing a Forest
Toddlers, preschoolers, and even adults age can do this craft. Do leaves always need to be in green color? What if try in a different way? So here is the news of creating a leaf. Moreover, this looks professional and fantastic. You need colorful tissue paper, glue, and scissor. Cut lots of rainbow color tissue papers into small squares. No need for any pattern to arrange those papers, simply place the papers in a random manner. By watering down the glue paste the papers otherwise it may easily get damaged. If we cut those in the shape of a shamrock, we are done! to make it better, draw a shamrock on white paper and cut it. a place that shape above this tissue paper now trims down the tissue paper. This looks great, isn’t it? To secure it safely as well as attractive make a frame and place it inside this.
Rainbow Stick
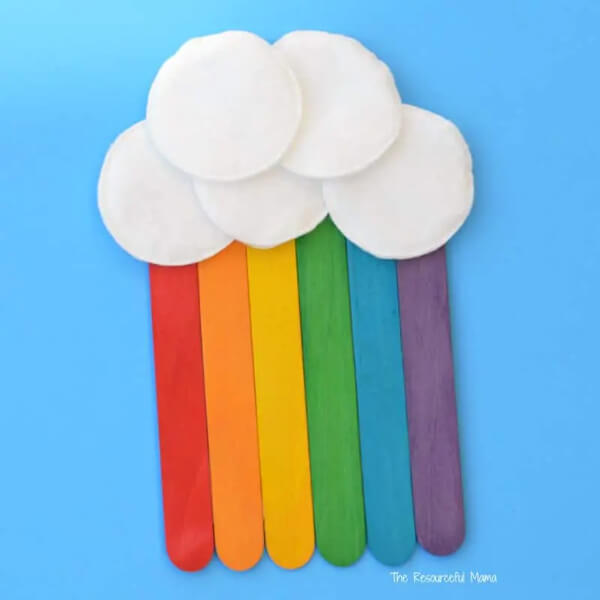
Image Source/Tutorial: The Resourceful Mama
This is pretty easy for toddlers. The items needed are cotton pads, cardstock, paints, and craft sticks. Paint the sticks with different colors. Keep cardstock as a base arrange and paste the painted sticks to form a rainbow. Now paste the cotton pad above the sticks to create clouds.
Telescope Rainbow

Image Source/Tutorial: Smart Schoolhouse
It’s kind of different from other rainbow crafts. You need a lid say a mason jar lid, colored papers, glue, and scissors. Measure the size of the chosen lid and based on that measurement create color paper’s length and width. Keep the width as constant, and reduce the length of each color paper by half an inch. For example, place yellow color after the lid with the measure of width:1.5 and length:9 inches. Next to yellow is purple with width:1.5 and length:8.5 inches and for the next one width:1.5 & length:8 and so on. Glue them correctly as shown in the below image.
Rainbow Fun
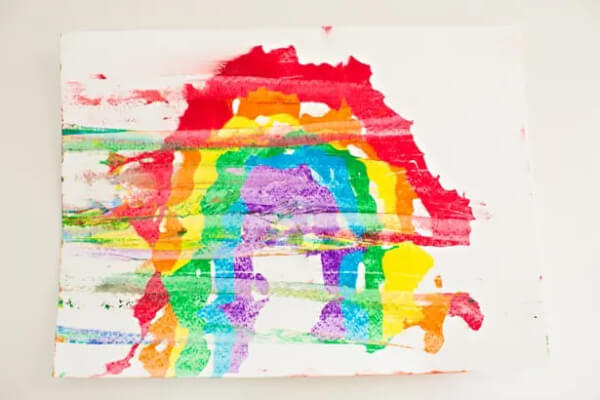
Image Source/Tutorial: Hello Wonderful
This suits toddlers. Arrange the things to make this craft for your child. Is that necessary to make a craft perfectly? Why not in another way round? We couldn’t always expect perfectness from your little one. Leave the craft-making thing to little cuties and watch their atrocities and creativity. Fill shaving cream on a pan and pour rainbow color paints like the rainbow shape on it. Ask your kid to press the white paper gently on the pan and remove the paper in a few seconds. With cardboard or something remove the shaving cream which sticks on the paper. Otherwise, without shaving cream, you can create this art by just giving paper and paints to your cutie pie. Let them create their own…
Rainbow Blower
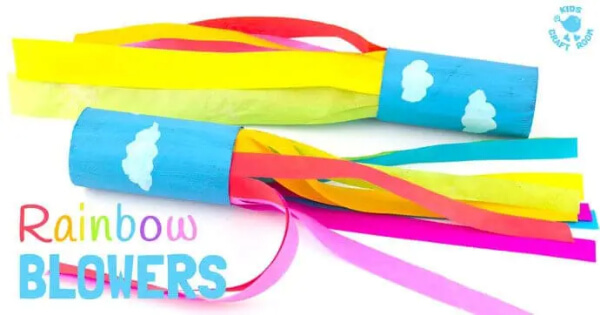
Image Source/Tutorial: Kids Craft Room
Any age of kid can do this craft. Cylindrical cardboard, paint and brush, glue, and scissor is needed to make this. Recycle the cardboard from your home, take the required length of cardboard and paint that with acrylic paint and draw clouds with white paint to make it good. Cut the construction paper or colorful tissue paper and paste it on the inside of the cardboard. You can play with that now.
Twig Art
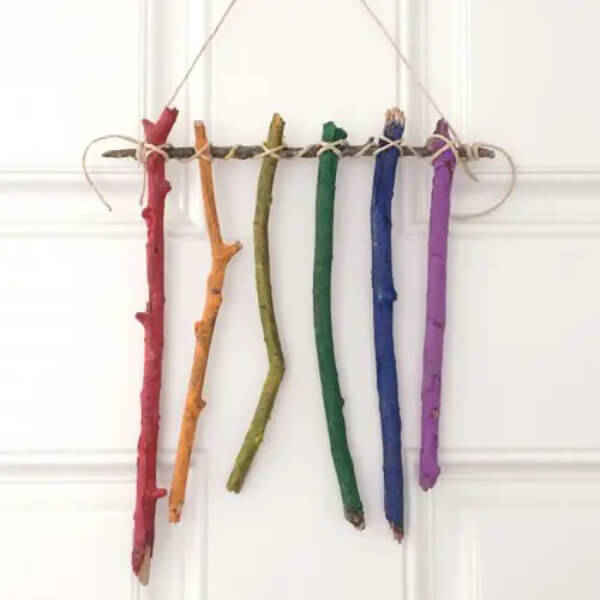
Image Source/Tutorial: Twitchetts
You need not spend any amount on this craft. You need sticks and twigs, paint, brush, and string. If it is an autumn season and you have many sticks and twigs like this in your garden then it’s enough you can try something with that. It’s like “For the capable, even grass can be a weapon”. A preschooler can make this. Paint the twig with various colors paints. Place a twig in a horizontal manner and start to tie the other painted twigs with jute or any string. Now hang them out. That’s all
Cardboard Mobile Rainbow
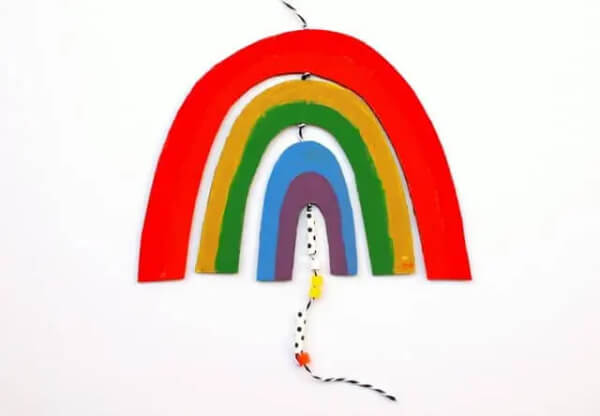
Image Source/Tutorial: Pink Stripey Socks
This craft is easy peasy so let’s start doing it. You need cardboard, string, glue, scissors, and paint. Take cardboard like from cereal box or electronic box and cut them in U shape or semi-circle shape. Then trim them into 3 pieces as shown in the below image. Now paint them with different dark colors on both sides so that it’ll look nice while moving in any d. Poke the string into the center of the cardboard where you can see vertical holes. Tie a knot at the start and end of each cardboard to make sure it fits correctly and add beads below the smallest arc as a form of decoration. Now hang them near the window side so that when the breeze hits this craft it’ll move and make the craft beautiful.
Bread Rainbow
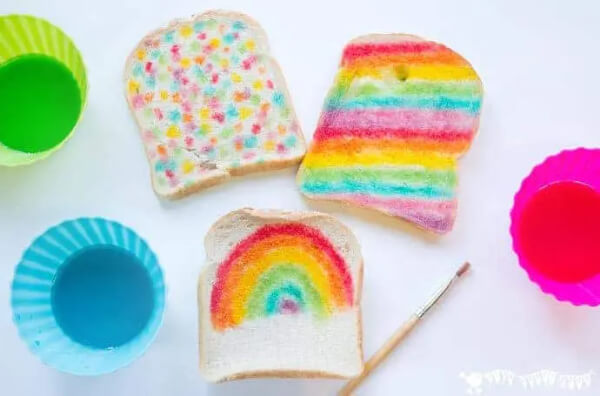
Image Source/Tutorial: Kids Craft Room
Always children won’t pay attention to food, will they? So we can make them see the food more attractive and active. But the sad reality is we can’t pour paint on bread. So what do we do? Yes, got the idea, we can make an edible paint. The process is very simple. Add granulated sugar, paintbrush, food color(to make different colors) and water then keep that in heat flame. When the sugar is diluted you will get the liquid(edible paint). With the paintbrush color the bread like a rainbow, flag, or whatever your kid wants to paint. It’s restricted to bread, you can also paint with this edible paint in cupcakes, cookies, or pancakes as well.
You may like these:
Cloud-Themed Craft Projects to Enjoy During the Holiday Season
Celebrate the holidays with imaginative cloud-themed crafts, offering creative and whimsical projects that inspire joy and artistic expression for all ages.
Simple Winter-Themed Craft Activities for Children
Engage kids in easy and festive winter crafts, perfect for celebrating the season while fostering creativity and fine motor skills through hands-on projects.
Winter Craft Projects Suitable for Both Kids and Adults
Enjoy collaborative winter-themed crafts designed for all ages, providing opportunities for creativity and bonding during the colder months.
Snowman-Inspired Craft Ideas for Kids – Creative and Straightforward Concepts
Encourage children to create festive snowman crafts, offering simple and imaginative projects that celebrate winter and inspire playful creativity.
Spring-Themed Craft Ideas and Activities for Children
Welcome the season with vibrant spring crafts, providing kids with fun and educational activities that celebrate nature’s renewal and creativity.