It may seem that our kids are way too much involved in the digital world and to put that to rest, you must be probably thinking about some activities for your kids to perform. We think fingerprint crafts are very beneficial for any kid’s nurturing. It is important for their development as it stimulates a child’s senses, such as touch/feel, sight, smell, etc.
It also helps in building the intellectual developing meaning the mixing of colors teach our children about the colors and how to create new colors from the existing ones and most importantly it is FUN! They are also very cheap and easily available as you only require paint colors for them. You can easily get them at any nearby stationery or online e-commerce platforms such as Amazon, Flipkart, etc.
Contents
- Fingerprint Crafts for Kids
- 1. Fingerprint Flowers
- Supplies you need:
- Procedure:
- 2. Finger Beehive
- Supplies you need:
- Procedure:
- 3. Fingerprint Bunny
- Supplies you need:
- Procedure:
- 4. Fingerprint Football
- Supplies you need:
- Procedure:
- 5. Fingerprint Napkins
- Supplies you need:
- Procedure:
- 6. Fingerprint Corn
- Supplies you need:
- Procedure:
- 7. Finger Peacock
- Supplies you need:
- Procedure:
- 8. Fingerprint Apple Tree
- Supplies you need:
- Procedure:
- 9. Fingerprint Alphabet
- Supplies you need:
- Procedure:
- 10. Thumbprint Flower Pots
- Supplies you need:
- Procedure:
- 11. Thumbprint Magnet
- Supplies you need:
- Procedure:
- 12. Thumbprint Dandelion
- Supplies you need:
- Procedure:
- 13. Thumbprint Bunches
- Supplies you need:
- Procedure:
- You may like these:
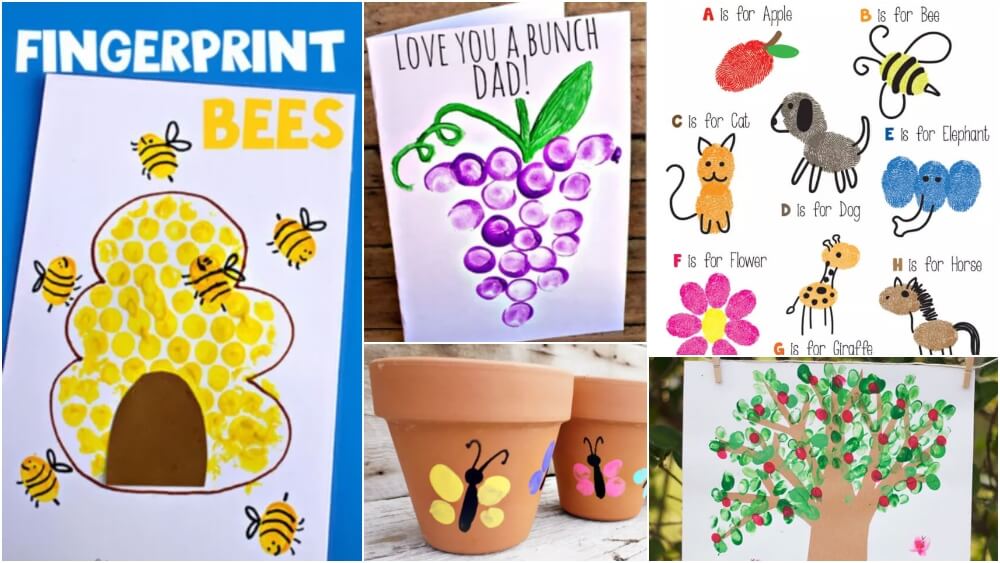
Fingerprint Crafts for Kids
1. Fingerprint Flowers
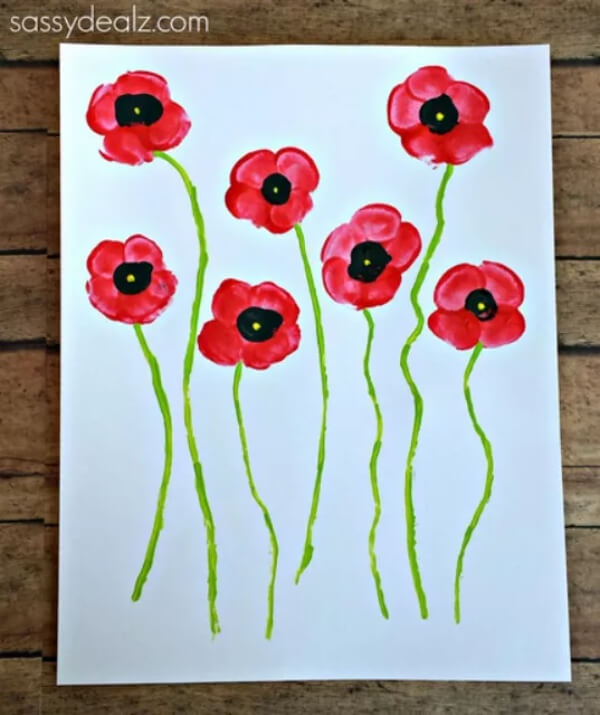
Image Source/Tutorial: Crafty Morning
Description- Want to make your kid engage in some good craftwork instead of video games, then here’s the real deal for you! We have brought to you the activity of making flowers and that too with fingerprints of your children. It’s super easy to make and requires minimal materials.
Suitable age group- 3-10 years
Supplies you need:
- Red, black, green, and yellow paint
- white paper
- 2 paintbrushes
Procedure:
- Pour some red paint into a plate or bowl.
- Start by dipping your kid’s finger in red paint.
- Now dab the fingers on a white paper sheet in a circular shape to make flowers.
- Doing 4-5 thumbprints is enough for one flower each.
- Next, dip your finger in the black paint and start dabbing the thumb in the middle of each flower.
- After the paint has dried, put small yellow dots in the middle of the black circle with the help of the paintbrush.
- Then start drawing stems of the flower with green paint.
- Add some grass at the rim of the sheet as well to make it more lively.
2. Finger Beehive
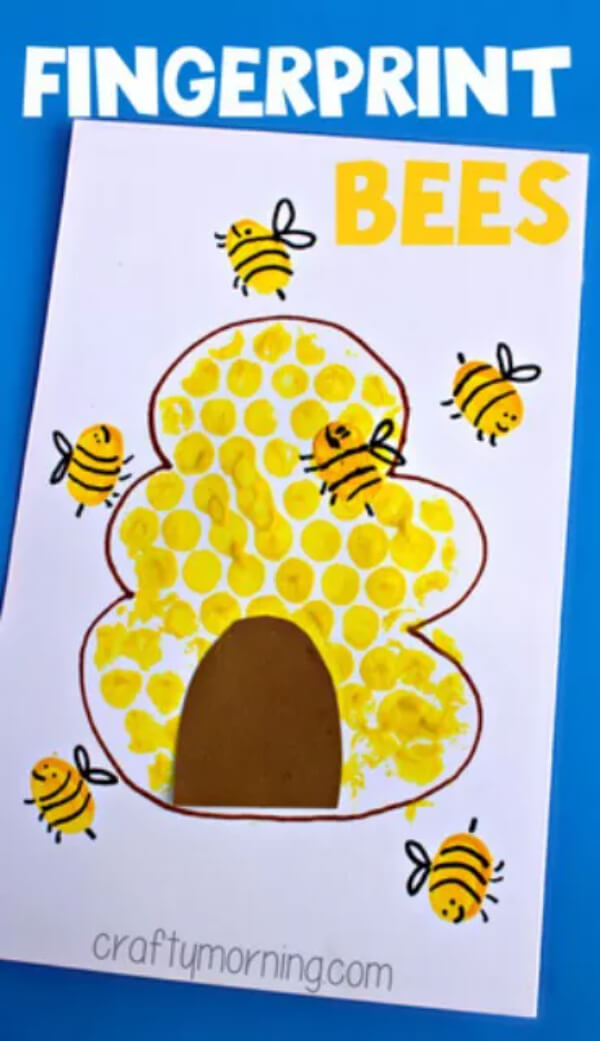
Image Source/Tutorial: Crafty Morning
Description-Bees provides us with the most important of all that is honey! They are also very important for our food cycle. But they often tend to sting and make noises, so we have decided to make bees that would not sting us and even help us decorate our house. Here’s how.
Suitable age group- 4-10 years
Supplies you need:
- 2 shades of yellow paint
- Bubble wrap
- Brown and white paper
- Markers
- Paintbrush
Procedure:
- Cut out a small beehive shape from a bubble wrap and paint it with yellow color.
- After that, have your kid dab the bubble wrap on a sheet of white paper.
- Outline the beehive with the help of a brown marker.
- Cut a small piece of the door from a brown paper sheet and glue it on the rim of the beehive.
- With a darker shade of yellow, let the kids dip their thumb on the paper sheet and dab it all around the beehive.
- Leave it to dry.
- After this, let the kids draw the features of bees with the help of a black marker.
And You’re Done!!!
3. Fingerprint Bunny
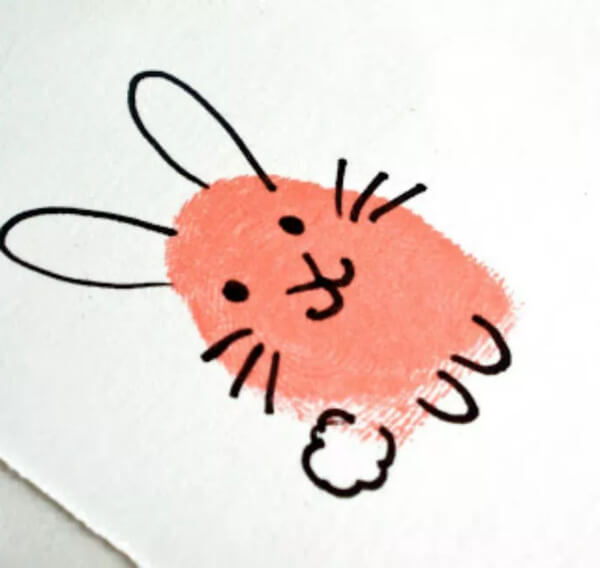
Image Source/Tutorial: Sarahndipities
Description- Bunnies are every kid’s best friend, they grow up listening to stories about them. The very first one we hear is generally about tortoises and bunnies. So, let’s take an initiative and help them to build one, and that too with fingerprints. These handprint crafts foster creativity in children as they see everyday things in a new light.
Suitable age group- 3-10 years
Supplies you need:
- White paper sheet
- Black marker
- Pink paint color
Procedure:
- Start by dipping your kid’s thumb into the paint and dab their thumb on the white sheet.
- Then, with the help of a black marker, draw the features of the bunny and also its tail.
And That’s It Your Bunny Is Ready!
4. Fingerprint Football
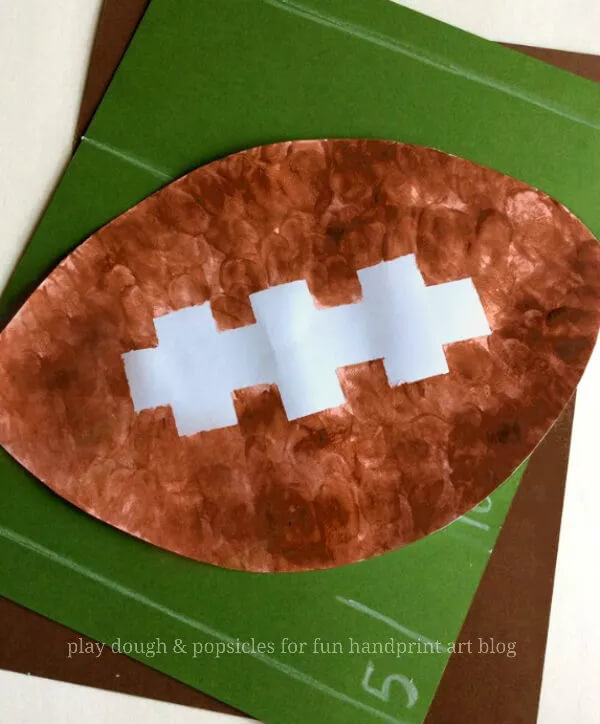
Image Source/Tutorial: Fun Handprint Art
Description- Football is not a sport, it’s an emotion and we all quite agree with that but our children may not. So, we have exclusively brought you an activity that will build enthusiasm as well as charisma in our children for our beloved sport.
Suitable age group- 5-10 years
Supplies you need:
- Painters tape

- Brown Paint
- White paper
- Scissors


Procedure:
- Draw the shape of the football on a white paper sheet and cut it out.
- Then cut 3 strips of 1 1/2inch from painters and another strip of 5-6 inches long.
- First, we place the long strip on the football cutting and then the three 1 1/2 inch strips horizontally over the longer strip.
- Now pour some brown paint on the plate and let your kid dip fingers and then dab it all over the white football cutting.
- Leave it to dry.
- Once it’s dry, carefully remove the painter’s tape.
And It’s Done!
5. Fingerprint Napkins
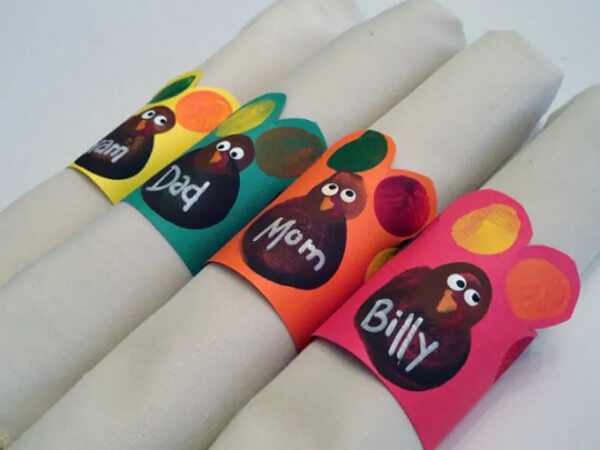
Image Source/Tutorial: Make and Takes
Description- As Thanksgiving is just weeks away, we all know how much work it is to make a whole turkey and set the table. But what if we might help you to set the napkins, you know baby steps! These fingerprint napkins are built using your child’s fingerprints and it will keep them busy as well. Here’s how.
Suitable age group- 5-10 years
Supplies you need:
- Card stock
- Acrylic paints
- Small paintbrush
- Toothpick
- Scissors
- Glue stick
- White paint pen
Procedure:
- Start by downloading the pattern from the internet and then print it out.
- Now, let your kid dip their fingers into the paint and dab it alternatively on the feathers of the template.
- Leave it to dry.
- Now, with the help of the end of the paintbrush draw the eyes of the same with white paint.
- Now, add the beaks with the orange paint.
- Now, by the edge of the toothpick, put black dots on the white area of the eyes.
- Using white paint, add the name of your guests on the napkins.
- Fold the card stock in the shape of the ring and glue the ends together.
And That’s Pretty Much It!
6. Fingerprint Corn
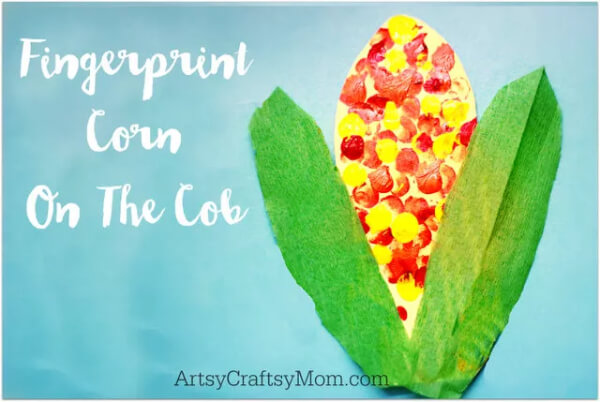
Image Source/Tutorial: Artsy Craftsy Mom
Description- As the fall season is almost here, why don’t we give our children a lesson and bring them closer to the farm, one such example is corns. Let’s do an activity and make corn using our little fingers.
Suitable age group- 5-10 years
Supplies you need:
- Yellow card paper
- Scissors
- Green Paper
- Acrylic Paints
- Glue stick
Procedure:
- Start by cutting out the yellow card stock in the shape of alphabet U.
- Now, draw the leaves on the green paper and cut them out.
- Next, tell the kids to dip their fingers into the colors and dab u shaped paper all over.
- Wait, till one color is dry then repeat step 3 with other colors as well.
- Glue the leaves at the bottom of u shaped paper in a slightly tilted left as well as right corner.
And That’s It Your Corn Is Ready!!
7. Finger Peacock
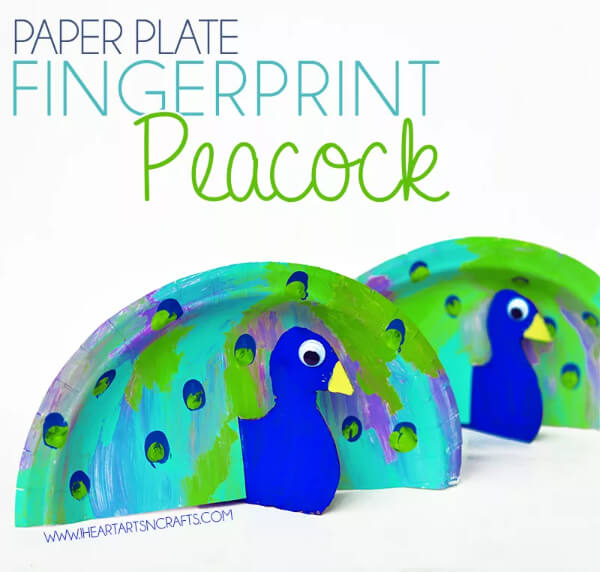
Image Source/Tutorial: I Heart Arts N Crafts
Description- We all love peacocks, don’t we? and we do feel good when we are surrounded by them because they are so beautiful! So why not create one of them on our own? Here’s an activity where you can decorate your home with peacocks and that too with minimal materials.
Suitable age group- 6-14 years
Supplies you need:
- Paints
- Paper plate
- Scissors
- Cardboard
- Googly eyes
Procedure:
- Let’s start by picking a paper plate and cutting it in half.
- Then paint the paper plate with the colors of your choice and leave it to dry.
- Once, it’s all dried up, dip your kid’s fingers into the paint of peacock color combination and dab it all over the plate.
- Now, with the help of scissors cut through the middle of the paper plate where the peacock body will be inserted.
- Next, take a piece of cardboard and draw the body of the peacock on it.
- Paint it over in the color of a peacock, stick the googly eyes as well and color the beak with a darker yellow shade.
- Slide the body of the peacock into the slit you just created so that the craft can stand stably.
And Just Like That It’s Done!!
8. Fingerprint Apple Tree
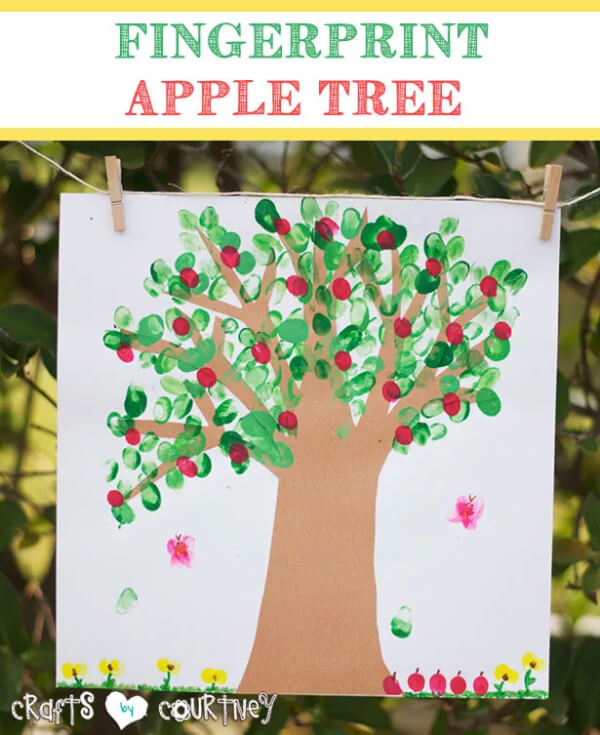
Image Source/Tutorial: Crafts by Courtney
Description- Want to get lushed in the greens of various trees? don’t worry we have got you covered. Let’s take an initiative and help our kids create an apple tree covered with butterflies and fruits all around. It will be super fun.
Suitable age group- 5-14 years
Supplies you need:
- Cardstock
- Paint
- Scissors
- Glue Stick
- Pencil
Procedure:
- Start by drawing a tree trunk with a lot of branches on brown cardstock and cutting it out.
- Glue the tree trunk on a white paper sheet.
- As for the leaves, dip your kid’s fingers in green paint and let them dab it all over the branches.
- Leave it to dry for some time.
- Once dried, dip fingers again in some red-colored paint and dab it over the green ones imitating the apples.
- Once you’re done, add some fruits, flowers, and butterflies at the bottom of the sheet as well to decorate it.
And Taddaa!!! You’re Done!!!
9. Fingerprint Alphabet
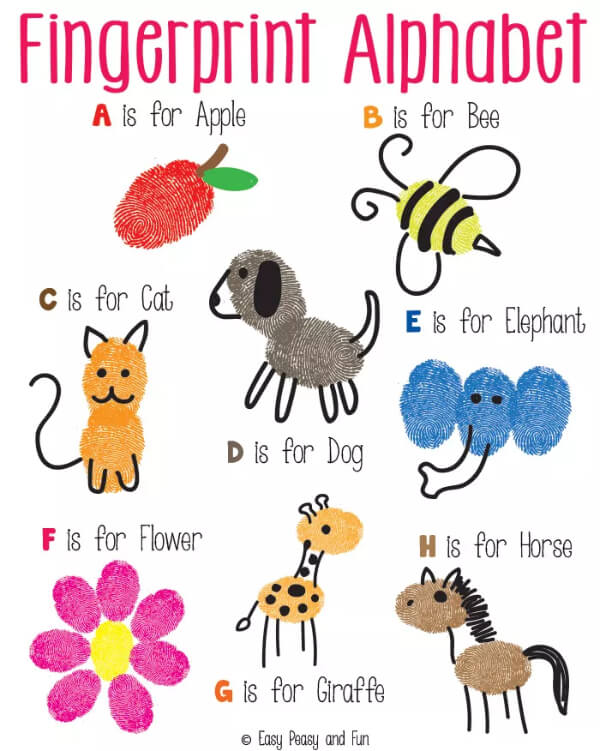
Image Source/Tutorial: Easy Peasy and Fun
Description- This activity is very crucial as it will help our children learn the alphabets which is very important at this age but don’t worry we will make it fun! We will create alphabets using our kid’s little fingers and they will have a lot of fun while learning. Here’s how:
Suitable age group- 3-10 years
Supplies you need:
- White paper sheet
- Paint
- Marker
- Sketch pens
Procedure:
- Start by dipping your kid’s finger in red paint and dab it on the white paper sheet.
- Draw leaves and branches of the apple with the help of the marker
- With the sketch pens, you can write “A for apple.”
- Moving on to the alphabet b, dip your finger into a darker shade of yellow and dab the white paper.
- Now, draw the features of the bee with a marker and with sketch pens make your kid write “B for the bee.”
- Next, dip your kid’s finger in orange paint and dab it two times, up and down, and then with the help of a marker, draw the eyes and mouth on the upper print and tails and paws on the lower.
- With sketch, pens write “C for the cat.”
- Next, dip your kid’s finger in black paint and dab it two times, first and then the other slightly right and above the first one.
- Then with the help of a marker, draw the eyes and mouth on the upper print and tails and paws on the lower.
- With sketch, pens write “D for dog.”
- Now, dip your kid’s finger in blue paint and dab it three times horizontally.
- Then with the help of a marker, draw the eyes on the middle print and just below it the trunk of the elephant.
- With sketch, pens write “E for elephant.”
- Dip the finger in yellow paint and dab the white paper sheet and then again in pink color and dab the sheet around the yellow one in a circular pattern thus creating a flower.
- With sketch, pens write “F for flowers.”
- dip your kid’s finger in light orange paint and dab it diagonally two times leaving some space between the two prints.
- With the help of a marker, draw the features of the giraffe.
- With sketch, pens write “G for Giraffe.”
- dip your kid’s finger in light brown paint and dab it diagonally two times leaving some space between the two prints.
- With the help of a marker, draw the features of the horse.
- With sketch, pens write “H for the horse.”
And It’s Done!
10. Thumbprint Flower Pots
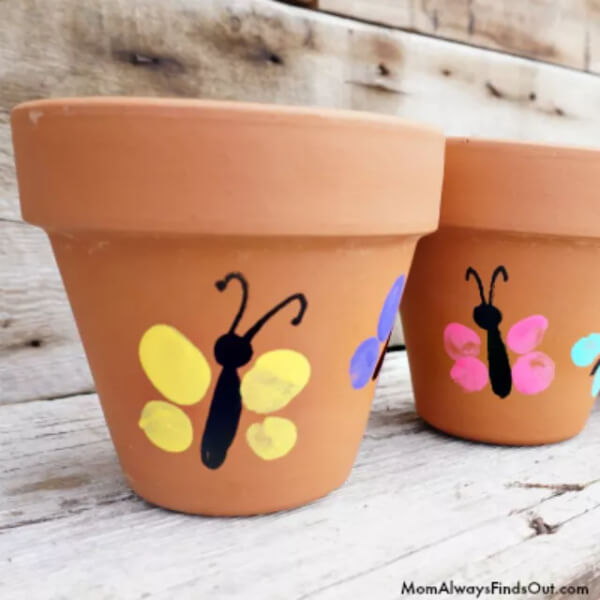
Image Source/Tutorial: Mom Always Finds Out
Description- We all want our kids to be more involved in the outdoor activities and what better way than to have a garden full of their thumbprints on the pots. Here’s how:
Suitable age group- 5-14 years
Supplies you need:
- Cotton pots(We used 4-inch size pots.)
- Acrylic paint (Various colors – the brighter the better!)
- Black marker
Procedure:
- Start by taking a pot and drawing a butterfly with the help of a black marker.
- Dip your hands on a plate full of paint as per your desire.
- Press your dipped thumb onto the pot four times to create the wings of the butterfly.
- Leave it to dry for some time.
- Moving on, creating a bee.
- For this, dip your thumb in yellow paint and dab the flower pot.
- Leave it to dry.
- Now, draw the features of the bee with the help of a marker.
And That’s It You’re Done.
11. Thumbprint Magnet
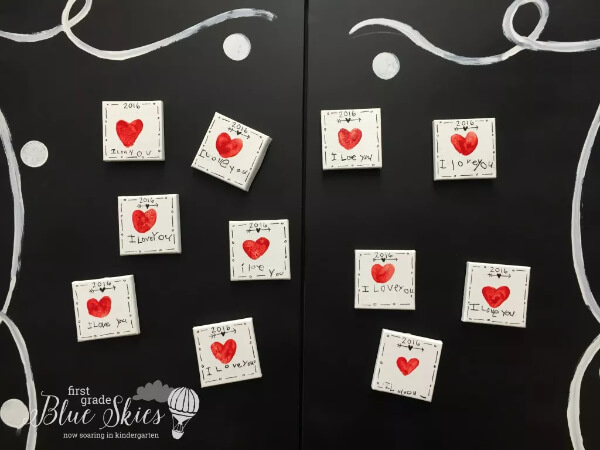
Image Source/Tutorial: First Grade Blue Skies
Description- Magnets are super fun to play with and very similarly we can build a craft from it also. It will help our kid’s imagination to grow and let them think more about how they can create so many things from a daily life object. It will build their vision.
Suitable age group- 6-14 years
Supplies you need:
- Tissue paper
- Acrylic paint
- Magnet
- Black marker
Procedure:
- Start by writing ‘I Love You’ on the tissue paper with a pencil with a lighter texture.
- Then start by outlining the same with a black marker.
- Next, dip your kid’s finger in the red acrylic paint and dab them on the tissue paper to make a heart.
- Leave it to dry.
- Now, add an adhesive magnet at the back of the tissue to secure it.
Ande That’s Pretty Much It!
12. Thumbprint Dandelion
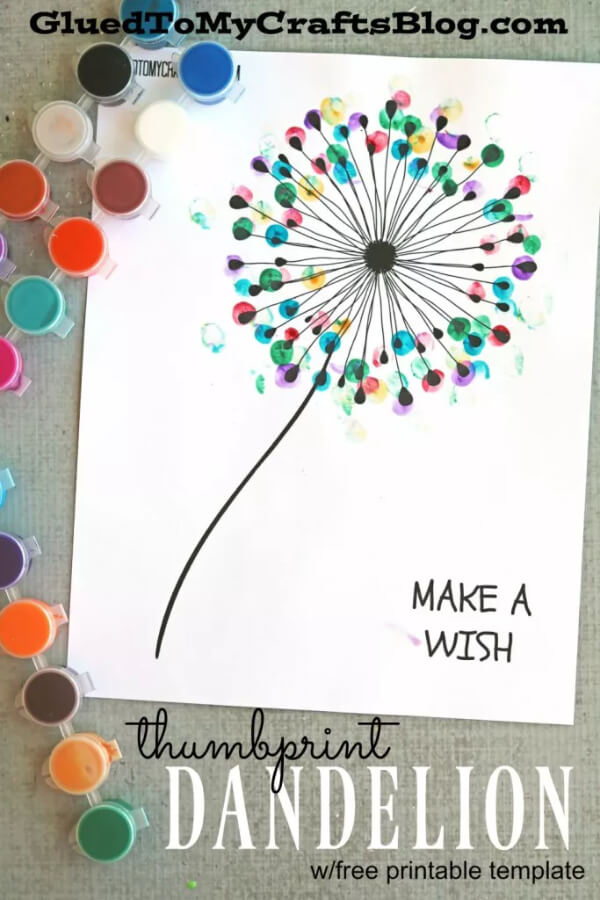
Image Source/Tutorial: Glued To My Crafts
Description- What is not to like about flowers, they’re just perfect!!! Using our kid’s fingers to create flowers and put them to display in our house will also build our child’s confidence. These activities give our kid’s fingers the rough surface we need to create the friction that allows us to pick up a baseball or hold onto a pencil to take a test.
Suitable age group- 6-14 years
Supplies you need:
- White cardstock paper
- Color Printer
- Paint color
- Small Paper Plate
Procedure:
- Start by downloading the dandelion thumbprint template from the internet on white cardstock.
- Pour the paint colors on a small paper plate.
- Next, help your kids dip their fingers in the paper plate and have them press it down on the tips of the dandelion print.
- Repeat step no. 3 until the dandelion is covered with full flowers.
And You’re Done! Your Dandelion Print Is Ready To Display.
13. Thumbprint Bunches
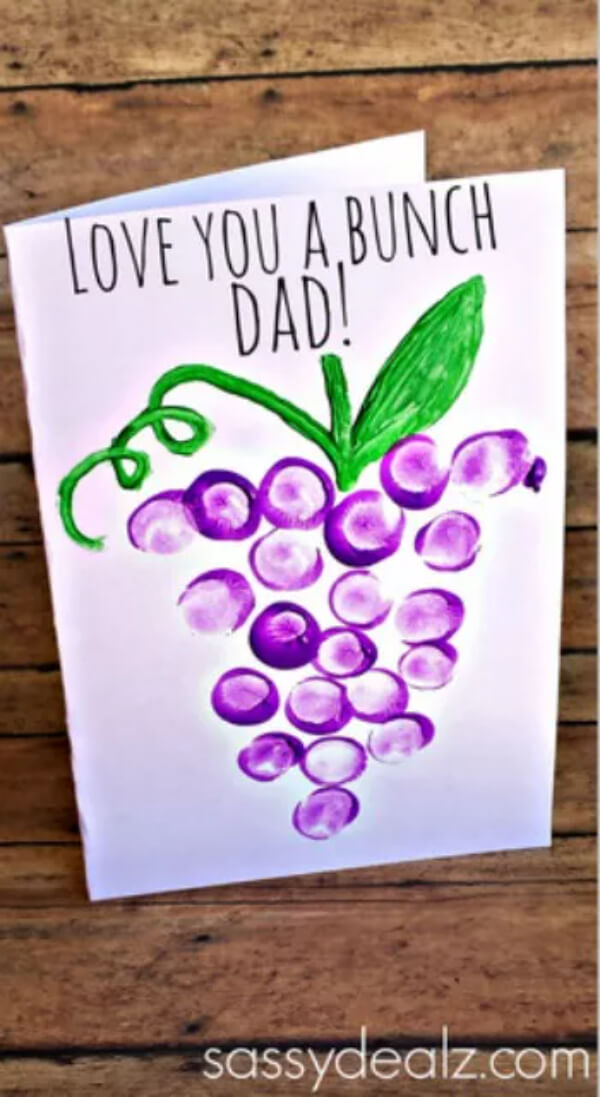
Image Source/Tutorial: Crafty Morning
Description- Who doesn’t love handmade goodies and that too handmade cards. Let’s take an initiative and teach our kids to make handmade cards for our loved ones. Here’s how:
Suitable age group- 4-10 years
Supplies you need:
- Washable green/purple paint
- White cardstock paper
- Black marker
- Paintbrush.
Procedure:
- Start by taking a white cardstock paper and have the kids dip their fingers in purple paint.
- Next, let the kids dab their thumbs on the paper in an inverted triangular shape.
- Now, with the help of the paintbrush and using green paint, guide them into drawing the stem and leaves of the same.
- At the top of the sheet, with a black marker write “Love you bunches, mom”.
And That’s It You’re Done For The Day!
If you were questioning how to engage your lovelies in physical activities and get them more involved at home before reading this, then I hope, your searching has now come to a rest. So, what are you waiting for, put some colors in the bowl and paint the world red with your fingers? Do let us know in the comment section what was your favorite activity and do visit our website for future references.
You may like these:
Basic Painting Techniques Designed for Children
Introduce kids to fundamental painting methods, helping them develop artistic skills and confidence while experimenting with colors, textures, and creative expression.
Simple Fruit-Themed Craft Activities for Kids
Inspire children to create fun and colorful fruit-themed crafts, combining creativity with learning about healthy foods through hands-on and enjoyable projects.
Easy Apple-Inspired Craft Concepts for Kids
Encourage creativity with simple apple-themed crafts, perfect for seasonal activities or educational projects that combine art and learning in a fun way.
Snowman-Themed Craft Projects for Kids – Creative and Straightforward Ideas
Engage kids in festive snowman crafts, offering creative and easy projects that celebrate winter and inspire imaginative play.
Spring-Themed Craft Ideas and Activities for Children
Welcome the season with vibrant spring crafts, providing kids with fun and educational activities that celebrate nature’s renewal and creativity.


