

In this article, we have tried to include easy and beautiful Ladybug Art and craft ideas for kids. Lady Beetles, or ‘Our Lady’s bird,’ are usually found in red, orange, pink, blue, brown, yellow and even in pure black or grey colours.
Small black or white spots are spread throughout their body. They can have stripes, spots, patches, or might be unpatterned, depending upon the species and its stage of development. This name “ladybird” is associated with the Virgin Mary, occasionally known as “little messiah”, especially by Christians. Most ladybugs or coccinellids are round to elliptically shaped. A dome-shaped body with six legs, heads, hidden wings and prominent antennae is their characteristic identification feature. Exciting and picturesque as they are, it is quite fascinating to observe their everyday routine while sitting idle in the garden.
Are you lucky enough to have spotted a bunch of colourful bugs feasting on leaves and insects or walking down the lane beside you and your toddler? Now, it’s time to craft these pretty lady beetles into some easy, colourful ideas. ‘Our lady’s bird’ looks interesting with some of the below-mentioned DIY craft designs that you can make with kids, even with toddlers and preschoolers eager to learn more about them.
Contents
- Ladybug Crafts & Activities for Kids
- Toilet Paper Roll Innocent Ladybird
- Wooden Spoons and Cupcake Liners for LadyBug
- Ladybeetles crafted by Apple Stamping
- Rock Painted Ladybugs
- Corner Ladybird Bookmark with Origami
- Ladybug out of Recycled CD and Handprinting
- Striped Paper Dome-Shape Ladybug Craft
- Ladybug Headband or Hats Making Craft
- Sustainable Egg Carton LadyBeetles
- Stitching an Adorable Lady Beetle Felt Brooch
- Paper Weaved Ladybug as Wall Hanging
- Playful Coffee Filter Ladybird
- Potatoes and Fingerprints Stamped Ladybugs
- Ladybug Assembly using Puzzle pieces and Feathers
- Ladybug Slime Recipe for Decorations
- Recycling Jars with Themed Ladybug Lid
- Upcycled Bowl Ladybug in your Garden
- Painted Lladybugsmaking their way through the garden
- Ladybug Crafts and Activities for Kids | Fun Bug-Themed DIY Projects
- Educational Benefits of Ladybug Crafts and Activities for Kids
- Fun Facts About Ladybugs for Kids
- Frequently Asked Questions (FAQs)
- Q1. What age group are ladybug crafts suitable for?
- Q2. What materials are commonly used for ladybug crafts?
- Q3. How do ladybug crafts help children’s development?
- Q4. Can ladybug crafts be used in the classroom?
- Q5. Are ladybug crafts good for preschoolers?
- Q6. How can parents make ladybug crafts more educational?
- Q7. Why are ladybugs important in nature?
- Q8. What are some easy ladybug activities for kids?
- You may like these:
Ladybug Crafts & Activities for Kids
Toilet Paper Roll Innocent Ladybird
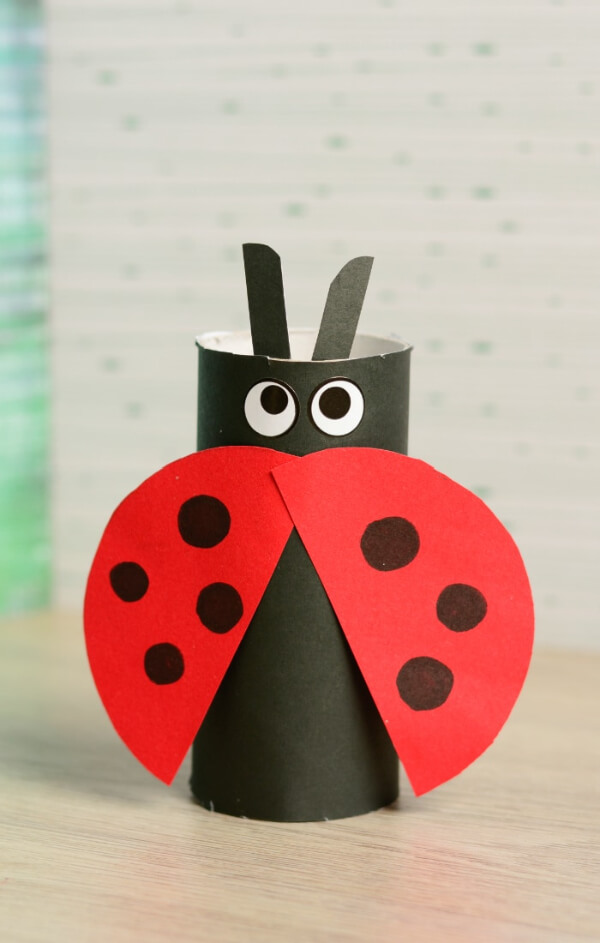
Image Source/Tutorial: easypeasyandfun.com
Let’s start with the easiest one. A ladylike mannered Beetle with innocent eyes full of mischief! All we will need is a leftover toilet paper roll, black and red sheets of paper and a black marker. Of course, scissors and glue to put everything together. The best example of how to repurpose and transform waste paper into a beautiful ladybug seated on the table, ready to whiz past you in no time.
Wooden Spoons and Cupcake Liners for LadyBug
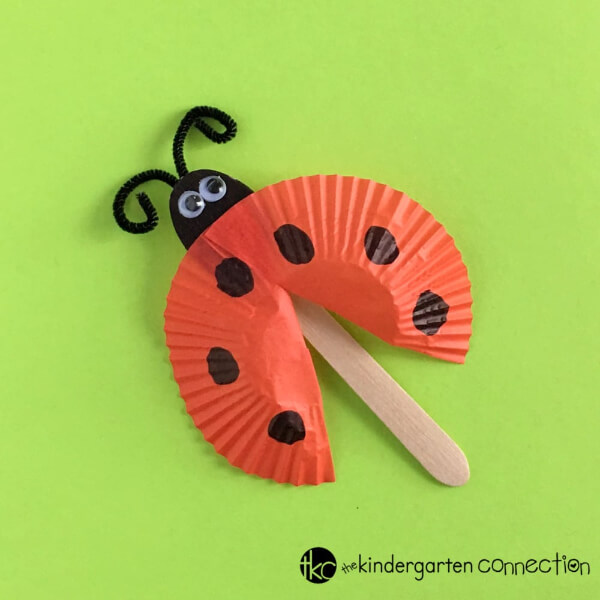
Image Source/Tutorial: thekindergartenconnection.com
Nothing cuter for kids to be able to craft a ready-to-fly beetle independently. Materials required are a few red or orange cupcake liners, a thick black marker, three to four mini black pipe cleaners, some self-adhesive wiggle eyes, safety scissors, wooden spoons and double-sided tape to stick antennae and the wings to the basic structure. They are so beautiful to look at, and once practised, these ladybird beetles’ spoon puppets help to explore kids’ creative side.
Ladybeetles crafted by Apple Stamping
Image Source/Tutorial: simpleeverydaymom.com
An eyecatcher indeed! Craft supplies needed include an apple, a pair of scissors, red paint, paintbrushes, a glue stick, a black marker, and a red marker. Additionally, you will require cardstock paper in green and white colours. Then, print the ladybug head template on white paper. A great art and craft project idea to be carried out during the holidays. This activity is pretty easy and enjoyable for toddlers, as they will love stamping beetles on every other thing within their reach.
Rock Painted Ladybugs
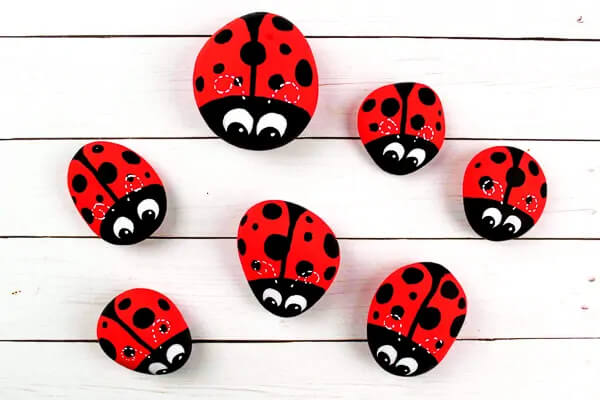
Image Source/Tutorial: simpleeverydaymom.com
Must have painted small rocks in your childhood days and then pocketed them to share your creativity with friends and family. How about letting your kids indulge in nature activities with you by their side, letting them paint their hearts out? You will need perfectly-sized smooth rocks, Posca pens red, black and white (painting pens for kids, as they are easy to control and handy for detailing purposes), a dark pencil, and finally a Mod Podge sealer to keep all colours in place. These stones can behave as exquisite showpieces or paperweights on office desks and work surfaces.
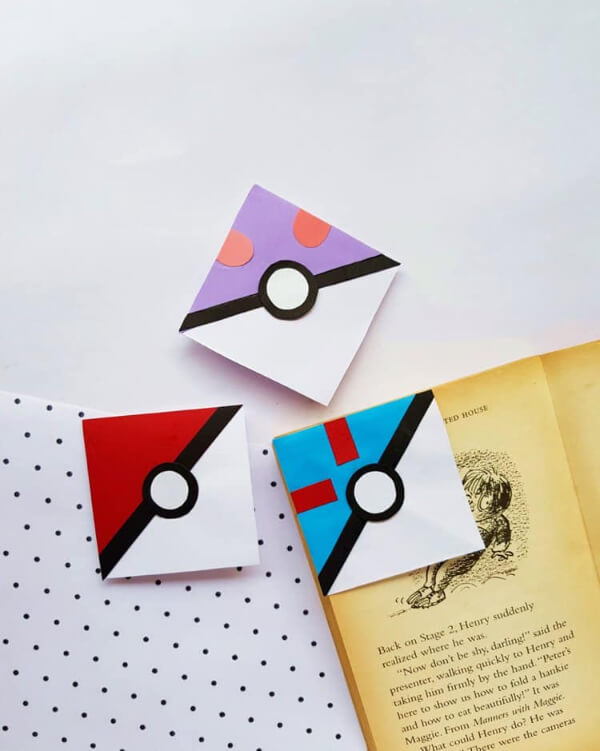
Corner Ladybird Bookmark with Origami
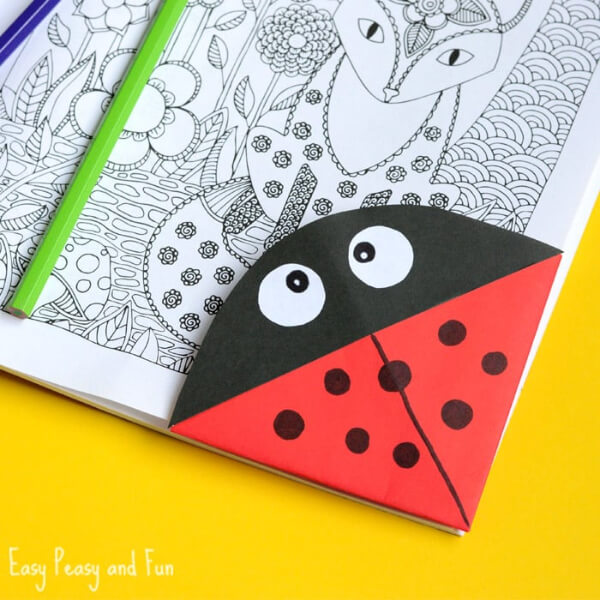
Image Source/tutorial: easypeasyandfun.com
Bug Lovers will be delighted to get their hands on the step-by-step methodology of creating ladybug bookmarkers to save their pages and get back to reading from wherever they left off in their beloved books. This fancy bookmark is sure to steal hearts and is easy to experiment with. Origami craft paper in red, white and black is needed to begin paper folding. A black marker, glue and scissors will be required for drawing eyes and giving the final touch-ups. It will be done and dusted quickly without putting in too much effort. A perfect trickster that helps in developing a kid’s reading habits.
Ladybug out of Recycled CD and Handprinting
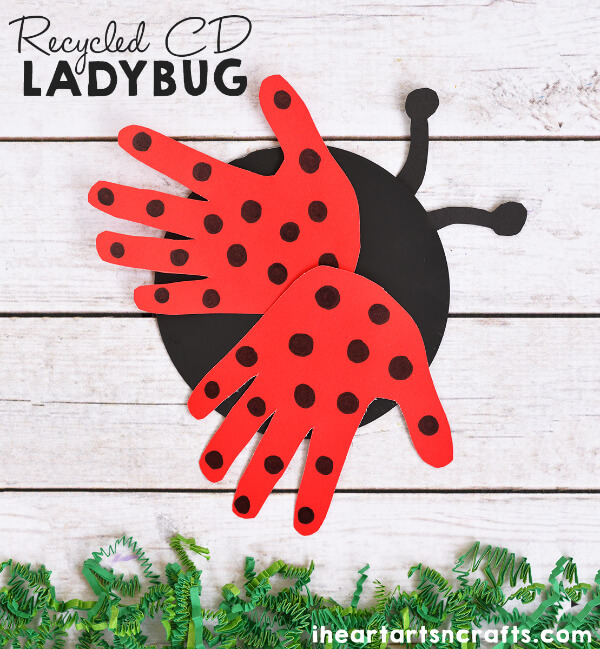
Image Source/Tutorial: iheartartsncrafts.com
After pen drives came, Circular disks got out of fashion. In modern homes, many discarded CDs are not fit for any further use. With the help of these, we can shape up an original artistic work by capturing our little one’s handprints in them for a lifetime. All we will need is an old scratched CD or DVD unfit for use, Construction Paper( black and red), Black Acrylic Paint, glue, a pair of scissors and a black marker. You will have to assist your kid with proper tracing, painting and cutting of shapes. Besides reusing disks, this piece of craft will always remain close to your heart and a lifelong memoir of time spent with your child.
Striped Paper Dome-Shape Ladybug Craft
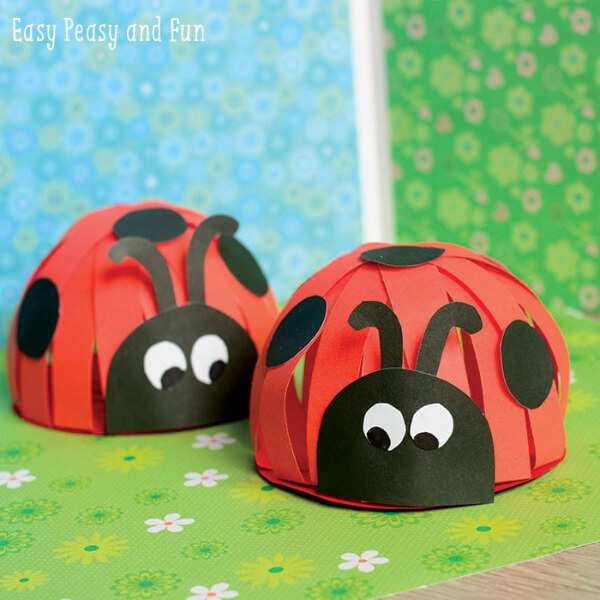
Image Source/Tutorial: easypeasyandfun.com
In my opinion, the cutest craft item of the lot also acts as a brilliant decor for your preschooler’s room. What we need is paper in red, black and white colours, safety scissors, stick glue and a black marker. We need to glue strips in a rounded manner carefully to the bottom surface until the dome looks full, and place black dots evenly on the ladybug’s dome-shaped body. Oval-shaped googly eyes should be carved out neatly and perfectly drawn on the white paper for the desired cutesy look of ‘Our Lady’s bird’. A fantastic craft idea for beginners who have just grown habitual or comfortable with safety scissors.
Ladybug Headband or Hats Making Craft
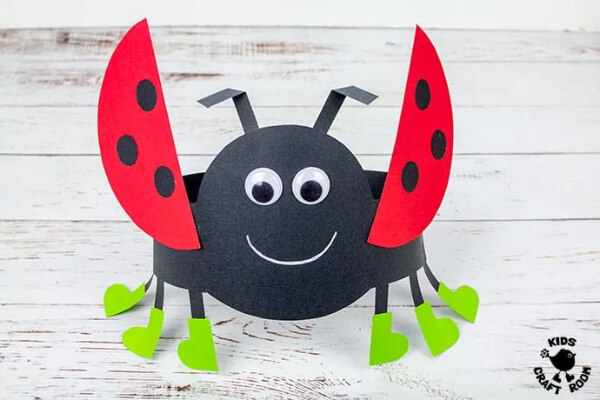
Image Source/Tutorial: kidscraftroom.com
Feeling naughty or playful? All set to scare off people with entomophobia and drive them nuts!?! Why chase a Ladybug if you can be one! Try working on yourself first with the given set of instructions. Materials required include a Ladybug Craft Template, Black, Red and Lime green cardstock paper, printer card, White Posca Pen, Adhesives, Wiggle Eyes, Scissors and Stapler with pins. With moving eyes, a big smile and black spotty wings, these DIY hats can be adjusted to suit any head size. Toddlers will enjoy wearing this, and guests will become awestruck by such resourcefulness.
Sustainable Egg Carton LadyBeetles
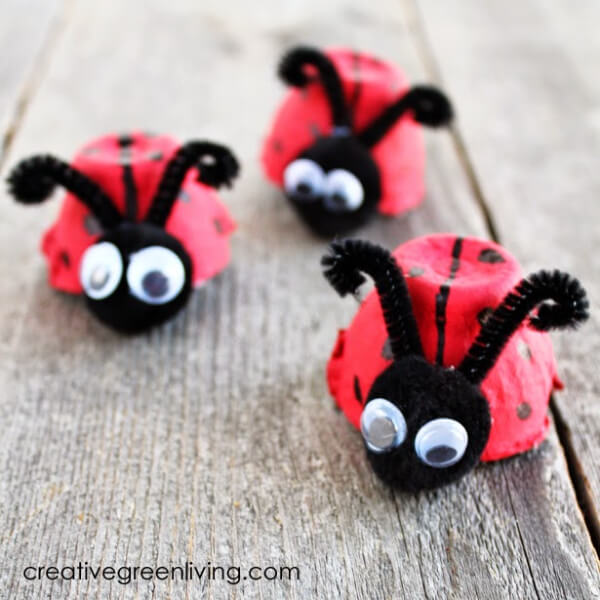
Image Source/Tutorial: creativegreenliving.com
Ready to play games with ladybugs? All we need is a recyclable Egg carton, scissors, paintbrushes, red craft paint, black marker, pom poms for the head, googly eyes, pliers, Black chenille stems (pipe cleaners) and tacky glue to complete the list. Cut and pre-paint the carton cups to make the task of joining pieces together less time-consuming. You can make hundreds of adorable lady beetles with these cups and play with your friends within a budget that will fit your pocket easily. They look so real when kept on a wooden bench in a garden!
Stitching an Adorable Lady Beetle Felt Brooch
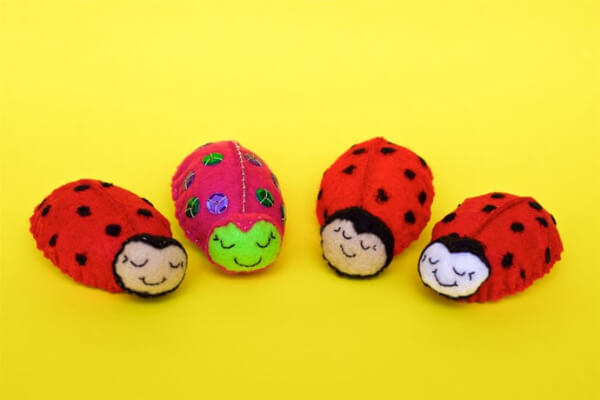
Image Source/Tutorial: mypoppet.com.au
Want to introduce needles and threads to your child, but don’t know where to begin? Start with sewing simple stitches to complete this attractive, soft and colourful felt-filled Ladybug Brooch. These are Supercute, pocket-sized soft toys that accompany your children if you do not attach the brooch back pin to them. The procedure is not very easy, and you will have to guide your child at every step in making it. Innovate the patterns and designs on the outer fabric of the stuffed lady beetle. Become the life of any party by revivifying the spirit of an old outfit by wearing these on!
Paper Weaved Ladybug as Wall Hanging
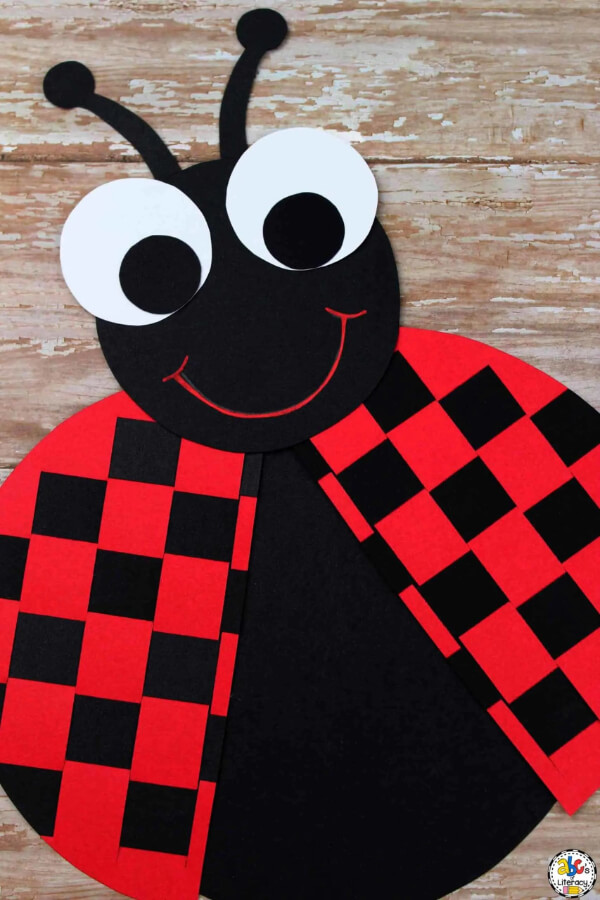
Image Source/Tutorial: abcsofliteracy.com
A beautiful smile accompanied by a red and white check-patterned body plus happy googly eyes. To enhance hand and eye coordination and refine their fine motor skills, this wholesome craft project will put a child’s ability to the test and reinforce his or her creative skillset. Collect red, black and white cardstock paper, red paint pen, scissors, black marker and a glue stick. Print the Ladybug template out first and then start tracing shapes on the coloured stock papers. Weaving strips of paper in and out of the slits is quite an engaging task, and kids love it! These Beautiful Bugs as wall and fridge hangings in your homes will surely take your guests by surprise.
Playful Coffee Filter Ladybird
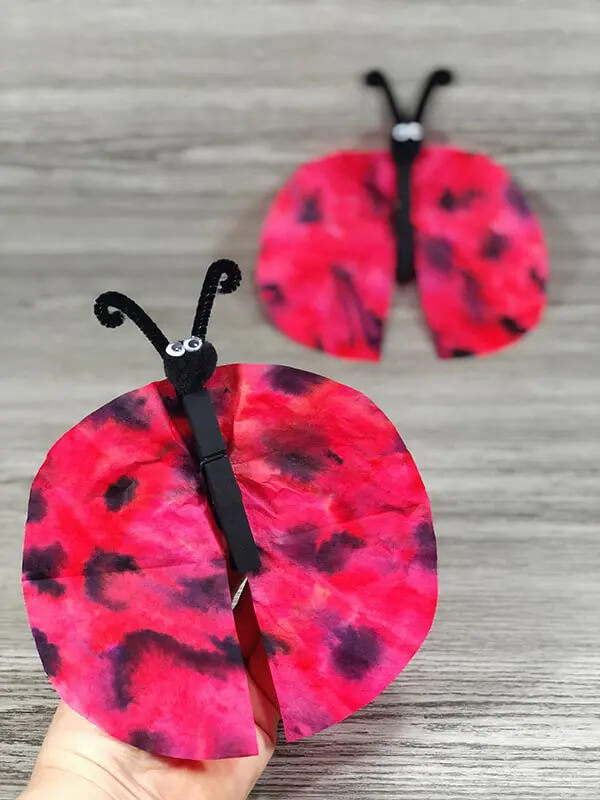
Image Source/Tutorial: darcyandbrian.com
The creation of this coffee filter Ladybird will require round white coffee filters, wooden clothespins, washable markers, googly eyes, Craft Paint, paintbrushes, cardboard, a spray bottle, chenille stems (pipe cleaners), black Pom Poms, scissors and tacky craft glue. A perfect fun activity for kindergartners that can later be used for educating children about Ladybugs. It’s rather interesting to watch colours diffuse, blend and dry, revealing the final tinted-shaded look. These ladybugs can be clipped anywhere to hover around in the blowing wind or can be used to decorate the top of a gift bag.
Potatoes and Fingerprints Stamped Ladybugs
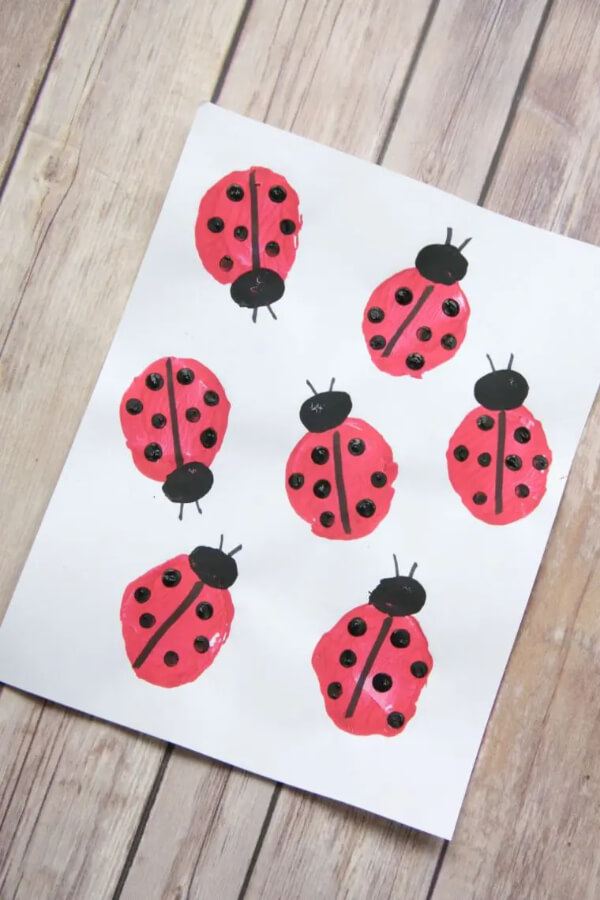
Image Source/Tutorial: mymommystyle.com
Ever tried stamping with potatoes? It’s joyful indeed! Dipping fingers in paint is every other child’s ecstasy. Here we will use a potato for stamping the beetle’s body and black paint for dipping the fingers. Thumb stamping for making heads and imprinting fingers on the lady beetle’s body for spots. All we need is white cardstock paper, potatoes, and red and black paints. These stamps can be used to beautify cards, personal postcards and book leaflets with the colourful paints you love the most.
Ladybug Assembly using Puzzle pieces and Feathers
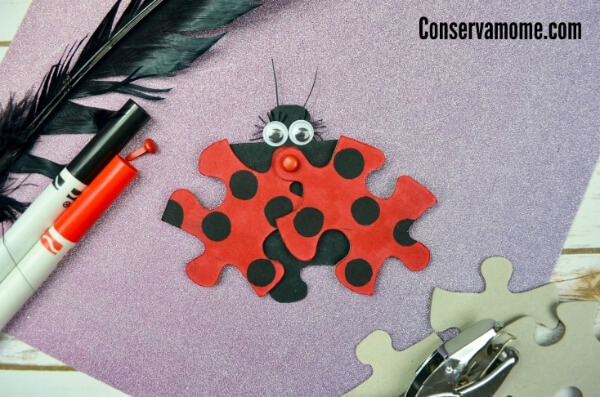
Image Source/Tutorial: conservamome.com
Fond of solving puzzles? Then you must have leftover pieces of long-solved puzzles in your home. Let’s try to make something new and exciting out of these futile pieces. Gather three puzzle pieces each for every ladybug, Red and Black markers, a 1/16th hole puncher, blackbird feathers and coloured brass fasteners. Kids of any age can try their hand at creating these artful pieces; only punching holes would be your responsibility. You can create as many ladybugs as you want out of puzzle pieces, beating their wings around, ready to take off as soon as possible.
Ladybug Slime Recipe for Decorations
Image Source/Tutorial: naturalbeachliving.com
If your kids love making moulds out of clay or dough balls, they will definitely like slime too. You yourself might have used slime for making science projects in our school or college. I think a stretchy, squishy homemade slime to which we can add red colourants and glitter, alongside some black mini pom-poms. Knead and wait for the perfect Red Slimy Ladybug Look you are vouching for, and decorate it with some faux small ladybugs.
Recycling Jars with Themed Ladybug Lid
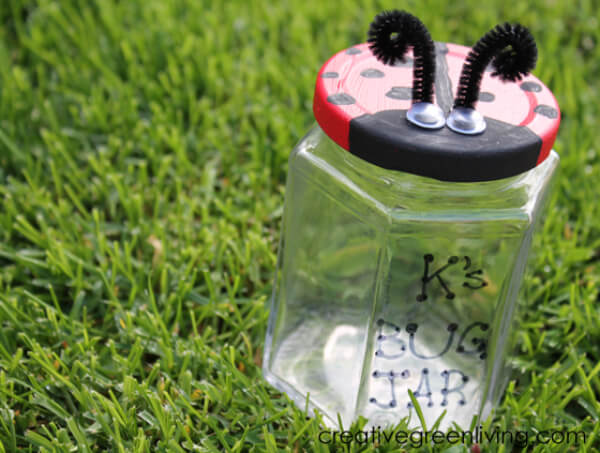
Image Source/Tutorial: creativegreenliving.com
Transform an empty, boring glass jar into a magnetic ladybug catcher! Yes, you heard that right. An easy and fun-filled kids’ craft activity that gets your kids to stroll around under the open sky, searching and examining the varieties of bugs or insects present around them. A ladybird theme has been painted on the lid of the jar, whereas 3D elements like antennae and wiggling eyes have been stuck to this lid, making it look even more convincing and real. You will need a glass jar with a lid, acrylic paint in red and black, paintbrushes, black chenille stem(pipe cleaner), googly eyes, glue and the basic black permanent marker or paint pen. Finally, don’t forget to personalise your jar by naming it and do observe bugs through the glass to know more about them.
Upcycled Bowl Ladybug in your Garden
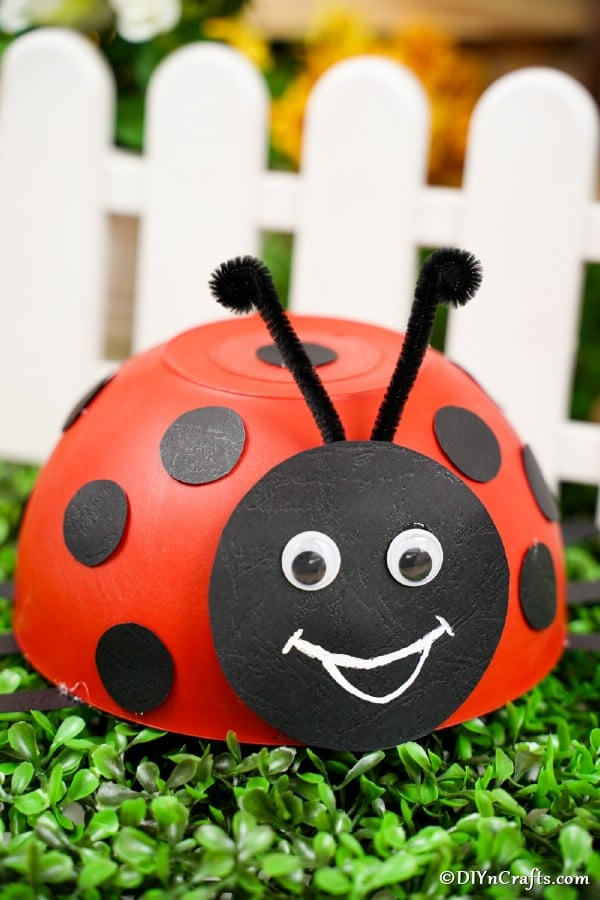
Image Source/Tutorial: diyncrafts.com
Old scratched bowls or any plastic container would serve our purpose. You can even use bowls of mismatched shapes and sizes to complete a ladybug family or show the variety in them. It is one of the simplest gardening crafts, especially for kindergartners. Can be used to decorate any table or shelf for a party! Supplies needed include a Large coloured plastic bowl of your choice, Black craft paper or black foam paper, a pen, large wiggle eyes, a black pipe cleaner(chenille stem), a white paint pen, a pair of scissors, a hot glue gun and hot glue sticks. In no time, you will get ready with a smiling ladybird waiting to welcome you!!!
Painted Lladybugsmaking their way through the garden
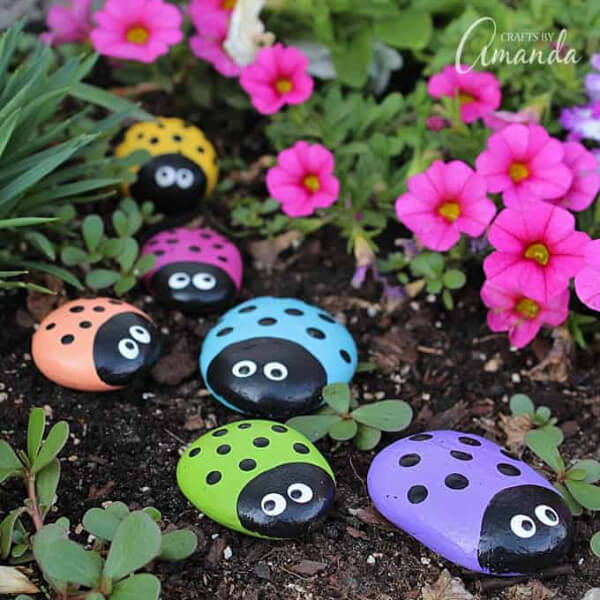
Image Source/Tutorial: craftsbyamanda.com
Rock painting or stone painting is something that doesn’t fade or wash off in the sun’s light, rain, or persistent snow. Apart from acting as a perfect painting surface, rocks of various sizes and shapes are freely available in abundance to experiment with. In fact, we can create an entire loveliness or army of ladybugs trekking their way under the bushes in all possible colours in our greenhouse or backyard. Remember to make sure that no one picks these stones and walks away with them! You will realise with time that these adorable and super cute bugs were surely worth the effort!
Ladybug Crafts and Activities for Kids | Fun Bug-Themed DIY Projects
Discover adorable ladybug crafts and activities for kids with fun bug-themed DIY projects. These creative activities help children improve fine motor skills, creativity, and insect awareness through hands-on learning. Perfect for preschool, kindergarten, classroom lessons, homeschool activities, spring crafts, nature studies, and educational playtime fun.
Educational Benefits of Ladybug Crafts and Activities for Kids
Ladybug crafts are more than just fun art projects—they provide valuable learning opportunities for children of all ages. Creating ladybugs using paper, recycled materials, paint, or natural objects helps children develop important skills while exploring the fascinating world of insects. These hands-on activities make learning enjoyable and encourage creativity both at home and in the classroom. Ladybug-themed crafts are especially popular during spring, nature studies, and insect learning units.
Benefits of Ladybug Crafts for Children
- Strengthens fine motor skills through cutting, folding, painting, and glueing.
- Encourages creativity, imagination, and artistic expression.
- Improves hand-eye coordination and concentration.
- Helps children learn about insects, nature, and life cycles.
- Promotes problem-solving and critical-thinking skills.
- Supports colour recognition, counting, and pattern-making activities.
- Encourages recycling by using everyday household materials.
- Builds confidence as children complete their own craft projects.
- Provides opportunities for parent-child and classroom collaboration.
- Makes science and nature learning more engaging and memorable.
Fun Facts About Ladybugs for Kids
Did you know that ladybugs are considered helpful insects because they eat many garden pests? Ladybugs come in differentcolourss such as red, orange, yellow, and even black, and some species have spots while others have stripes or no markings at all. Learning these interesting facts while creating crafts helps children connect art with science and nature exploration.
Frequently Asked Questions (FAQs)
Q1. What age group are ladybug crafts suitable for?
Answer: Ladybug crafts are suitable for children aged 3 to 10 years. Younger kids can enjoy simplcolouringng and painting activities, while older children can create more detailed ladybug crafts using paper, recycled materials, and other craft supplies.
Q2. What materials are commonly used for ladybug crafts?
Answer: Common materials include colored paper, cardstock, paint, markers, glue, scissors, paper plates, toilet paper rolls, pom-poms, buttons, rocks, and recycled household items.
Q3. How do ladybug crafts help children’s development?
Answer: Ladybug crafts improve fine motor skills, hand-eye coordination, creativity, concentration, and problem-solving abilities. They also encourage children to learn about insects and nature through hands-on activities.
Q4. Can ladybug crafts be used in the classroom?
Answer: Yes, ladybug crafts are excellent classroom activities. Teachers can use them during insect units, spring themes, science lessons, art classes, or nature studies to make learning interactive and engaging.
Q5. Are ladybug crafts good for preschoolers?
Answer: Absolutely! Simple ladybug crafts such as fingerprint ladybugs, paper plate ladybugs, and colouring activities are perfect for preschoolers and help develop early learning skills.
Q6. How can parents make ladybug crafts more educational?
Answer: Parents can discuss ladybug life cycles, habitats, colours, counting spots, and the role ladybugs play in nature while crafting. This helps combine art, science, and learning in a fun way.
Q7. Why are ladybugs important in nature?
Answer: Ladybugs are beneficial insects that help protect plants by eating harmful pests such as aphids. They play an important role in maintaining healthy gardens and ecosystems.
Q8. What are some easy ladybug activities for kids?
Answer: Easy activities include ladybug colouring pages, fingerprint art, paper crafts, rock painting, spot-counting games, sensory bins, and nature observation activities.
Ladybug crafts and activities are a wonderful way to combine creativity, learning, and fun. Whether children are making paper ladybugs, painted rocks, bookmarks, or recycled craft projects, these activities help develop essential skills while encouraging curiosity about nature. Try these adorable ladybug ideas at home or in the classroom and make learning about insects an exciting hands-on experience for kids. Explore more educational resources on our website, including essays, paragraphs, worksheets, flashcards, Quizzes, and fun learning activities. Follow us on YouTube & Facebook for daily educational updates and creative learning ideas.
You may like these:
Straightforward Bookmark Craft Projects for Children
Inspire kids to create personalised bookmarks with easy craft ideas, combining creativity and practicality to encourage a love for reading and artistic expression.
Simple Origami Craft Concepts for Kids
Introduce children to the art of origami with easy and engaging paper-folding projects that enhance creativity and fine motor skills.
DIY: Recycled Craft Ideas for Children
Encourage eco-friendly creativity with DIY crafts using recycled materials, teaching children sustainability while fostering imagination and resourcefulness.
DIY Recycled Paper Craft Projects for Kids to Experiment with at Home
Inspire kids to create unique crafts using recycled paper, promoting creativity and sustainability through enjoyable at-home activities.
Recycled Craft Activities and Projects for Kids
Discover innovative and eco-conscious craft ideas using recycled materials, perfect for engaging children in creative and sustainable projects.


